


SIA Tech Mods
-
Posts
43 -
Joined
-
Last visited
Content Type
Forums
Status Updates
Blogs
Events
Gallery
Downloads
Store Home
Everything posted by SIA Tech Mods
-
Some of you may already know the work of Ada Lovelace and the amazing achievement in the very early days of computer software, the very first days infact! NVIDIA GeForce certainly noticed this, so much so they named their current GPU architecture after her, it was this that lead me on a mission of my own, to own a piece of this technology and to go to Ada's place of rest in St. Mary Magdalene, Hucknall and pay respect to Ada and also her father, Lord Byron, who has very much an interest past aswel I'll make sure to include more about him too. Not many will buy a particular GPU to honour Ada's great work but I am one who was willing, with this, I hope to give you a little insight into Ada's work and where we are today because of the great feat she accomplished. Link to the church website with a virtual tour if you wish to have a look around for yourself! - http://hucknallparishchurch.org.uk/
- 1 reply
-
- 3
-

-

-
Exactly! He's got to remember to have hope and look forward to the future in the times of need! Never saw a child look so down as he was when he was in hospital, the smile on his face when he was given the PC was out of this world! He didn't even know what it was at this point, just thought it looked amazing and knew it was for him, when we told him it's his own PC he went next level crazy! Was a moment I enjoyed more than him I think.
-
Yes I talked his parents into buying a bigger desk
-
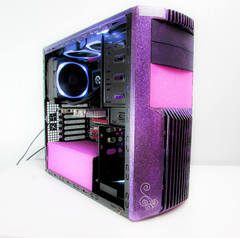
Just showing off a build I put together with help of the PC/Modding community, this was for a little boy who's spent month's in hospital due to a brain tumour known as craniopharyngioma, he's had 3 operations and likely will be more in the future. I wanted to do something for him, to help give him a boost, to give him something to look forward to, I originally planned to mod their case and upgrade their family rig which consisted of a Intel 12100 and a GTX 1650 but once the community caught wind, we have managed to put together a whole new system based on the boys favourite game! The new rig consists of: AMD 7700X (community supplied) MSI B650 Tomahawk Wifi (community supplied) MSI RX 6750XT Mech 2 (Local cafe fundraiser) Thermaltake ToughPower PF3 850w (Thermaltake sponsored) Was a GF 1 750w community sought but we had issues Thermaltake Divider 300 TG AIR (community supplied) Thermaltake TH360 V2 Ultra (Thermaltake sponsored) Thermaltake CT120 ARGB Sync PC Cooling Fan (2-Fan Pack) x2 (Thermaltake Sponsored) Corsair Vengeance RGB 32GB DDR5 6000MHz (Community supplied) CableMod ModMesh Pro Custom set (Cablemod sponsor) CableMod RGB/UV 30cm light strip (Cablemod sponsor) Samsung 980 Pro 1Tb (Community supplied) Made to order Green and purple pearl paint job although the pictures fail to show this, the light needs to hit it just right and it shows so much more in natural sunlight! (video of front panel in the sun to give the full effect of the purple pearl) Creeper Vinyl made to order 3D Printed blocks and Ender dragon printed and supplied by AML Customs To finish it off I made sure he had something decent to view it on - (trialled him with a 27" I had spare but it wasn't quite right for him so Samsung Odyssey g5 LC32G55TQBUXXU (32" 1440p) I honestly did not expect the amount of love and thought from the community that this build has had, without them this build certainly wouldn't be what it is without them! So much appreciation from me for making this next level
-
be quiet! Be quiet! 20th Anniversary build.
SIA Tech Mods replied to SIA Tech Mods's topic in Build Logs
Some more shots of the be quiet! 20th anniversary case mod. Despite the lack of attention this build has had and the delay with the vinyl I've really enjoyed doing this build! It has been a ride for sure.
-
be quiet! Be quiet! 20th Anniversary build.
SIA Tech Mods replied to SIA Tech Mods's topic in Build Logs
Happy anniversary be quiet! ☺ Managed to get it built up this evening after the gpu came. Will be getting better photos tomorrow after I've done something with that right side... It just doesn't feel quite right at the moment.
-
be quiet! Be quiet! 20th Anniversary build.
SIA Tech Mods replied to SIA Tech Mods's topic in Build Logs
Terribly sorry that my phone camera just wouldn't focus for this but here's a little video of the right side panel with the lighting on, Windows wasn't installed at this point so you'll have to enjoy the RGB in all it's glory. 316774478_5460828907305621_7565716454910508687_n.mp4 -
be quiet! Be quiet! 20th Anniversary build.
SIA Tech Mods replied to SIA Tech Mods's topic in Build Logs
In the image 2nd above this post there's a small piece of card with a test of the gun metal grey... hate to say it but I just wasn't a fan of it on the be quiet! Pure base 500 FX, I've gone through several different blacks to try match the original colour, I believe for this case and theme it was already the best colour it could be. Photos show custom orange cables that help add a splash of the be quiet! vibe, the interior of the rig mostly built up, a quick test fit on the right side panel, glass panel with vinyl, now this was a big part of the waiting time, it was one of those awkward situations where the sister in law said she could help out but over a month later I ended up doing it and here we are now at this point, I've also attached a photo with some tape across horizontally, I was going to do the 20th anniversary logo this way but decided against it, it just didn't feel right but the image shows part of the process of marking straight lines to place the vinyl on, this only helped so much as using frosted opaque vinyl was extremely difficult to line up perfectly at 1am this morning Ultimately I'm just waiting for the GPU before I polish the build up for final photos.
-
The items in the case we're just props for the photos.
-
be quiet! Be quiet! 20th Anniversary build.
SIA Tech Mods replied to SIA Tech Mods's topic in Build Logs
Lots of filler and sanding but I feel like I'm almost at the point where I'll be happy with it. Paint still needs another coat.
-
be quiet! Be quiet! 20th Anniversary build.
SIA Tech Mods replied to SIA Tech Mods's topic in Build Logs
I think I'll be able to make it work I've just thrown this together. I've just had to do the school run to do now food to cook and got take the kids to cheerleading, so I won't be able to do any more until late this evening, maybe tomorrow.
-
be quiet! Be quiet! 20th Anniversary build.
SIA Tech Mods replied to SIA Tech Mods's topic in Build Logs
Houston, we have a problem! Just got a call for the side panel, the thing looks great except for the letter R... or lack of it I guess we just going to improvise and see what can be done. The guys are cutting me another R so I can cut it down and fit the missing piece I need. Hoping it won't even be noticeable when painted.
-
be quiet! Be quiet! 20th Anniversary build.
SIA Tech Mods replied to SIA Tech Mods's topic in Build Logs
Just a small post, I did expect to be fetching the side panel back today, but they've not even got around to that yet, I had a message this morning, a whole week later, confirming what I wanted doing. Although not much different from the design in the original post I have uploaded the CAD drawing, we've had to alter the text slightly to keep the inner's of the lettering from falling out and being lost down the machine bed, the outer dimensions is the size of the panel itself so what you see here is what the panel will look like once cut.
-
This mod is going to be built for the occasion, I've already sent the righthand side panel off to be cut, this will be done with a water jet and all going to plan it should have the 20th Anniversary logo perfectly cut, this part is painful as it's out of my hands. I will then be adding frosted acrylic to the panel and lighting for the effect, I may go for a slightly tinted frosted window yet, the more I think about it the more I realise it is in keeping with the glass panel on the lefthand side. Once I have received the panel, I will then need to decide what I'm actually doing with the case as the panel will need a respray and I don't have the colour be quiet! use to paint their cases so the whole thing will be painted or other... If I go the route of painting I'll using a classic gun metal grey. I'm also adding the 20th Anniversary logo on the PSU shroud in the form off clear acrylic along with an orange colour acrylic version, one will be placed on top of the other to give a raised/3D effect. 20th Anniversary logo Parts list Ryzen 5700G Gigabyte B550 Aorus Elite AX V2 Muskin Redline Lumia 2x 8gb 4133mhz - Changed to T-Force Xtreem 4133mhz 2x 8gb Kingston KC3000 1Tb NVMe be quiet! Pure Base 500FX be quiet! Pure Power 11 FM 550w be quiet! Pure Loop 2 FX 360mm To be added shortly after Gigabyte 6650XT Windforce.
-
Holy crap, I never updated here... Well the machine is up and running, has been for a while, I'll attach some final photos for you all. This build turned out pretty decent in the end.
-
It's different
-
Hi All, it's been a long time since I posted here! However I'm back once again and this time I'm doing a new build for my 2 daughters. This is something a little different (for me at least), I'm working with wood on this build and have minimal tools nor previous history working with wood so I'm learning on the go and finding ways to make things work with what I have... After all, I do like to be the guy who shows modding doesn't need the most expensive tools or knowledge to get things done, as long as you have a passion and willing to learn with a lot of paitence too. My work space hasn't changed over the years either, I'm still mostly working from a small shed and the garden space so need the weather to be on my side for any obvious progress to be made, anyways let's get started shall we. The case I'm working with is the beautiful Tower 100 and motherboard is the Aorus B450 I Pro Wifi I made a base for the tower to stand on, I made with a little recess so the tower actually sits in the base to help it blend, maybe I used a little too think of wood here? But I wanted to make sure the base is strong enough to hold the weight long term. this will be used by 2 kids afterall. Cutting some parts for the roof, none of this cutting is all that easy with a cheap jigsaw but it's possible, nothing a little refining and wood glue won't be able to fix. When an arcade machine goes wrong there's usually a door with a lock and key for the staff to access... Gotta have that! What having 2 young girls does to you... First coat goes on And another A quick mock up whilst I wait for the weather to brighten up. Now, sadly, I was expecting a delivery of the claw hand and arcade stick with a few other bits & bobs but I've just had to request a refund, I can't seem to find any UK/Euro stock for the claw hand either so I may be waiting longer than I'd like, however I'll post here once I can provide another update, During this time I'm going to go back to the base and refine that a little more, hide the screw holes with wood filler and other little tweaks.
-
A little update! It's been rather long since I had chance to do much since my kids take up most of my time and then a little hiccup with a wrong package I recieved but we are now getting there! There is just 2 things on the way but I plan to start building the loop tomorrow anyway. Which actually brings us to the fittings I'll be using, they are beautiful to say the least! Looking forward to using these. Firstly I needed some aluminium! That was easy enough but then I wanted to get it engraved but as you see below that didn't turn out so great and was rather hard to see under normal conditions. After the failure with the engraving I decided that I'll try somewhere else for my engraving, that is yet to be done but in the mean time I was able to get the finish I wanted on the panels. A brushed finish on the outside and a rough mirror finsh on the inside (No power tools and shoulder injury makes this kind of work extremely difficult) and I'm quite happy with the look, I didn't want a 100% smooth mirror finish, or at least even now I don't think so anyway, it gives it a bit of a rough look which suits the overall look I'll be going for Hopefully I'll be able to have this build finished soon now!
-
There's plenty of videos nowadays that can assist you, my biggest tip would be don't worry about the process, as long as you use the right tools and take your time it will go right, even if things go wrong, which they have for me before, I just sand back using a lower and lower grit if needed until the error is fixed, as long as your not applying too much paint and sanding in between it's easier than it looks, albeit I'm still learning but that's where the fun is for me.
-
This has been the toughest in my opinion. I've never had to account for factory paint being in certain places, like the front IO panel. To get a flush, surface wasn't easy, it took time and a light hand, I used 2500grit wet to sand down the edges where I painted the green to blend with the factory paint, the main reason I did this was to avoid any paint chipping in the future.
-
Hi guys, it's been awhile since my last build but I finally have another in the works, This one I call project Scorpion Going with the Thermaltake Core P5 V2 for the case, here it is with my great Sketchup skills that don't catch any details but I guess you'll see those as I add them along the build process. Along with with the Thermaltake M360 Plus water cooling kit! ... and of course the Thermaltake Toughpower GF1 ARGB 850w PSU! I've not got everything I need for this build yet so this will be an ongoing project, however, that said, I've made a start where I can. When the build is going to stagger in places it is bound to leave me time to think about things that I can change to improve my design, I decided to try the Cablemod Vertical GPU mount, it looks amazing on this case and that's even with the weird 8600GT I used! :D
-
And without further delay I can show you the final images of the build.
-
We have another panel done!
-
Ok I wasn't going to share any more tonight but I'm loving this PSU shroud so much I can't resist!
-
I'm really liking where this is heading, however I'd like to hear some of your opinions from what you see here?


.jpg.bc1f322388a8ff5e3d8f52fb368f83c8.jpg)
.png)


