


Zeuligan
-
Posts
148 -
Joined
-
Last visited
Reputation Activity
-

 Zeuligan got a reaction from Rosinbole in [Sponsored] Angl3d Ti - Dual Custom Loop EKWB | ASUS ROG | be quiet! Dark Base Pro 900 | by Zeuligan
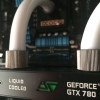
I'm more than happy! Sometimes brands just go way beyond what could be expected even in the wildest dreams. Sometimes amazing people keep doing amazing things. When this happens at the same time you get Atila at EKWB. Thank you so much Atila and thank you so much EKWB for the support.
The perfect block for project Angl3d Ti just arrived. Got to test out my new Nikon FX as well -
Zeuligan got a reaction from Rosinbole in [Sponsored] Angl3d Ti - Dual Custom Loop EKWB | ASUS ROG | be quiet! Dark Base Pro 900 | by Zeuligan
For me it is always extra fun to reach the backside of a project. It is fun, it gives me the opportunity to sleeve and it is a milestone that state that a project is close to the end.
I started in Fusion 360 to get a feel for what I wanted to make. Went fairly fast to reach something I felt could work. I guess the upside of doing my third consecutive project in the amazing be quiet! Dark Base Pro 900. Color scheme was set a long time ago.
Took the loose motherboard tray and went to work.
A few anoying rivets that always adds extra work. Took some measurements and masked for sawing.
No problem with this baby. Fast, straight, hazzle free. Love my Ryobi saw (thank you again Ryobi for the support).
Started with a quick prototype that I 3D printed. Extended the height for dual layers (ofc) and did some modifications to holes and fastening after testing with a custom 24 I had laying around. This will look good sanded down and printed on high quality settings.
All pieces done. Will make the backside look clean.
I got some happy comments on my manually created cable "plate" on project Zeuligan. Was extra fun to be able to 3D print a perfect one. Still just a test print (lesser quality), but needed a prototype for measurements.
So easy. Did I mention I just love my saw? ❤️
That will work just as intended, I like this idea for cable management very much. Should prob make more of this...
Not that much thinking needed as I had my concept from Fusion 360. Just had to check that I could bend the cables and that I ended up at the right place at the bottom. The MB-plate has 2 holes wide enough for 30ish cables. Not good to miss that opening.
After finding the right placement, distance it wasn't much more to it. Just drill all the holes and thread them.
Could finally use some of that expensive black matte car vinyl I bought as a test for the exterior before I decided to paint it instead. Will make for a nice contrast in finish and color.
Pretty happy with that end result tbh. The matte finish works well for both the texture of the 3D printed custom cable combs and the half shiny metal frame. Will make for a nice backdrop for the custom sleeved MDPC-X cables.
Speaking of that. First layer of the 24 pin ready. Will leave that as a teaser for next updated that will be all the cables sleeved (ran out of ATX pins (sigh)) and mounted on the backside. Hope it will look good.
-
 Zeuligan got a reaction from KrZaj in [Sponsored] Angl3d Ti - Dual Custom Loop EKWB | ASUS ROG | be quiet! Dark Base Pro 900 | by Zeuligan
I'm more than happy! Sometimes brands just go way beyond what could be expected even in the wildest dreams. Sometimes amazing people keep doing amazing things. When this happens at the same time you get Atila at EKWB. Thank you so much Atila and thank you so much EKWB for the support.
The perfect block for project Angl3d Ti just arrived. Got to test out my new Nikon FX as well -
Zeuligan got a reaction from KrZaj in [Sponsored] Angl3d Ti - Dual Custom Loop EKWB | ASUS ROG | be quiet! Dark Base Pro 900 | by Zeuligan
For me it is always extra fun to reach the backside of a project. It is fun, it gives me the opportunity to sleeve and it is a milestone that state that a project is close to the end.
I started in Fusion 360 to get a feel for what I wanted to make. Went fairly fast to reach something I felt could work. I guess the upside of doing my third consecutive project in the amazing be quiet! Dark Base Pro 900. Color scheme was set a long time ago.
Took the loose motherboard tray and went to work.
A few anoying rivets that always adds extra work. Took some measurements and masked for sawing.
No problem with this baby. Fast, straight, hazzle free. Love my Ryobi saw (thank you again Ryobi for the support).
Started with a quick prototype that I 3D printed. Extended the height for dual layers (ofc) and did some modifications to holes and fastening after testing with a custom 24 I had laying around. This will look good sanded down and printed on high quality settings.
All pieces done. Will make the backside look clean.
I got some happy comments on my manually created cable "plate" on project Zeuligan. Was extra fun to be able to 3D print a perfect one. Still just a test print (lesser quality), but needed a prototype for measurements.
So easy. Did I mention I just love my saw? ❤️
That will work just as intended, I like this idea for cable management very much. Should prob make more of this...
Not that much thinking needed as I had my concept from Fusion 360. Just had to check that I could bend the cables and that I ended up at the right place at the bottom. The MB-plate has 2 holes wide enough for 30ish cables. Not good to miss that opening.
After finding the right placement, distance it wasn't much more to it. Just drill all the holes and thread them.
Could finally use some of that expensive black matte car vinyl I bought as a test for the exterior before I decided to paint it instead. Will make for a nice contrast in finish and color.
Pretty happy with that end result tbh. The matte finish works well for both the texture of the 3D printed custom cable combs and the half shiny metal frame. Will make for a nice backdrop for the custom sleeved MDPC-X cables.
Speaking of that. First layer of the 24 pin ready. Will leave that as a teaser for next updated that will be all the cables sleeved (ran out of ATX pins (sigh)) and mounted on the backside. Hope it will look good.
-
Zeuligan got a reaction from KrZaj in [Sponsored] Angl3d Ti - Dual Custom Loop EKWB | ASUS ROG | be quiet! Dark Base Pro 900 | by Zeuligan
It's always equal part joy and frustration when you reach the painting part of a project. It's the mark of getting close to assembly, but it's also a very time consuming and sometimes frustrating part. This time more then usual with two disasters.
With a new living situation I had to be creative to be able to paint. Not recommended to spray paint inside your appartement Designed a 3-way corner for regular electrical PVC pipes - 20mm and printed out 8 of them.
Makes it simple to put together a spray tent of varible size, for close to nothing. Just to wrap in painters plastic and spray away Placed my tent on my balcony and it worked over expectations. Just had to stay away from rainy or windy days. We have a lot of thoose in Gothenburg, so spent close to 2 weeks painting all the parts.
I started by adding a first coat of primer. This to make it easier to visually spot all the weak areas, where I had to fill in and where I had to take away to keep angles in my polygons. Adds an extra day or two as the primer has to be really dry before I can add Putty to it (or the paint and putty melts together and it's a real mess) but well worth it IMHO.
With a combination of a small printed calibration cube (20x20x20mm) and the bottom of a bic lighter wrapped in straps of 280 and 400 grain paper I spent the next 6 days doing nothing but sanding and reapplying Putty.
Better, but far from satisfied. Then disaster struck...
When carrying one piece from my spray tent I accidently droped it onto the other piece and they both broke in several pieces. Not easy to Acrifix on paint, so had to sand down and start all over on some edges. Very sad and frustrated, but still happy that I was neither on a deadline or that it was actually mendable.
Lost a few days, but got both pieces together again and reached the exciting part where I could add the first layer for finishing coating - matte black. Wasn't happy with the finish, so sanded down part of it, switched out the spray can nozzle and had a 2nd go.
Look at that! Black and with much better surface. Still not home, so went over it with 600 and 800 grit and added 2 more layers.
That matte varnish is sexy! Very matte even after just 1 layer and close to that car vinyl feeling I wanted from start. Super happy. The extra matte black paint on the front piece suddenly looks super shiny in comparison.
At first I was scared that I had ruined it. The varnish was so white, even at super thin layers, but after 45-60min it just started to turn black and after just 30 min it turned from white to matte black.
Tripple matte awesomeness. Looking forward to when I can start to put this together.
After the exterior it was time to paint the shroud and 3D-printed parts. Smaller, but way more time consuming due to 10 times more edges. Same procedure, primer, putty, sanding, putty, sanding, putty, primer, spray putty, sanding, primer, spray putty, primer, sanding, coating, sanding, coating, coating, varnish, varnish and last a varnish.
Disaster 2, apparently butter fingers. Droped my shroud on the way in from the balcony, 5 pieces (cry).
If you have any questions, please feel free to ask anything. If you hate it or love it, share your thoughts. Silence worries me...
-
Zeuligan got a reaction from Rosinbole in [Sponsored] Angl3d Ti - Dual Custom Loop EKWB | ASUS ROG | be quiet! Dark Base Pro 900 | by Zeuligan
It's always equal part joy and frustration when you reach the painting part of a project. It's the mark of getting close to assembly, but it's also a very time consuming and sometimes frustrating part. This time more then usual with two disasters.
With a new living situation I had to be creative to be able to paint. Not recommended to spray paint inside your appartement Designed a 3-way corner for regular electrical PVC pipes - 20mm and printed out 8 of them.
Makes it simple to put together a spray tent of varible size, for close to nothing. Just to wrap in painters plastic and spray away Placed my tent on my balcony and it worked over expectations. Just had to stay away from rainy or windy days. We have a lot of thoose in Gothenburg, so spent close to 2 weeks painting all the parts.
I started by adding a first coat of primer. This to make it easier to visually spot all the weak areas, where I had to fill in and where I had to take away to keep angles in my polygons. Adds an extra day or two as the primer has to be really dry before I can add Putty to it (or the paint and putty melts together and it's a real mess) but well worth it IMHO.
With a combination of a small printed calibration cube (20x20x20mm) and the bottom of a bic lighter wrapped in straps of 280 and 400 grain paper I spent the next 6 days doing nothing but sanding and reapplying Putty.
Better, but far from satisfied. Then disaster struck...
When carrying one piece from my spray tent I accidently droped it onto the other piece and they both broke in several pieces. Not easy to Acrifix on paint, so had to sand down and start all over on some edges. Very sad and frustrated, but still happy that I was neither on a deadline or that it was actually mendable.
Lost a few days, but got both pieces together again and reached the exciting part where I could add the first layer for finishing coating - matte black. Wasn't happy with the finish, so sanded down part of it, switched out the spray can nozzle and had a 2nd go.
Look at that! Black and with much better surface. Still not home, so went over it with 600 and 800 grit and added 2 more layers.
That matte varnish is sexy! Very matte even after just 1 layer and close to that car vinyl feeling I wanted from start. Super happy. The extra matte black paint on the front piece suddenly looks super shiny in comparison.
At first I was scared that I had ruined it. The varnish was so white, even at super thin layers, but after 45-60min it just started to turn black and after just 30 min it turned from white to matte black.
Tripple matte awesomeness. Looking forward to when I can start to put this together.
After the exterior it was time to paint the shroud and 3D-printed parts. Smaller, but way more time consuming due to 10 times more edges. Same procedure, primer, putty, sanding, putty, sanding, putty, primer, spray putty, sanding, primer, spray putty, primer, sanding, coating, sanding, coating, coating, varnish, varnish and last a varnish.
Disaster 2, apparently butter fingers. Droped my shroud on the way in from the balcony, 5 pieces (cry).
If you have any questions, please feel free to ask anything. If you hate it or love it, share your thoughts. Silence worries me...
-
Zeuligan got a reaction from KrZaj in [Sponsored] Angl3d Ti - Dual Custom Loop EKWB | ASUS ROG | be quiet! Dark Base Pro 900 | by Zeuligan
After a vacation in the Caribbean I'm back with a short update and more to come...
I often opt for clean design and practical solutions. This was also my intention when I started to sketch on the solution for the bottom RGB led strips from Corsair.
Did a design in Fusion 360 for a led holder for the Corsair Lighting Node Pro strips I won in Swedclockers gallery of the month competion.
Combined that with a holder that snaps in place ontop of the end of the holder with a screw hole.
The strip with the holders are exactly the same length as the fan dust holders. It's on the bottom, so no one will ever notice, but I will know.
Marked out the fastening holes and with my Ryobi machine set to slow it is easy to drill out acrylic without it cracking.
Can't have any visible cables and I still want to be able to replace strips (or I could just unpin a connector) so decided to make a pass through hole.
Drilling large holes in acrylic on slow speed isn't really smart, without special drills, as that will crack the acrylic. So a quick and easy solution, drill many small holes.
It will just squeeze into that hole. Some cleaning with a small hand file and I'm good to go.
All done and the RGB led strip is firmly fastned in the strip with it's edges ensuring it stays in place. -
 Zeuligan reacted to CiBi in [Sponsored] Angl3d Ti - Dual Custom Loop EKWB | ASUS ROG | be quiet! Dark Base Pro 900 | by Zeuligan
Absolutely stunning mod, sick! Can't wait to see it finished.
-
Zeuligan got a reaction from KrZaj in [Sponsored] Angl3d Ti - Dual Custom Loop EKWB | ASUS ROG | be quiet! Dark Base Pro 900 | by Zeuligan
The case will be so packed with water cooling, with it's dual pumps and dual reservoirs I felt I needed to position the GPU in a different way. Was also important to create balance. Many polygons in this project. Very easy to go overboard.
Cranked out the MB backplate and my 1080Ti covered in beautiful EKWB acrylic.
Took some measurements, cut and bent some aluminum and drilled holes for mounting. Not very elegant looking, but sturdy.
Drilled some holes to the top of the case and taped a fan in place to ensure proper measurements.
I like it. Quick, yet very functional. Don't worry, I don't plan to leave that GPU haning in just an aluminium bracket. One wrong move and we have an expensive water accident on our hands.
Took two iterations to get what I wanted. The GPU is very beautiful by it's own and due to previously mentioned balance, I wanted to leave polygons out of the ekvation. This is my idea of a 3D printed vertical GPU bracket.
The 3D printed bracket combined with the aluminum reinforcement will be very sturdy and the bracket will also hide the aluminum angles. Didn't really think I would leave it like that right?
Almost, the aluminum is sticking out a little. Need to make the bracket longer. Last iteration.
Yum. The GPU slides into a track in the aluminum and into an equal track in the bracket. Then a fastening bolt goes on the other end, secure the card to the aluminum and 3D printed bracket. The card also slides 2 mm into the bracket, looking it in place in all directions. Not a bad solution if I may say so my self.
I printed hex-nut shaped holes on the inside of the brackets, 90% of the size. Then I heated the nut with my soldering iron and pressed the nut into the plastic together with some superglue. That will hold
Went through a few more prorotypes and iterations for the GPU cover. Left the polygon design behind. Became to much and I will need something cleaner. Biggest problem is the size required to hide the PCI riser cable.
Happy, at last. At this last angle, the GPU metal is visible for the slide in. Got an equal track inte aluminum bracket on the inside. Just need to sand down, prime and paint the bracket and cover.
-
 Zeuligan got a reaction from Anthony_95 in [Sponsored] Angl3d Ti - Dual Custom Loop EKWB | ASUS ROG | be quiet! Dark Base Pro 900 | by Zeuligan
The case will be so packed with water cooling, with it's dual pumps and dual reservoirs I felt I needed to position the GPU in a different way. Was also important to create balance. Many polygons in this project. Very easy to go overboard.
Cranked out the MB backplate and my 1080Ti covered in beautiful EKWB acrylic.
Took some measurements, cut and bent some aluminum and drilled holes for mounting. Not very elegant looking, but sturdy.
Drilled some holes to the top of the case and taped a fan in place to ensure proper measurements.
I like it. Quick, yet very functional. Don't worry, I don't plan to leave that GPU haning in just an aluminium bracket. One wrong move and we have an expensive water accident on our hands.
Took two iterations to get what I wanted. The GPU is very beautiful by it's own and due to previously mentioned balance, I wanted to leave polygons out of the ekvation. This is my idea of a 3D printed vertical GPU bracket.
The 3D printed bracket combined with the aluminum reinforcement will be very sturdy and the bracket will also hide the aluminum angles. Didn't really think I would leave it like that right?
Almost, the aluminum is sticking out a little. Need to make the bracket longer. Last iteration.
Yum. The GPU slides into a track in the aluminum and into an equal track in the bracket. Then a fastening bolt goes on the other end, secure the card to the aluminum and 3D printed bracket. The card also slides 2 mm into the bracket, looking it in place in all directions. Not a bad solution if I may say so my self.
I printed hex-nut shaped holes on the inside of the brackets, 90% of the size. Then I heated the nut with my soldering iron and pressed the nut into the plastic together with some superglue. That will hold
Went through a few more prorotypes and iterations for the GPU cover. Left the polygon design behind. Became to much and I will need something cleaner. Biggest problem is the size required to hide the PCI riser cable.
Happy, at last. At this last angle, the GPU metal is visible for the slide in. Got an equal track inte aluminum bracket on the inside. Just need to sand down, prime and paint the bracket and cover.
-
 Zeuligan got a reaction from W-L in [Sponsored] Angl3d Ti - Dual Custom Loop EKWB | ASUS ROG | be quiet! Dark Base Pro 900 | by Zeuligan
It has been a time consuming and fairly tough period to dail in my 3D printer to the level I require, but once done the parts started to roll out the plate. Printed almost 24/7 for the last 3 weeks.
After a few adjustments and attempts I got the design I wanted. Opted for a frame that I then will design and clip-in air intake cover.
No, it's not a window but almost. It's the prototype design for the clip-in design for the air intake. Just added some structural elements to keep it sturdy while testing.
Fit's perfectly (dimensions are a little of due to prototype printing profile (read speed printing). Will be much better with finished print. Happy with the solution.
Spent some time testing out different designs and patterns, but decided for hexagons. Classic as well as fitting the design theme. Just harder to print...
That printer is just pooring out hexagons at a rapid speed. So happy Creality CR-10S dialed in...
Not a bad view, not bad at all. Designed to print the fan intakes with the legs down. This forces the need for a fairly large support structure printed below. Extra filament and almost double the print time. Well worth it as the finished print will almost be flawless.
Nothing to complain about that...
Printed the frame in as well, but in end print profile and with Swedish high quality bio friendly plastic from add:north. Beautiful!
Perfect fit. Will add an air filter on the inside of the hexagon lid. It's printed 3mm thinner than the frame to make room for this.
Reprinted my dual pump cover in add:north black as well. Just some light sanding and some paint and it should looks perfect.
With the end print profile, the fit is just perfect. Very happy with the result and well worth the design time in Fusion and prints. -
 Zeuligan got a reaction from Zando_ in [Sponsored] Angl3d Ti - Dual Custom Loop EKWB | ASUS ROG | be quiet! Dark Base Pro 900 | by Zeuligan
It has been a time consuming and fairly tough period to dail in my 3D printer to the level I require, but once done the parts started to roll out the plate. Printed almost 24/7 for the last 3 weeks.
After a few adjustments and attempts I got the design I wanted. Opted for a frame that I then will design and clip-in air intake cover.
No, it's not a window but almost. It's the prototype design for the clip-in design for the air intake. Just added some structural elements to keep it sturdy while testing.
Fit's perfectly (dimensions are a little of due to prototype printing profile (read speed printing). Will be much better with finished print. Happy with the solution.
Spent some time testing out different designs and patterns, but decided for hexagons. Classic as well as fitting the design theme. Just harder to print...
That printer is just pooring out hexagons at a rapid speed. So happy Creality CR-10S dialed in...
Not a bad view, not bad at all. Designed to print the fan intakes with the legs down. This forces the need for a fairly large support structure printed below. Extra filament and almost double the print time. Well worth it as the finished print will almost be flawless.
Nothing to complain about that...
Printed the frame in as well, but in end print profile and with Swedish high quality bio friendly plastic from add:north. Beautiful!
Perfect fit. Will add an air filter on the inside of the hexagon lid. It's printed 3mm thinner than the frame to make room for this.
Reprinted my dual pump cover in add:north black as well. Just some light sanding and some paint and it should looks perfect.
With the end print profile, the fit is just perfect. Very happy with the result and well worth the design time in Fusion and prints. -
Zeuligan got a reaction from KrZaj in [Sponsored] Angl3d Ti - Dual Custom Loop EKWB | ASUS ROG | be quiet! Dark Base Pro 900 | by Zeuligan
Very excited about starting the inside of the case. It has been a long time since I did the PSU Shroud for project Angl3d and feels extra special to start to build around it. It's a beautiful case, the be quiet! Dark Base Pro 900, even without it's amazing exterior. Love the removeable backside, MB tray solution. Started by cutting a backdrop mounting plate in 3mm plexi for the dual EKWB RGB reservoirs. Installed the previously created custom EKWB D5 dual pump bracket. The lower part of the custom PSU shroud still fits perfectly and was snug against the reservoir backplate. But I wasn't happy with the holes for the pump brackets. One side was off with almost 2mm. Nothing my new Ryobi can't fix. Took a 3mm drill and expanded the holes that was off. That's what I'm talking about. A much better fit. Looks really good and scary tight. It will fit, I know that, but still can't help worring a little... The combination of hard edges of the PSU Shroud polygons with the soft and beautiful roundness of the EKWB D5 plexi tops is just stunning. Can't imagin how ace this will look when the shroud is coated in matte black. Redesigned the pump-bracket base into a single dual unit. Clearing the PSU shroud with 1,5mm... It's not a very bid differance, but still believe the little heavier base this 3D printed detail will add to the mod. Slightly angled outwards and angled corners. For thoose of you that just turned into this log, it's still just printed with a prototype profile, hence the poor quality. The dual bracket is less than 1 hour print and with final profile almost 4h, so will look better Also printing with high quality Swedish black matte filament from add:north for final prints. Still very proud of the PSU shroud. It will make the beautiful and round water cooling products from EKWB to pop. Nope, not very clean, but still very ace using for measurements. Spent a little time adjusting and measuring between the dual pumps, placement of the reservoirs and the GPU. Decided to make a very unconventional mounting of the GPU that will make the placement of the dual reservoirs better. Centered placement over the pumps. Drilled out 4 holes for the reservoirs and another 6 holes for mounting the backplate to the HDD ladder. With a full box of a few thousand of countersunk M3, M4, M5 and M6 bolts I couldn't resist making the mounting holes countersunk with a plan for exposing the bolt heads. Color coordinated Leaving room on the right side for hard tubing, fittings and other fun stuff. -
Zeuligan got a reaction from Zando_ in [Sponsored] Angl3d Ti - Dual Custom Loop EKWB | ASUS ROG | be quiet! Dark Base Pro 900 | by Zeuligan
Very excited about starting the inside of the case. It has been a long time since I did the PSU Shroud for project Angl3d and feels extra special to start to build around it. It's a beautiful case, the be quiet! Dark Base Pro 900, even without it's amazing exterior. Love the removeable backside, MB tray solution. Started by cutting a backdrop mounting plate in 3mm plexi for the dual EKWB RGB reservoirs. Installed the previously created custom EKWB D5 dual pump bracket. The lower part of the custom PSU shroud still fits perfectly and was snug against the reservoir backplate. But I wasn't happy with the holes for the pump brackets. One side was off with almost 2mm. Nothing my new Ryobi can't fix. Took a 3mm drill and expanded the holes that was off. That's what I'm talking about. A much better fit. Looks really good and scary tight. It will fit, I know that, but still can't help worring a little... The combination of hard edges of the PSU Shroud polygons with the soft and beautiful roundness of the EKWB D5 plexi tops is just stunning. Can't imagin how ace this will look when the shroud is coated in matte black. Redesigned the pump-bracket base into a single dual unit. Clearing the PSU shroud with 1,5mm... It's not a very bid differance, but still believe the little heavier base this 3D printed detail will add to the mod. Slightly angled outwards and angled corners. For thoose of you that just turned into this log, it's still just printed with a prototype profile, hence the poor quality. The dual bracket is less than 1 hour print and with final profile almost 4h, so will look better Also printing with high quality Swedish black matte filament from add:north for final prints. Still very proud of the PSU shroud. It will make the beautiful and round water cooling products from EKWB to pop. Nope, not very clean, but still very ace using for measurements. Spent a little time adjusting and measuring between the dual pumps, placement of the reservoirs and the GPU. Decided to make a very unconventional mounting of the GPU that will make the placement of the dual reservoirs better. Centered placement over the pumps. Drilled out 4 holes for the reservoirs and another 6 holes for mounting the backplate to the HDD ladder. With a full box of a few thousand of countersunk M3, M4, M5 and M6 bolts I couldn't resist making the mounting holes countersunk with a plan for exposing the bolt heads. Color coordinated Leaving room on the right side for hard tubing, fittings and other fun stuff. -
 Zeuligan got a reaction from filippalfi in [Sponsored] Angl3d Ti - Dual Custom Loop EKWB | ASUS ROG | be quiet! Dark Base Pro 900 | by Zeuligan
Big progress on the base structure and bottom part of the custom pc casemod. With the last part of this mod finished with a fairly solid structure, this part will be all about filling the gaps in the exterior acrylic and make one solid structure.
With the front part of the bottom almost done, I continued on the back side. First angle in place and I got my pattern and most of the parts already prepared.
I just can't stop creating angles and triangles in this mod
It will look amazing once it's done...I hope...
Hard to see on the pictures, but each triangle creates an angled to the next.
Two longer parts for the front, want the edge to move forward and create a bridge to the front exterior part.
Forgot to replicate one piece, so had to measure and create a template.
A litte bigger piece to stay with a balanced look of the exterior.
Like an arm workout this mod. Spent hours with this little saw already. Not a bad tool for hand-cutting acrylic tbh.
Final piece of the side. Long skarp edge.
Both symetrical and a little kickass.
Just the backside to close before the entire back
Snug fit...
Small triangles with even smaller angled edges. Not sure how many times I cut my self on the hand file making these two...
Almost done...
Looks a little messy, but as this will not be a transparent piece, I opted for speed and durability.
Fully assembled and without any protective plastic for the first time.
Feet still fits perfectly and completes the angled look really nice...
If you wonder, no, it will not stay this way, but will be either wrapped in a matt black car vinyl or painted black, depending on what result works the best.
I would love to hear what you think...
-
Zeuligan got a reaction from KrZaj in [Sponsored] Angl3d Ti - Dual Custom Loop EKWB | ASUS ROG | be quiet! Dark Base Pro 900 | by Zeuligan
It is one of the best and most time consuming decisions I ever made for my modding - buy a 3D printer. After brutal failures and fun learnings I could start to design and put out prototypes. I knew from start of this mod I wanted to do something special with the GPU. After all, it is the main inspiration for this entire mod.
I went through endless of concepts and iterations in Fusion 360 and spent more time infront of a computer than inside one, but patience payed of.
The printer, after my mods, turned out to be very good and I put it to a test - a lot!
Lets just say that I went through some iterations and prototypes trying to find something that both looked good, but not to much, to keep the balance between good design and keep the components in focus. Don't mind the poor quality of the prints. They are printed with a prototype profile to keep print times as high as possible. Finished prints will take 20x times as long to print and should look sharp and nice when done.
This is my idea for the top, front part. Plan to devide the cover for my 1080Ti in two halves, so I can hide the screws from behind and squeeze the front and back piece ontop of the GPU. Should look clean, be sturdy enough and prevent scratches or invasive alterations to the GPU.
It is a little heavy and to much Batman over this design. I redesigned all the individual components and it should look smoother and more in balance now.
I love these pump tops from EKWB. I also feel that the round shape will be needed and make a nice contrast to all the polygon edges in this build. That doesn't mean we should leave them unmodded
After some Fusion 360 iterations and some print iterations this turned out pretty neat. I need to fasten two pumps to the base before anything else, as they will also fasten the bottom floor of the custom angled PSU cover / dual floor. I'm also trying to avoid screws, as it will be very tight to have to add afterwards. A slide in clip was designed to the two pieces to snap them into one when fastened.
Think this will look very good and make the pump tops stand out even more. I'm currently playing with the idea of hiding a RGB led strip inside the base of this cover pointing upwards, not sure if that will look good.
Speaking of RGB leds. I got 15m of adressable LED strips in various density and countless of connectors and wires. Next step will be to start experimenting with the lightning of the build and components as well as starting on the interior. Stay tuned for more and please let me know what you feel about this update and mod in the comments below.
-
Zeuligan got a reaction from Zando_ in [Sponsored] Angl3d Ti - Dual Custom Loop EKWB | ASUS ROG | be quiet! Dark Base Pro 900 | by Zeuligan
It is one of the best and most time consuming decisions I ever made for my modding - buy a 3D printer. After brutal failures and fun learnings I could start to design and put out prototypes. I knew from start of this mod I wanted to do something special with the GPU. After all, it is the main inspiration for this entire mod.
I went through endless of concepts and iterations in Fusion 360 and spent more time infront of a computer than inside one, but patience payed of.
The printer, after my mods, turned out to be very good and I put it to a test - a lot!
Lets just say that I went through some iterations and prototypes trying to find something that both looked good, but not to much, to keep the balance between good design and keep the components in focus. Don't mind the poor quality of the prints. They are printed with a prototype profile to keep print times as high as possible. Finished prints will take 20x times as long to print and should look sharp and nice when done.
This is my idea for the top, front part. Plan to devide the cover for my 1080Ti in two halves, so I can hide the screws from behind and squeeze the front and back piece ontop of the GPU. Should look clean, be sturdy enough and prevent scratches or invasive alterations to the GPU.
It is a little heavy and to much Batman over this design. I redesigned all the individual components and it should look smoother and more in balance now.
I love these pump tops from EKWB. I also feel that the round shape will be needed and make a nice contrast to all the polygon edges in this build. That doesn't mean we should leave them unmodded
After some Fusion 360 iterations and some print iterations this turned out pretty neat. I need to fasten two pumps to the base before anything else, as they will also fasten the bottom floor of the custom angled PSU cover / dual floor. I'm also trying to avoid screws, as it will be very tight to have to add afterwards. A slide in clip was designed to the two pieces to snap them into one when fastened.
Think this will look very good and make the pump tops stand out even more. I'm currently playing with the idea of hiding a RGB led strip inside the base of this cover pointing upwards, not sure if that will look good.
Speaking of RGB leds. I got 15m of adressable LED strips in various density and countless of connectors and wires. Next step will be to start experimenting with the lightning of the build and components as well as starting on the interior. Stay tuned for more and please let me know what you feel about this update and mod in the comments below.
-
Zeuligan got a reaction from KrZaj in [Sponsored] Angl3d Ti - Dual Custom Loop EKWB | ASUS ROG | be quiet! Dark Base Pro 900 | by Zeuligan
After a new modding room and a full stack of amazing tools thx to Ryobi I could get back to modding and project Angl3d Ti. Some parts left to do on the complicated front as well as closing up the bottom and front.
It was suddenly a dream. The last 3 angles to finish the front took 20min to finish instead of 200min. The saw and sander from Ryobi are monsters. Surprisingly quiet, but so powerful.
This is the last problem area left to do. Joining the bottom piece with the front piece.
Fast work at the new saw and some sanding
And we had a match. Left the piece a little big by choice, need to file it into perfect size to ensure an unvisible joint with the front.
Two larger pieces was all that was left to close up the bottom.
One final test fit before I added the pieces to the bottom. Then I will have to spend a few days sanding...
I spend almost the next week finishing up the 3 pieces. Just not sanding, but filling in all small gaps and uneven surfaces. The large beige section is plastic wood. Had to make up for a less perfect piece, but now it's even and smooth.
Will be so much fun turning this into black matt finish. Exterior is close to finish. Probably got 2 weeks left, sanding down the 3 front holes to perfect shape and size and then desining and 3D-print all the mesh pieces. Need to learn how to print and design...
Merry Christmas everyone
-
Zeuligan got a reaction from KrZaj in [Sponsored] Angl3d Ti - Dual Custom Loop EKWB | ASUS ROG | be quiet! Dark Base Pro 900 | by Zeuligan
After finishing my modding room and after some back and forth I pulled the trigger on a 3D printer on Black Friday. 2 days later it arrived with, what would become a 2 week headake.
I took a decision to buy the Creality CR-10S. Just couldn't justify paying almost 250% more for a Prusa 3.
Wouldn't be a computer modder and leave the printer untouched Ordered some v-slots and went to work on my brand new printer...
After a few days later I was happy. I built a 2nd "floor" to the printer and will replace the controllerbox with my own printed design and hide inside the printer. That way I will have a footprint just as small as the printer and can also build an encloser (good for ABS printing etc).
I also replaced fans, added stepper dampeners, printed my own support brackets etc. Fun week.
After an additional week of tweaks and calibration and cursing I had finally dialed in my printer the way I wanted it.
Fairly accurate
That first layer is shiny ❤️
First prototype of many for project Angl3d. Testing different fastening brackets and shapes. The finished object will of course be a mesh, as it's an air vent.
-
Zeuligan got a reaction from KrZaj in [Sponsored] Angl3d Ti - Dual Custom Loop EKWB | ASUS ROG | be quiet! Dark Base Pro 900 | by Zeuligan
It's not that common for me to do an update not directly related to a computer mod, but after the amazing news that Ryobi decided to sponsor me, I had to rebuild my modding room.
I will just let the pictures speak for themselves. Turned my 2,2x3,1m modding room from a dull and quite ugly place into a modern and functional modding area.
Reason for building as I did, is that I live in a subletting appartment and are not not allowed to do any none-reversable changes to the appartement. This was my modding solution to a modding area without a permanent change to the walls.
-
Zeuligan got a reaction from Rosinbole in [Sponsored] Angl3d Ti - Dual Custom Loop EKWB | ASUS ROG | be quiet! Dark Base Pro 900 | by Zeuligan
After a new modding room and a full stack of amazing tools thx to Ryobi I could get back to modding and project Angl3d Ti. Some parts left to do on the complicated front as well as closing up the bottom and front.
It was suddenly a dream. The last 3 angles to finish the front took 20min to finish instead of 200min. The saw and sander from Ryobi are monsters. Surprisingly quiet, but so powerful.
This is the last problem area left to do. Joining the bottom piece with the front piece.
Fast work at the new saw and some sanding
And we had a match. Left the piece a little big by choice, need to file it into perfect size to ensure an unvisible joint with the front.
Two larger pieces was all that was left to close up the bottom.
One final test fit before I added the pieces to the bottom. Then I will have to spend a few days sanding...
I spend almost the next week finishing up the 3 pieces. Just not sanding, but filling in all small gaps and uneven surfaces. The large beige section is plastic wood. Had to make up for a less perfect piece, but now it's even and smooth.
Will be so much fun turning this into black matt finish. Exterior is close to finish. Probably got 2 weeks left, sanding down the 3 front holes to perfect shape and size and then desining and 3D-print all the mesh pieces. Need to learn how to print and design...
Merry Christmas everyone
-
 Zeuligan got a reaction from MrJoosh in [Sponsored] Angl3d Ti - Dual Custom Loop EKWB | ASUS ROG | be quiet! Dark Base Pro 900 | by Zeuligan
After a new modding room and a full stack of amazing tools thx to Ryobi I could get back to modding and project Angl3d Ti. Some parts left to do on the complicated front as well as closing up the bottom and front.
It was suddenly a dream. The last 3 angles to finish the front took 20min to finish instead of 200min. The saw and sander from Ryobi are monsters. Surprisingly quiet, but so powerful.
This is the last problem area left to do. Joining the bottom piece with the front piece.
Fast work at the new saw and some sanding
And we had a match. Left the piece a little big by choice, need to file it into perfect size to ensure an unvisible joint with the front.
Two larger pieces was all that was left to close up the bottom.
One final test fit before I added the pieces to the bottom. Then I will have to spend a few days sanding...
I spend almost the next week finishing up the 3 pieces. Just not sanding, but filling in all small gaps and uneven surfaces. The large beige section is plastic wood. Had to make up for a less perfect piece, but now it's even and smooth.
Will be so much fun turning this into black matt finish. Exterior is close to finish. Probably got 2 weeks left, sanding down the 3 front holes to perfect shape and size and then desining and 3D-print all the mesh pieces. Need to learn how to print and design...
Merry Christmas everyone
-
 Zeuligan got a reaction from KrMaH in [Sponsored] Angl3d Ti - Dual Custom Loop EKWB | ASUS ROG | be quiet! Dark Base Pro 900 | by Zeuligan
After a new modding room and a full stack of amazing tools thx to Ryobi I could get back to modding and project Angl3d Ti. Some parts left to do on the complicated front as well as closing up the bottom and front.
It was suddenly a dream. The last 3 angles to finish the front took 20min to finish instead of 200min. The saw and sander from Ryobi are monsters. Surprisingly quiet, but so powerful.
This is the last problem area left to do. Joining the bottom piece with the front piece.
Fast work at the new saw and some sanding
And we had a match. Left the piece a little big by choice, need to file it into perfect size to ensure an unvisible joint with the front.
Two larger pieces was all that was left to close up the bottom.
One final test fit before I added the pieces to the bottom. Then I will have to spend a few days sanding...
I spend almost the next week finishing up the 3 pieces. Just not sanding, but filling in all small gaps and uneven surfaces. The large beige section is plastic wood. Had to make up for a less perfect piece, but now it's even and smooth.
Will be so much fun turning this into black matt finish. Exterior is close to finish. Probably got 2 weeks left, sanding down the 3 front holes to perfect shape and size and then desining and 3D-print all the mesh pieces. Need to learn how to print and design...
Merry Christmas everyone
-
 Zeuligan got a reaction from LaserLion in [Sponsored] Angl3d Ti - Dual Custom Loop EKWB | ASUS ROG | be quiet! Dark Base Pro 900 | by Zeuligan
After a new modding room and a full stack of amazing tools thx to Ryobi I could get back to modding and project Angl3d Ti. Some parts left to do on the complicated front as well as closing up the bottom and front.
It was suddenly a dream. The last 3 angles to finish the front took 20min to finish instead of 200min. The saw and sander from Ryobi are monsters. Surprisingly quiet, but so powerful.
This is the last problem area left to do. Joining the bottom piece with the front piece.
Fast work at the new saw and some sanding
And we had a match. Left the piece a little big by choice, need to file it into perfect size to ensure an unvisible joint with the front.
Two larger pieces was all that was left to close up the bottom.
One final test fit before I added the pieces to the bottom. Then I will have to spend a few days sanding...
I spend almost the next week finishing up the 3 pieces. Just not sanding, but filling in all small gaps and uneven surfaces. The large beige section is plastic wood. Had to make up for a less perfect piece, but now it's even and smooth.
Will be so much fun turning this into black matt finish. Exterior is close to finish. Probably got 2 weeks left, sanding down the 3 front holes to perfect shape and size and then desining and 3D-print all the mesh pieces. Need to learn how to print and design...
Merry Christmas everyone
-
Zeuligan got a reaction from LaserLion in [Sponsored] Angl3d Ti - Dual Custom Loop EKWB | ASUS ROG | be quiet! Dark Base Pro 900 | by Zeuligan
After finishing my modding room and after some back and forth I pulled the trigger on a 3D printer on Black Friday. 2 days later it arrived with, what would become a 2 week headake.
I took a decision to buy the Creality CR-10S. Just couldn't justify paying almost 250% more for a Prusa 3.
Wouldn't be a computer modder and leave the printer untouched Ordered some v-slots and went to work on my brand new printer...
After a few days later I was happy. I built a 2nd "floor" to the printer and will replace the controllerbox with my own printed design and hide inside the printer. That way I will have a footprint just as small as the printer and can also build an encloser (good for ABS printing etc).
I also replaced fans, added stepper dampeners, printed my own support brackets etc. Fun week.
After an additional week of tweaks and calibration and cursing I had finally dialed in my printer the way I wanted it.
Fairly accurate
That first layer is shiny ❤️
First prototype of many for project Angl3d. Testing different fastening brackets and shapes. The finished object will of course be a mesh, as it's an air vent.


