


karolll95
-
Posts
33 -
Joined
-
Last visited
Reputation Activity
-

 karolll95 got a reaction from Xaiux in Project Lightning
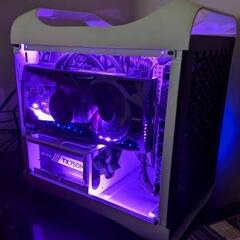
Hi! Here we present to You, project Lightning in its full glory! ⚡️⚡️⚡️ We've used here a EKWB Mystic Fog fluid, so the best effects are with RGB lightning, but for now, let's check it without lightning and leave the best for later 😉 Hardware used in the project: - Ryzen Threadripper 3970X - Asus ROG Zenith II Extreme - 4x TeamGroup Night Hawk RGB 16 GB - 2x RTX 3090 Asus Strix OC - 2x Samsung 970 EVO M.2 2 TB - 2x Samsung 860 SATA 4 TB - Corsair AX1600i - Phanteks Enthoo Pro 2 TG LC: - EK Water Blocks EK-Quantum Momentum ROG Zenith II Extreme D-RGB - Plexi - 2x EK Water Blocks EK-Quantum Vector Strix RTX 3080/3090 D-RGB - Nickel + Plexi - 2x EK Water Blocks EK-Quantum Vector Strix RTX 3070/3080/3090 Backplate - Nickel - 2x XSPC TX480 Ultrathin - EK Water Blocks EK-CoolStream SE 360 - EK Water Blocks EK-CoolStream PE 360 - schwarz - EK- Quantum Kinetic FLT 360 D5/DDC Body D-RGB - Plexi - EK- Quantum Kinetic FLT 240 D5/DDC Body D-RGB - Plexi - EK-Quantum Torque fittings - EK Mystic Fog - Aquacomputer OCTO fan controller for PWM fans - Aquacomputer farbwerk 360 - Aquacomputer NEXT flow sensor - Noiseblocker eLoop 120 mm - Custom cables made by ExpendableCustoms Huge thanks to Caseking Phanteks TeamGroup for supporting that project! -
 karolll95 got a reaction from BiG StroOnZ in Project Lightning
Hi, Now You can see what cable design will be used in Project Lightning ⚡️ As always, we're using MDPC-X sleeving, this time Liquid Carbon and Black with aluminum combs 😊 -
-min.thumb.jpg.6bb5bb869faad807bbf55550a4fe15d2.jpg) karolll95 got a reaction from DailyProcrastinator in Project Lightning
karolll95 got a reaction from DailyProcrastinator in Project Lightning
Hi, We're pushing forward with Project Lightning! ⚡️ This time, we've made use of magnetic stickers, that Corsair supplies with AX1600i. Great thing! Previously we used to design and made custom stickers, now it's a lot faster and easier! 💪 -
karolll95 got a reaction from DailyProcrastinator in Project Lightning
Hi,
Some of You might have guessed what case is it, others probably thought about very similar one, nevertheless here I present a skeleton for Project Lightning! ⚡️
Phanteks Enthoo Pro 2 TG
-
karolll95 got a reaction from DailyProcrastinator in Project Lightning
Hi,
This time we'll show You some of the storage that will be used in our project 😊
Samsung 970 EVO Plus NVMe M.2 SSD 2TB
And at the end some teaser, who knows what case is it? 😎
-
karolll95 got a reaction from DailyProcrastinator in Project Lightning
Hi 😊 Let's move to next part for Project Lightning! This is very important component of every PC, which often is treated neglectfully. And it shouldn't, if You want Your components to get stable power all the time 💪 Here we decided to go with the obvious choice: Corsair AX1600i 🤩 It is the ultimate digital ATX power supply, built using only the best components and state-of-the-art gallium nitride transistors to deliver more than 94% efficiency. -
karolll95 got a reaction from DailyProcrastinator in Project Lightning
Hi,
Thanks guys! 😊
Like we promised in a previous update, this time we're show You the motherboard 😊 To let that 32 core monster fly, we need a serious motherboard. And surely we have one! Asus ROG Zenith II Extreme 💪 -

-
 karolll95 got a reaction from Tristerin in Project Lightning
Hi 😊
We're starting new project, that we decided to call Project Lightning. 🌩️
Why Lightning? Because the assumption is that the design should be refined, but the possibility of obtaining different colors and lighting effects is welcomed, so there will be a lot of it, but we will try to do it with taste, which will certainly be a challenge 💪
At the very beginning we would like to thank our sponsors for that project 😊
So, we begin with the heart - CPU. Yet again we decided to go with unstoppable AMD Ryzen™ Threadripper™ 3970X.
PC will be used mainly for graphic designing and rendering, so it will make use of that 32 cores and 64 threads 😎
And at the end, a little teaser for next post, the motherboard... 😊
-


-
-

-

-

-
karolll95 got a reaction from KrZaj in Project Impossible
It's been a while since last update but due to exams I had no time to push this project forward. Now however it's almost done.
In the meantime, I though with my friend that we should connect our passion and we started ExpendableCustoms Here are links to Facebook and Instagram .
And here are pics of ExpendableCustoms 3D stickers
-
-
karolll95 got a reaction from KrZaj in Project Impossible
I haven't been here for a while but now I'm back with some progress
I hope I would be able to end this project soon.
-
 karolll95 got a reaction from Maarten/Pine in Project Impossible
@rowanhazard
I hope it will!
Today I made my first hardtube Here is a look at Alphacool satin tubing :thumb:
-
karolll95 got a reaction from KrZaj in Project Impossible
Another update Unfortuntately case isn't ready yet but I have something to fill up time
This is how I see Project Impossible at the end. I'm aware that few bends will be difficult but I'll try my best
-
karolll95 reacted to Brodholm in WING X99 | A CNC-milled Scratch Build! (Benchmarks, temps and wallpapers posted!)
Polishing and sanding the acrylic
I got this kit. You basically use sand paper, and then you use number 3, number 2 and then clean with number 1.
I recommend using microfiber cloths. And remember to NOT use the same cloth for different number bottles. You do not want to use the same cloth for number 2 as you did for number 3!!!
Before you go with the number 3 you will have to do the basic work with sand paper. I went from 240 grit to --> 400 --> 800 ---> 1500 ---> 2000 and then I went with number 3. That produced a really nice result.
Did all the sanding in this container filled with moving water. It really helps when you have running water when you polish. At least I think so.
This is how it can look when you start.
Sanded to 2000 grit.
Polished with nr 3, 2 and then cleaned with nr 1. I was a bit lazy with this part since it really does not matter.
Sanded this uneven with 60 grit. The idea being that it will diffuse the light and give a more even illumination around the base of the case.
Can you spot the difference?
Clear like glass!
Rinse and repeat, same procedure as before.
Finally done with the polishing. This took a LOT of hours to do, and it is really draining work, both mentally and physically. You need to push really hard when you polish with the cloth and sanding seems like it never ends. Going through all those stages of different grit papers was tedious work. But in the end the result was all worth it! Now I need to make some o-rings!
-
karolll95 reacted to Brodholm in WING X99 | A CNC-milled Scratch Build! (Benchmarks, temps and wallpapers posted!)
About time to mount some components. These have been sitting on my shelf long enough...
Like a glove! Always a bit nervous when you make scratch builds and make custom IO that it will not fit. But it was really nice and snug!
GPUs and SSDs mounted!
Here is a neat tool I designed. The thing I hate the most about sleeving is stretching the sleeve so that you get a really tight fit around the cable. That hurts my hands bad after a while, and it is not like the other burning and bending etc does not hurt. And at the same time you need to pinch the cable so it does not go back. This is my first rev of a tool to aid me in this. And I must say it works quite nicely.
Here you can see the sleeve pulled through the rolls causing it to tighten around the cable. And when you stop pulling the sleeve stay in place and does not go back. And a stretched sleeve looks much much better than a non stretched sleeve.
This is such a mess. I don't like to sleeve, I think it is tedious and I get nervous that I have done something wrong all the time and checks everything like 5 times over and over...
Okay, a few days later I am done with 90% of the cables. My fingers hurt, I have burned myself on the arm and hand (very small table in the apartment) since I put down my arm and hand on the very hot gas touch 2 times... My fault but lets blame the very limited space
This sleeve gets very stiff when streched and it is a pain to bend, but on the other hand it looks amazing and it is really tight, much tighter than the MDPC sleeve that is very good quality.
Okay now, how the hell do I fit this into here. I originally planed this with 18 AWG wire and much softer sleeve. Now with this much tighter sleeve and 16 AWG wire the cables do not like to stay in place...
I really like how the GPU comb turned out. I wanted to make something that goes with the same theme and lines as the build. Turned out better than I thought it would.
Decided to make the pump connect inside the pump house.
Shortened the original cables of the D5 pumps
I ended up using hot glue to be able to get the cables to stay in place. Was impossible otherwise. Either way, I only used hot glue on places where you cant see it. So no hot glue what so ever will ever be visible. I originally was against using any kind of glue "since then I cant remove the cables" then I remembered that I have threaded each individual cable through holes so that is pretty much a permanent installation... So then I was fine with it. If you do something like this though I recommend that you are really careful to not get any glue where you don't want it.
A small amount of hot glue to fix the bottom layer of the cables did the trick. Really neat.
Here you can see the whole tree.
Now I just need these cables to conform to MY reality, GET IN LINE!!!
That is more like it! Will leave it like this for a day or two and they will stay more or less in place when I remove the scrap acrylic pieces.
Looks really neat but what a pain to do. Don't think I would have done them visable if I knew how much time I would have to spend on them. I would at least have done some changes in the design if I knew I was going to use 16AWG and this thicker sleeve. This could have been much easier than it was.
Time for a very big moment. Plugged in the cable and put on the switch on the PSU. Time to boot for the first time since removing every single cable and every connector and putting them back in again. THe amount of money that rides on that all the cables are correctly connected is HUGE.
Here we go...
The sweet, sweet boot screen! What a HUGE relief, it posted just fine into bios and all GPUs etc are detected. Had to turn it off after about a minute though since I have no cooling on yet. But this is such a relief.
Quickly fixed up the cables on the front and straightened them up a bit (they need a bit more work to be perfect but I will do that later)
The foot is not mounted back again since I might need to screw in the fill ports from underneath when I connect the custom blocks.
Another quick boot with the lights connected also.
Starting to look a lot like the renders! I am really excited now! Now I just need to polish the acrylic parts, make orings, leak test the blocks and test the pump tops. And If all that works I am basically 99% done with the case. Just some minor things like the power on button that needs to be fixed!
A Video of how the sleeving tool works and how I do my sleeving:
-
 karolll95 got a reaction from Verrm in Project Impossible
Update
Firstly I want to share with You my choice of sleeving for this project.
IMO it's the best looking sleeving for a ROG motherboard
Teleios from E22. Main cables will have Fusion Red/Black and Carbon sleeve. All the rest will be black.
Today I received small package from China Slight accent but I'm not sure if I'll use it and where
I also received mouting bracket for top radiator.
And a small teaser
Panels are ready but there are few scratches and they need to be re-paint. I will re-paint all four outside panels.
-
karolll95 got a reaction from Verrm in Project Impossible
@rowanhazard
I hope it will!
Today I made my first hardtube Here is a look at Alphacool satin tubing :thumb:
-
 karolll95 got a reaction from Sneling in Project Impossible
@rowanhazard
I hope it will!
Today I made my first hardtube Here is a look at Alphacool satin tubing :thumb:
-


-min.thumb.jpg.6bb5bb869faad807bbf55550a4fe15d2.jpg)


