

CroyAlore
-
Posts
33 -
Joined
-
Last visited
Content Type
Forums
Status Updates
Blogs
Events
Gallery
Downloads
Store Home
Everything posted by CroyAlore
-
Hello everybody, Its been a while since I've had a chance to work on this project due to my other project, Pluto. I've been working over the last couple weeks to try to get this project completed and I've got another update here. The new GPU, I got this card a while ago when pretty much every card was selling out so I decided to go with the FE as the price from NVIDIA was the lowest I could find at the time. Heat sink removed and ready for the water block. All the parts I should need and more to get the GPU attached to the rest of the loop. These Barrow tubes have really helped me put together this rig and a compact way. Here is the Bracket I will use to support the GPU. It was difficult for me to figure out how to go about supporting the GPU subtle way, but my friend ended up coming up with this idea. With this bracket and some added support at the I/O end it has been holding firm so far (Still got to do some testing). Now to remove the old backplate. Here you can see the illumination panels LED as well as what the rig looks like without the panel. Now the new I/O. I had to do a lot of measurements to try to make sure the GPU would line up correctly with the increased height from the fittings and motherboard and honestly didn't know if it would fully work until i connected it to the rig and tried it out. The SDD Sits pretty comfortably in the gap left underneath the I/O for the GPU. And thankfully it aligned correctly and everything with the measurements worked great. Here is the back of the bracket, I'll have to add some more screws to better support it. I've got a new way to better manage the cables from when I first built titan so it should come out much cleaner than before. Final wire management from the front. Thanks all for reading I should have one more update and then final pictures coming soon after. IF you guys have any questions or want more angles of how its supported just ask
-
Here are the Thermals: I tested the system in two configurations, either standing on its feet or laying on the front panel for maximum air flow. First Configuration - Standing on Feet With 100% GPU Fan Speed: Furmark at 1080p with 0xAA 3DMark Skydiver Stress Test (with Markers) Adia 64 Second Configuration - Laying on the Front Panel With 100% GPU Fan Speed: Furmark at 1080p with 0xAA Furmark at 1080p with 0xAA plus Adia64
-
Here are the final pictures for the project along with some comparisons to show the size of the build. I hope you guys enjoyed the build as much as I did.
-
So this is what the system looked like with the original cut I did. To begin with I was hoping the middle fan would breathe through the new hole and the other two fans would breathe through the small gaps that the legs create but the thermals where barley decent this way. So I decided to cut the bottom as big as all three fans and lift the case up with new legs. Here is the new cut with a slit left in the middle to allow the unibody to fix its self to the internal frame as well as the GPU. The new legs are very easy to add and give the case a miniature look so they ended up working great With the GPU bracket put in place and all three pieces fixed together. You can see all the new room for the GPU to breathe now with the new mods. Now with the GPU and Cooler mounter you can see how much more exposed the fans are now. All the colors end up working great and I have one more "Case Fan" added to the front of the case to remove the hot air from the GPU. Never though I would use a 40mm fan as a case fan Now theres much more room between the table and the bottom of the case to breathe. Now for some last minute modifications to the internal frame. The PSU still runs hot so I wanted to put a cut behind the heat sink and add a blower fan to the bottom to allow it to cool. I still have some more tests with this however because I want to see how it heats the surrounding area and see if there is too much heat there for the motherboard. I also added another cut to the bottom of the mother board tray to allow the NVMe to be switchable later without difficulty, something I added once I had to switch the NVMe to the back to add a SDD NVMe to the front. Here is the path of the PSU extension cable and how the cables are managed with the PCI Riser. I'll be posting some thermals later today once I organize all the benchmark tests, Thanks all!
-
On the left is the PSU the Chopin came with. On the right is the HDPLEX 160W direct plugin. By using this with a external brick I'll be able to save a large amount of room inside of the case. The only issue is that because of the G.Skill ram it cant fit. But thats fine, I can try just adding a extension cable and placing the HDPLEX somewhere else. First I'll have to make an addition cut for the 24 Pin cable. Here is the build so far with all the additional cuts and mods. You'll see later in this update that I increased the side of the bottom right hole to allow more air intake for the GPU. Before painting. The paints I use. But i decided against putting on a clear coat at the end. After Primer. After painting it black. Now that the case is spray painted I put in the 24 pin extension cable. However its pretty messy, but I can just use a cable comb to hold them in place. It holds pretty tight and you can actually see the comb at the top of the cable. Now to just heat-shrink the Front I/O cables. I think all togather it looks much cleaner than what it would look like if I had directly plugged in the HDPLEX. The front of the case so far. And the back. I mount the HDPLEX on the back with some spacers to allow the heatsink some room to breathe. I am looking into adding a squirrel fan to keep it cool if I can find a quiet enough one. And here it is with the cable connected. I do not know much about the HDPLEX's so if anyone knows if using a extension cable or having the heat-sink turned towards the case has any problems I would greatly appreciate some tips. Now for the GPU. When I orrignally tested this 1050ti the cooler sounded like a turbine compared to the Noctua Fan so I'll be trying to build my own cooler for it. These fans are incredibly quiet, especially for their size. I tested them at full load and they didn't produce much noise at all compared to the stock fans at idle. The shroud for the GPU. Here is the near complete custom cooler. And a rough picture to show how the fans intake air. The bottom of the Chopin unibody has openings on the front and back of the case for the two non-center fans to breathe. I'll be cutting a hole for the center fan to intake air as well, but I'll have to wait for the next update to do that as I'm waiting for the new unibody to be delivered. I'm fairly new to these new mods, specifically the HDPLEX and Custom Cooler, and I'd love feedback on what to do or If I'm doing anything incorrectly or if I can be doing either of these two better.
-
I'm using the HDPLEX 160W, its ussaly direct plug but because of the ram there inst any room to fit it, So I mounted it to the back and using a extension cable to connect it. Does anyone with knowledge of the HDPLEX know if its fine to use a extension cable with it?
-
I made sure to keep the clutter in the case to a minimum so I chose to use a NVMe with no other HDDs, and the result is this compact motherboard. As you can see here the cooler pretty much uses as much room as it can get. Now with the main components out of the way I can start working on the GPU. I started by making the cuts needed to fit the GPU below the motherboard tray, as well as a cut at the back for the IO and two cuts at the bottom of the case to allow for additional airflow. It fits pretty snug in there and there is plenty of room in between the motherboard tray and the card to fit the riser. The riser takes up some additional room at the back but by using different riser and modifying the other side of the case I should be able to get it to fit. Also the cases' rear panel has a protruding shroud to give a small bit of room for the riser as well. The next thing to do from here is change the fans on the GPU, as the current fans sound like a small turbine, and to mount the GPU in the case. Thanks all.
-
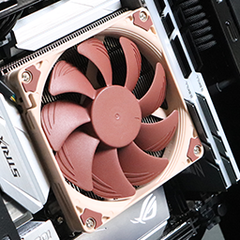
Hello all, I’m making a short worklog for a small mobile build I'll be working on. This originally was going to be a quick build but I got a couple ideas when I found the InWin Chopin case. I noticed that it had room on the bottom of the case for a long PSU but I figured it may be possible to replace it with a low-profile GPU and just use a HDPLEX instead of the included PSU. Other than that I want to try to make the build as cool and silent as possible, through the use of Noctua fans. Hardware: [CPU]: Intel i5 – 8400 [GPU]: Zotac GeoForce GTX 1050 Ti Low Pofile [MOBO]: Asus Strix Z370-I [RAM]: G.Skill TridentZ RGB 2×8 16GB - 3000 [NVMe]: Samsung 970 Evo 250GB [SSD NVMe]: Samsung 860 Evo 1TB [PSU]: HDPLEX 160W DC-ATX [CASE]: InWin Chopin [COOLER]: Noctua NH-L9i Other: [GPU FANS]: NF-A4x10 FLX x3 [CASE FAN]: NF-A4x10 FLX [PSU FAN]: SoundOriginal Blower Fan [RISER]: Fractal Design Flex VRC-25 PCIE x16 The theme for this build is going to coincidence with another build I am currently doing, COSMOS. I found that the colors of the Noctua fan strongly resemble that of Pluto, and also due to the builds size I decided to name it so and continue on with the cosmos based theme. There won't be too many mods to the build and hopefully I should be able to get the GPU mounted in the case without increasing the size of the chassis. I hope you guys enjoy the build, this shouldn't require too much time so it should be completeled quickly. Thanks all. Updates
-
Hey all, got part one of COSMOS here. This update shouldn't have too much to do with the case itself but all the upgrade hardware and cooling parts. I ended up going with the Asus Strix as the neutral grays and rgb lighting really goes well with the rest for the build. IT also lets me use a full cover CPU block that catches the light from the illumination panel well. While I was planning this build I was originally going to get the 7700K but luckily I had waited on upgrading the build long enough for the 8700K to come out. Overall its great but I might look into deliding as it still runs hot even with the water block. One of the biggest downsides to titan was I couldn't add a NVMe as the chipset was too old to support it. I originally wanted a way to keep the inside of the case simple and organized and would have rathered a NVMe on the board than a SSD taking up space, but I ended up finding a good place to add the SSD and even with the updates I'm still going to end up keeping the SSD in its place. (Probably going to have to shift it a bit to make room for the GPU when it gets vertically mounted) The tridentZ's rgb works great with the illumination panel and I was able to match the colors as well pretty easily. I was pretty set on upgrading to the traidentZs when I was planning this build and it really ended up working well The final shot with all the new components on the board ready to be switched in. Right after I took this picture I actually put on a temporary CPU block to test things out. So the time between this photo and the next is actually a couple weeks to allow for parts to ship in and proper testing. The block was really easy to install. Removing the all heat sinks only involved removing two small screws each and the new block fit on easily after adding the thermal pads and paste. Securing it in place was just a handful of screws and washers and the entire process didn't take long at all. Even easier than the block was the NVMe cooler. Front and back plate and two brackets to them in place. Only change I made here was to take the EK symbol and flip it around due to the motherboard orientation being upside down. I tried to block out the Strix logo and see if it looks better with the lighting. In the end I like it more but if you guys have a different idea I'd like your feed back, Its pretty easy to replace the bracket on the water block and showing the logo is basically a three step process. And here's the case with all the new components in place. The next update should have the start of the desk build. As you can see in some of the photos I'm already using it but I'll be sure to post some of those photos soon. The update should have the new GPU block and the start of the new back panel. Thanks all.
-
[Project] - Wonder Woman - WallPC - Goes to the dark side!
CroyAlore replied to BTA's topic in Build Logs
I'm a huge fan of that motherboard, I've been trying to model a build around it haha. Its looking great so far. and I'm glad your going for a symmetric build, I think wall mounted builds usually look way better when they are like that. -
scartch build COMPLETED - titan - Scratch Micro-ATX Build
CroyAlore replied to CroyAlore's topic in Build Logs
Thanks for the feedback, a lot of what you bring up is what I'm targeting in the new build actually! The dust isn't as big of a deal as you would, I'm thinking its because of the lack of airflow into the case, but I'm looking to close up the case anyways with some kind of side panels in the project update I'm doing. I actually found those cable combs like those when I was sleeving the cables! However I think they were either sold out or on back order so I wasn't able to get them, I'm looking to have a better routing solution in the update. I'll be sure to look into those Aluminium cable combs however, thanks for the lead -
reserved for final photos
-
Hello all, I'm starting a new work log on a update I've been planning to my titan build: Which you can find here, called COSMOS. The goal of this built was to: One, update some of my aging components, some where about four years old by the complete of titan, and two, update some of the features of the case I was either unable to complete during titans construction or had not though to incorporate. The case's cooling components are for the most part unchanged, except for the water-blocks that needed to be upgraded along with their hardware components. Below is a list of the upgraded and added hardware for the new Cosmos build: Upgraded: [CPU]: Intel i7 - 8700k [GPU]: Nvidia Geforce GTX 1080 Ti [MOBO]: Asus Strix Z370-G [RAM]: G.Skill TridentZ RGB 2x8 16GB -3000 Added: [NVMe]: Samsung 960 Evo 500GB The main of the updates of the case itself will be the inclusion of a vertical GPU mount. I have a quick Solid Works screenshot to demonstrate what I'm looking to at the bottom of this paragraph. I noticed that with titan there was a lot of empty room created by the graphic card and the tubes started to look awkwardly placed, so I started to work on a vertical mount solution. The problem here is that the weight of the card isn't supported by the bracket alone on the back panel so I've got a couple of ideas of how to mount it properly while still allowing me to move the case without worrying about the GPU coming loose. Besides the main update I'm looking to do two more things: First, find a better way to manage all the cables, and find some routing solutions for them. I'm thinking of upgrading the PSU to a smaller size and reorganizing the cables giving me more room on the bottom for cable management, but I will see what I'll do after the GPU is properly mounted. Second, find a very simple solution to enclosing the case. At the moment the case is open with no side panels. I do like the way the build looks without any side panels at all but the case was originally built with minimal air flow needed in the chassis as to prevent dust. So I would like to figure out a way to enclose the case while keeping the look of the case the same and integrating some kind of airflow for some of the passive components on the motherboard. While building this rig I've also decided to work on a battlestation to match it. The battlestation for COSMOS will have the same theme as the rig and will be designed after it so I'll be posting the worklog for the battlestation here along side it. I hope you guys enjoy the build, I'll be trying to provide updates as often as I can and try to keep everything organized at the bottom of this post if your just looking for updates: Thanks all. Table of Contents
-
scartch build COMPLETED - titan - Scratch Micro-ATX Build
CroyAlore replied to CroyAlore's topic in Build Logs
Hello all, I have finally completed the project, here are the final photos: -
scartch build COMPLETED - titan - Scratch Micro-ATX Build
CroyAlore replied to CroyAlore's topic in Build Logs
Thanks iFreilicht, I wanted to try to make something unique for the case. I got a quick update, Here is some of the last components to go in the case that I just finished sleeving. Had to sleeve these cables and replace the red connector with a white one to match the case better. Internal USB Hub to help manage the aquaero components as well as the Hue+ Hub. -
scartch build COMPLETED - titan - Scratch Micro-ATX Build
CroyAlore replied to CroyAlore's topic in Build Logs
Hey all, I got some more photos of the Led's for now until I figure out a way to mount the SSD/HDD's Here they are (Caution for anyone sensitive to moving colors/lights): Gif of the LED's -
scartch build COMPLETED - titan - Scratch Micro-ATX Build
CroyAlore replied to CroyAlore's topic in Build Logs
Haha thanks Psittac -
scartch build COMPLETED - titan - Scratch Micro-ATX Build
CroyAlore replied to CroyAlore's topic in Build Logs
I got a small update for the GPU mount and sleeving. Here's the flowrate Wire, I got a couple more wires to do in the case, but I got to wait for more sleeving to come in: Heres the GPU Mount, I still got to clean and paint the part, I think I will vinyl wrap it to cover the holes: Here it is with a temporary cover: -
scartch build COMPLETED - titan - Scratch Micro-ATX Build
CroyAlore replied to CroyAlore's topic in Build Logs
Thanks! I actually prefer the softtube to the hardline, but I might try using hardline one time, it wouldn't take that much work as the majority of the build uses extension fittings and Barrow acyrlic tubes. Haha thanks! I actually talked about this in another thread: At the moment I have a temporary clamp in place, and I am working on a bar that will support the GPU, that's the next thing to do for the project. -
scartch build COMPLETED - titan - Scratch Micro-ATX Build
CroyAlore replied to CroyAlore's topic in Build Logs
Hello everyone I got a update with the sleeving. I was able to do the majority of the sleeving over the last week using MDPC's Shade 19. -
scartch build COMPLETED - titan - Scratch Micro-ATX Build
CroyAlore replied to CroyAlore's topic in Build Logs
Haha thank you for the kind words. It's actually not rainmeter but it looks like it. It's Aquasuite, it's the program that comes with the Aquaero 6. It monitors hardware and liquid temps, and you can use it to adjust fan speeds depending on water temperature. One of the features is that you can display charts on the desktop, it's a pretty cool software. -
scartch build COMPLETED - titan - Scratch Micro-ATX Build
CroyAlore replied to CroyAlore's topic in Build Logs
Thanks Its a Stop Sensor, it shows me the water temperature. Its useful for the Aquasuite, I got this on my background: That specific sensor is the Outtake Temp. -
This looks exciting, I can't wait to see the effect, good luck.
-
Haha, I think it'll be just fine, I tired something similar and it turned out well, how is the fan led's controlled? Is it through a program?
-
That's a lot of led's, are you setting everything to blue?