


Custom Life CZ
-
Posts
6 -
Joined
-
Last visited
Custom Life CZ's Achievements
")
-
The case is finished. Some successes and failures [imo]... Happy with: > Fabric sits as I imagined and really softens the over-all 'feel' of the piece. > Wood was easy to integrate with the existing computer parts. Basically, mechanical screws can be tapped right into the wood without using inserts. > Hinges work and look better than I had imagined. Could be better: > Fabric too see-thru. Maybe I'll stumble onto a tighter weaved nylon, but so far this one seems to be the standard around here. > Back panel seems cheap in comparison to everything else being hand-made. Maybe I should take the time to make a back panel from scratch. > Maybe some people would complain that the staples used for upholstery are visible when case is open. I really can't see them when it's closed, but I supposed I could cover the staples with a narrow ribbon glued over them... or just use super-glue instead of staples [yes it does work on nylon]. Any other comments, questions, or concerns?
-
Added pics 15-16. Ready for paint.
-
Updated with pics 11-14. Thanx for the comments and thumbs up!
-
Updated with pics 7-10.
-
Updated with pics 3-6.
- 10 replies
-
- 1
-

-
- scratch build
- wood
- (and 3 more)
-
 Custom Life CZ changed their profile photo
 -
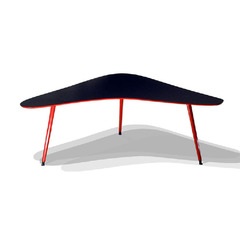
My idea is to make a computer case that's more congruent to furniture and interior design... rather than electrical boxes in an industrial setting. The first picture below is one of the many I used as inspiration [I will not copy this design]. 1. Below, what do you see? The armrest from broken Swedish chair? I see a computer case. 2. The layout. 3. Frame pieces all cut to size. 4. Gluing things that are not at right angles always takes some creativity. Here I had to add non-stretch ribbons to the clamps to pull the different angles together. 5. I tested a few different hinge types, and decided simplest was best. 6. Rear panel and mobo tray went in with no problems. 7. Front Panels: I used 1mm mild steel [because I had a bunch laying around]. The first one looked good on paper but after I made it, I didn't like the radius of the bends. Then I made one with a simpler 'C' cross-section, hated it. I wound up trashing at least 3 or 4. 8. Finally decided on this. Here I'm trying to get the 1mm gap lined up, and get the pilot holes drilled. 9. Front Panels done. This took way longer than any of the other operations because the tolerances had to be kept under 1/2mm [not fun]. 10. Rear panel framed in too. 11. With a temporary psu I started looking at what internal structure needed to be added. 12. Space for 3 x 120mm fans that will draw cool air from the bottom. The hot air will exhaust from the top because warm air naturally rises. 13. Changed my mind about the placement of the hard drives. Put in a crossbeam behind the mobo tray so the interior parts have something to attach to [it is parallel to the floor but the different angles might give the optical illusion that it's tilted]. 14. Created this triangular bracket because both the front and rear components are at an angle, and I wanted to tie them together solidly. 15. Power switch finished. Frame stripped down ready for paint. 16. Another view of power switch. 16. The case is Finished! It's covered with nylon fabric so... a) if you put 'awesome' components in it, you'd be able to see them from any angle; b) no heat is trapped inside; c) less dust gets in. 17. Front: the 'on' button is under the fabric but the ring around it glows when powered-up. Originally I wanted to hide the button when it's off, but the cloth turned out too see-thru for any hiding. 18. Right side panel can be removed with 4 screws. 19. Back view. 20. Bottom view. 21. Left panel swings open w/ just 2 screws, giving access to the entire interior. 22. Hard drive area fits either 1 SSD and 3 HDD... or 2 SSD and 2 HDD. 23. Detail of upholstery. In Its Environment: 24. If I wanted to use it as an entertainment computer, it could sit by the TV. [I know the 'holes' in the back are distracting, but they should all be filled w/ components, making the whole thing visually more solid.] 25. A slightly more 'sculptural' location. 26. I think it fits best here by the couch. Theoretically, I could use a wireless keyboard and the TV as a monitor.

- 10 replies
-
- 8
-
-

-
- scratch build
- wood
- (and 3 more)


