

p0Pe
-
Posts
270 -
Joined
-
Last visited
Content Type
Forums
Status Updates
Blogs
Events
Gallery
Downloads
Store Home
Everything posted by p0Pe
-
Evidently not. " This build proves as a "test build" in the prototype case to make sure that it has the thermal capacity, and space that is needed for an ultra high-end build." If I did not put 4 cards in there, I would not show exactly that.
-
I think you are missing the point of this build, and I cannot explain it much better than NoobCase did.
-
Jees man! Will come soon! The motherboard tray will ofcourse come with pre-drilled holes if that is what you mean. The motherboard mounting plate will come blank, but you can buy ones that fits your parts (such as the EK revo for example) Just wait until I start going at one of them with an angle grinder to fit the intel PCIe ssd Yes Exactly. It is not as much about getting the most performance for the buck, but about cramming as much high-end gear in as possible. Also to be able to pull as much heat as possible.
-
I will use black fittings for it for sure, but I have not yet decided on the fluid color. I can say as much that the main color theme will be blue/grey I sure hope so:D Glad to have you on board:D Thanks! I just hope everything works when I boot it up. I did not actually bother to test it all when the stock coolers was still on lol
-
Hello guys! Ever since finishing the R40 Engineering Station I have had an itch to start a new project, so I will cut straight to it. The case I will be building in this time is a prototype of the upcoming HEX GEAR R80, a full size ATX case with plenty of space for a LOT of hardware, as I will do my best to prove. This build proves as a "test build" in the prototype case to make sure that it has the thermal capacity, and space that is needed for an ultra high-end build. And what better way to do this than to cram all sorts of expensive, powerhungry and hot hardware into it! I will be keeping this build very clean, as it serves as a statement of what you can do with basic tools in this case (so not crazy water distributing plates, sorry!) I would also like to give a huge thanks to the sponsors that has provided parts for this project, and helped make it one of the most powerfull PC's possible to build. I would also like to thank the team from Official Nordster for the Rhino artwork in the banner. Lets get some specs on the table: Case: HEX GEAR R80 CPU: Intel i7 5960X Graphic cards: 4 x Nvidia Geforce GTX Titan X OS drive: Intel 750 ssd 1.2TB PCIe Secondary drive: KLEVV Urbane 480 gb ssd Motherboard: ASUS X99-E WS RAM: 64 GB KLEVV CRASS DDR4 ram PSU: Corsair AX1500i Fan controller: Aquaero 6 Watercooling: EK blocks, radiators, reservoir & pumps Fans: EK vardar Fittings: Bitspower Sleeving: E22 Tubing: E22 solid tubing Without much more writing, lets get started! A few renders of the case. The case follows many of the same ideas as the R40, but is just bigger so it can handle a full ATX system. The case also supports either a 360 + 480 mm radiator, or two 420 mm radiators (if you get some extra radiator mounting plates). For this build I will be using 60 mm thick 120 mm radiators as I believe it will be more than enough to cool the hardware used. The case is as mentioned a prototype of the upcoming R80 tower. Essentially a R40 but just with more space for stuff! Don't mind the grey paper still on the accent pack, it is as mentioned still a prototype. The case is build to be able to accommodate 8 PCI slots, and as you can see on this picture can easily handle 4 way SLI / crossfire. Some of the main hardware that will be used for this mod. A pretty hefty combo! However big the motherboard might be, it still looks small with all the cards put onto it. These cards are just INSANE! I plan on overclocking everything when it is done, to see how far I can push the system. This motherboard means business and have the specs to back it up. Really looking forward to getting this booted up! Lets try not to bend any of these before I get the CPU in place shall we? One of the first things I did was to drill a few holes in the motherboard mounting plate that comes with the case. This plate is made from 1.5 mm aluminium, so it is pretty easy to drill into and mount whatever you need on it. Always guide holes when prepping to drill. This way the drill will not run off and make a big fat scratch in your work part. Laser guided drill! And done! In this picture you can see the plate compared to a standard R40 mounting plate. More to come soon!
-
Rig name R40 Engineering stationCpu i7 5960xGpu Nvidia Titan x overclocked to 1400 on coreRam 32 gb corsair dominator platinumScore 13637
-

[Build Log] MODZERO FORTY - HEXGEAR R40 (Finished 3rd Dec)
p0Pe replied to MODZERO's topic in Build Logs
That looks crazy! I have never myself used di + silver coil. I have always used a clear premix (Either EK or Mayhems X1), and then added dye to that, and have never experienced anything like that with it. -
[Build Log] MODZERO FORTY - HEXGEAR R40 (Finished 3rd Dec)
p0Pe replied to MODZERO's topic in Build Logs
Native rad support = 360 + 480 mm (60 mm thick), with 140 mm panel kit you can mount two 420´s There are more pictures in the store page for them:D -
[Build Log] MODZERO FORTY - HEXGEAR R40 (Finished 3rd Dec)
p0Pe replied to MODZERO's topic in Build Logs
@MODZERO All accent packs are in stock:) @NoobCase - Psssst! http://www.hex-gear.com/2016/02/r80-full-tower-chassis/ -
I always use E22.biz But since you are in the US, there is also performance PC
-
Kickass build so far man! I will link it on our facebook page if you do not mind:D
-
Have you done any research yourself? You are not really giving away much info. You are basically asking for us to buy a cake for you, but do not state if you like strawberry or not.
-
[Build Log] MODZERO FORTY - HEXGEAR R40 (Finished 3rd Dec)
p0Pe replied to MODZERO's topic in Build Logs
Looks really good! I think the pictures are a bit dark, and a lot of detail are lost in the darkness. The neoprene tubing came out really good, as did the sleeving and general cabling! Good work man. -
When does the poll close?
-
Breathing new life into an AIO
p0Pe replied to You_are_a_cunt's topic in Custom Loop and Exotic Cooling
Exactly what to you think will "bust", and more interestingly, why? -
Breathing new life into an AIO
p0Pe replied to You_are_a_cunt's topic in Custom Loop and Exotic Cooling
So what happens to the 5% air? Am I correct if I read what you are writing as "if a AIO cooler is filled 100% with fluid, the fluid will expand enough to make it explode or leak"? Lastly, I think you are misunderstanding what I am writing. I am simply correcting the point you stated that "it can´t be done". Saying that it can be done does not equal advising to do it. -
Breathing new life into an AIO
p0Pe replied to You_are_a_cunt's topic in Custom Loop and Exotic Cooling
Where there is will, there is a way. -
I am using solidworks right now. I have a bachelor degree in engineering where we where tought the basics of Autodesk Inventor, but much of the stuff I know about 3D programs comes from working a lot with them, so yes, basicly self tought. A lot of people I went to school with only took the classes and cant draw anything other than basic squares now. Practice makes perfect. If you just want to learn to model, there is a vast amount of tutoriails available on youtube, for all sorts of programs.
-
Patience is key:D To be honest, if you want to do stuff like this it is actually relatively simple once you get the hang of it. It just takes a lot of time. Thanks man!
-
Sorry for the late answer. To be honest you are better off making some completely from scratch. Trying to work along on another design is always a pain to do, and often gives a worse result than simply just starting from scratch.
-
It has never failed me, and are also the way most companies leak test things.
-
Featured Build Logs Competition #004 - Submission Thread
p0Pe replied to Whaler_99's topic in Build Logs
Are we OK to have multiple entries? -
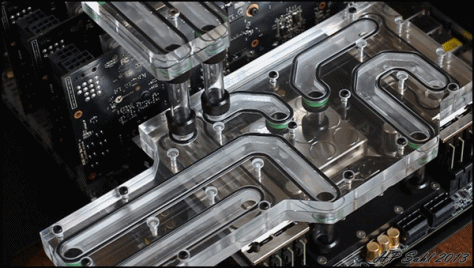
The rear distro block holds 450 ml in itself. The entire system takes 1.5L to fill:D Haha thanks man! 1.5L in total:) The fitting assembly is mostly there to ease draining of the loop, but it is also handy when doing leak testing. I am not really fond of the "normal" way of leak testing where you fill up your loop, and hope for the best. I think that it is only in the watercooling hobby you will find people that are willing to bet their hardware that they did not mess up. I use this valve to pump air into the loop, and then close the valve. I then let that sit for 48 hours, and check if the internal pressure in the loop is still the same. If the pressure is still the same, then the loop is tight, and I can fill it up with fluid without worrying. I feel relatively safe with my building skills when it comes to waterloops, but when you are busy, you sometime miss a fitting or something, and pumping air in the loop before water catches these little stupid mistakes that are bound to happen once or twice. When filling water in the loop, it is also handy as I can have an "air outlet" and get more water in the loop before I have to turn on the pump as you can see in the video. No chance that will work! Yeah, as stated by MourningSouls below, you will not really see a difference. And it gets a little airflow, and is currently 31 degrees hot, so I am not really worried about it overheating. Massive cooling of harddrives and RAM is some of the most overrated things you will see as a PC enthusiast. It looks good, but serves little purpose. Thanks man! This^ And to all of you who plan on breaking in, this is what you will have to get past:
-
Featured Build Logs Competition #004 - Submission Thread
p0Pe replied to Whaler_99's topic in Build Logs
Forum ID: p0Pe Build Title: HEX GEAR R40 - Engineering Statioon Thread URL: http://linustechtips.com/main/topic/415314-hex-gear-r40-engineering-station/page-5 Description: I needed a new workstation for myself, so I started a build with the idea of making a simple workstation that just had to get the job done. As most of my other mods, things quickly spiraled out of controll, and this ended up being one of the most complicated builds I have done to date, with a completely custom rear distributing watercooling plate, and a custom lasercut/engraved cable routing plate. -
Haha, you have to get past the guard dog first, and she is a fiesty little bastard! I made a video! And I hope you will enjoy it:D
