


MkZ
-
Posts
48 -
Joined
-
Last visited
Reputation Activity
-


-
 MkZ got a reaction from Monty007 in Project White Camel or (َوَضْحه in Arabic)
Well, Let's start with the specs
Intel Core i7-5820K Haswell-E 6-Core ASUS ATX DDR4 Motherboard X99-DELUXE G.SKILL Ripjaws 4 series 16GB (4 x 4GB) 288-Pin DDR4 SDRAM 2400 (PC4-19200) Desktop Memory 2x Samsung Electronics 850 Pro-Series 2.5" 256GB in RAID 0 2x Nvidia Geforce GTX 980 in SLI Seagate Desktop 3 TB HDD SATA 6 Gb/s NCQ 64MB Cache 7200 RPM EVGA SuperNOVA 1000w P2 80PLUS Platinum Certified I got all from amazon using linus link expect the 980s I only found them at newegg
This build is for my brother Omar
I'm going to leave this GIF here
I started off by looking at the case and fitting the power supply to decide should i paint it or not...
That Super-Nova paint finish is soo nice it would be a shame to paint over it, So I decided to leave it.
Take a look at those Hard-Drive cages they look soo bad and they are blocking all the air flow from the video cards, they have to go.
Humm..
I will only use the base, its enough for me, but how am I going to fix the hard drive to it though...?
Ok lets get my old dummy and my trusty ruler.
drilling some holes
Now its time to find some screws those won't do
Good thing I keep all my extra screws
the dummy fits perfect
Ok its time to do the RAM's
remember to store your RAMs in an Anti static bag
time to prepare the HDD for painting (oh yeah I'm painting this bad boy)
First phase of painting
second phase
(painting took around 48 hours ...sigh)
lets strip this case and get it ready
okay lets get the GTXs ready
removing the LEDs and started sanding them off
lets check back on my painting again
installing the motherboard into the case, just for thinking how i'm going to do the wiring.
started wiring and mounting the cooler.
almost done doing a POST test....aaannnd
all good B)
my gtxs LEDs rubbers materials are different, the first one just took a little sanding and it gave a good white glow, the second one though I almost sanded it to the bottom and its still kinda greenish...sigh
anyway...
Here is what you have been waiting for... some large DSLR shots
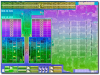
overclocking results
CPU 24/7 overclock
GPU 24/7 overclock
results
-
.thumb.gif.ad36bec38a1dbf5dfb79fb9feda55ee5.gif) MkZ got a reaction from QueenDemetria in Project White Camel or (َوَضْحه in Arabic)
MkZ got a reaction from QueenDemetria in Project White Camel or (َوَضْحه in Arabic)
Well, Let's start with the specs
Intel Core i7-5820K Haswell-E 6-Core ASUS ATX DDR4 Motherboard X99-DELUXE G.SKILL Ripjaws 4 series 16GB (4 x 4GB) 288-Pin DDR4 SDRAM 2400 (PC4-19200) Desktop Memory 2x Samsung Electronics 850 Pro-Series 2.5" 256GB in RAID 0 2x Nvidia Geforce GTX 980 in SLI Seagate Desktop 3 TB HDD SATA 6 Gb/s NCQ 64MB Cache 7200 RPM EVGA SuperNOVA 1000w P2 80PLUS Platinum Certified I got all from amazon using linus link expect the 980s I only found them at newegg
This build is for my brother Omar
I'm going to leave this GIF here
I started off by looking at the case and fitting the power supply to decide should i paint it or not...
That Super-Nova paint finish is soo nice it would be a shame to paint over it, So I decided to leave it.
Take a look at those Hard-Drive cages they look soo bad and they are blocking all the air flow from the video cards, they have to go.
Humm..
I will only use the base, its enough for me, but how am I going to fix the hard drive to it though...?
Ok lets get my old dummy and my trusty ruler.
drilling some holes
Now its time to find some screws those won't do
Good thing I keep all my extra screws
the dummy fits perfect
Ok its time to do the RAM's
remember to store your RAMs in an Anti static bag
time to prepare the HDD for painting (oh yeah I'm painting this bad boy)
First phase of painting
second phase
(painting took around 48 hours ...sigh)
lets strip this case and get it ready
okay lets get the GTXs ready
removing the LEDs and started sanding them off
lets check back on my painting again
installing the motherboard into the case, just for thinking how i'm going to do the wiring.
started wiring and mounting the cooler.
almost done doing a POST test....aaannnd
all good B)
my gtxs LEDs rubbers materials are different, the first one just took a little sanding and it gave a good white glow, the second one though I almost sanded it to the bottom and its still kinda greenish...sigh
anyway...
Here is what you have been waiting for... some large DSLR shots
overclocking results
CPU 24/7 overclock
GPU 24/7 overclock
results
-
 MkZ got a reaction from Sharif in Project White Camel or (َوَضْحه in Arabic)
Well, Let's start with the specs
Intel Core i7-5820K Haswell-E 6-Core ASUS ATX DDR4 Motherboard X99-DELUXE G.SKILL Ripjaws 4 series 16GB (4 x 4GB) 288-Pin DDR4 SDRAM 2400 (PC4-19200) Desktop Memory 2x Samsung Electronics 850 Pro-Series 2.5" 256GB in RAID 0 2x Nvidia Geforce GTX 980 in SLI Seagate Desktop 3 TB HDD SATA 6 Gb/s NCQ 64MB Cache 7200 RPM EVGA SuperNOVA 1000w P2 80PLUS Platinum Certified I got all from amazon using linus link expect the 980s I only found them at newegg
This build is for my brother Omar
I'm going to leave this GIF here
I started off by looking at the case and fitting the power supply to decide should i paint it or not...
That Super-Nova paint finish is soo nice it would be a shame to paint over it, So I decided to leave it.
Take a look at those Hard-Drive cages they look soo bad and they are blocking all the air flow from the video cards, they have to go.
Humm..
I will only use the base, its enough for me, but how am I going to fix the hard drive to it though...?
Ok lets get my old dummy and my trusty ruler.
drilling some holes
Now its time to find some screws those won't do
Good thing I keep all my extra screws
the dummy fits perfect
Ok its time to do the RAM's
remember to store your RAMs in an Anti static bag
time to prepare the HDD for painting (oh yeah I'm painting this bad boy)
First phase of painting
second phase
(painting took around 48 hours ...sigh)
lets strip this case and get it ready
okay lets get the GTXs ready
removing the LEDs and started sanding them off
lets check back on my painting again
installing the motherboard into the case, just for thinking how i'm going to do the wiring.
started wiring and mounting the cooler.
almost done doing a POST test....aaannnd
all good B)
my gtxs LEDs rubbers materials are different, the first one just took a little sanding and it gave a good white glow, the second one though I almost sanded it to the bottom and its still kinda greenish...sigh
anyway...
Here is what you have been waiting for... some large DSLR shots
overclocking results
CPU 24/7 overclock
GPU 24/7 overclock
results
-
 MkZ got a reaction from Rheinwasser in Project White Camel or (َوَضْحه in Arabic)
Well, Let's start with the specs
Intel Core i7-5820K Haswell-E 6-Core ASUS ATX DDR4 Motherboard X99-DELUXE G.SKILL Ripjaws 4 series 16GB (4 x 4GB) 288-Pin DDR4 SDRAM 2400 (PC4-19200) Desktop Memory 2x Samsung Electronics 850 Pro-Series 2.5" 256GB in RAID 0 2x Nvidia Geforce GTX 980 in SLI Seagate Desktop 3 TB HDD SATA 6 Gb/s NCQ 64MB Cache 7200 RPM EVGA SuperNOVA 1000w P2 80PLUS Platinum Certified I got all from amazon using linus link expect the 980s I only found them at newegg
This build is for my brother Omar
I'm going to leave this GIF here
I started off by looking at the case and fitting the power supply to decide should i paint it or not...
That Super-Nova paint finish is soo nice it would be a shame to paint over it, So I decided to leave it.
Take a look at those Hard-Drive cages they look soo bad and they are blocking all the air flow from the video cards, they have to go.
Humm..
I will only use the base, its enough for me, but how am I going to fix the hard drive to it though...?
Ok lets get my old dummy and my trusty ruler.
drilling some holes
Now its time to find some screws those won't do
Good thing I keep all my extra screws
the dummy fits perfect
Ok its time to do the RAM's
remember to store your RAMs in an Anti static bag
time to prepare the HDD for painting (oh yeah I'm painting this bad boy)
First phase of painting
second phase
(painting took around 48 hours ...sigh)
lets strip this case and get it ready
okay lets get the GTXs ready
removing the LEDs and started sanding them off
lets check back on my painting again
installing the motherboard into the case, just for thinking how i'm going to do the wiring.
started wiring and mounting the cooler.
almost done doing a POST test....aaannnd
all good B)
my gtxs LEDs rubbers materials are different, the first one just took a little sanding and it gave a good white glow, the second one though I almost sanded it to the bottom and its still kinda greenish...sigh
anyway...
Here is what you have been waiting for... some large DSLR shots
overclocking results
CPU 24/7 overclock
GPU 24/7 overclock
results
-
 MkZ got a reaction from marty14 in Project White Camel or (َوَضْحه in Arabic)
Well, Let's start with the specs
Intel Core i7-5820K Haswell-E 6-Core ASUS ATX DDR4 Motherboard X99-DELUXE G.SKILL Ripjaws 4 series 16GB (4 x 4GB) 288-Pin DDR4 SDRAM 2400 (PC4-19200) Desktop Memory 2x Samsung Electronics 850 Pro-Series 2.5" 256GB in RAID 0 2x Nvidia Geforce GTX 980 in SLI Seagate Desktop 3 TB HDD SATA 6 Gb/s NCQ 64MB Cache 7200 RPM EVGA SuperNOVA 1000w P2 80PLUS Platinum Certified I got all from amazon using linus link expect the 980s I only found them at newegg
This build is for my brother Omar
I'm going to leave this GIF here
I started off by looking at the case and fitting the power supply to decide should i paint it or not...
That Super-Nova paint finish is soo nice it would be a shame to paint over it, So I decided to leave it.
Take a look at those Hard-Drive cages they look soo bad and they are blocking all the air flow from the video cards, they have to go.
Humm..
I will only use the base, its enough for me, but how am I going to fix the hard drive to it though...?
Ok lets get my old dummy and my trusty ruler.
drilling some holes
Now its time to find some screws those won't do
Good thing I keep all my extra screws
the dummy fits perfect
Ok its time to do the RAM's
remember to store your RAMs in an Anti static bag
time to prepare the HDD for painting (oh yeah I'm painting this bad boy)
First phase of painting
second phase
(painting took around 48 hours ...sigh)
lets strip this case and get it ready
okay lets get the GTXs ready
removing the LEDs and started sanding them off
lets check back on my painting again
installing the motherboard into the case, just for thinking how i'm going to do the wiring.
started wiring and mounting the cooler.
almost done doing a POST test....aaannnd
all good B)
my gtxs LEDs rubbers materials are different, the first one just took a little sanding and it gave a good white glow, the second one though I almost sanded it to the bottom and its still kinda greenish...sigh
anyway...
Here is what you have been waiting for... some large DSLR shots
overclocking results
CPU 24/7 overclock
GPU 24/7 overclock
results
-
 MkZ got a reaction from connorpiper in Featured Build Logs Competition #001 - Submission Thread [CLOSED]
Forum ID: Mkz
Build Title: Project White Camel or (َوَضْحه in Arabic)
Thread URL: http://linustechtips.com/main/topic/234721-project-white-camel-or-%D9%8E%D9%88%D9%8E%D8%B6%D9%92%D8%AD%D9%87-in-arabic/
Description: This a build I made for my brother, I hope you like how it looks
-
 MkZ got a reaction from Shalashaska in Project White Camel or (َوَضْحه in Arabic)
Thanks, me two
Thanks man.
lool, Thanks man.
Thanks. and don't be scared its super easy to do.
thanks, but I like the 780t its a dream to work with.
soon my friend soon.
Thanks alot man.
Thank you, Camel because its big and powerful, if it was a Micro-ATX build it might be a horse
Thanks.
haha, thank you
-
 MkZ got a reaction from TheSLSAMG in Project White Camel or (َوَضْحه in Arabic)
Thanks, me two
Thanks man.
lool, Thanks man.
Thanks. and don't be scared its super easy to do.
thanks, but I like the 780t its a dream to work with.
soon my friend soon.
Thanks alot man.
Thank you, Camel because its big and powerful, if it was a Micro-ATX build it might be a horse
Thanks.
haha, thank you
-
 MkZ got a reaction from MangoJuiceStain in Project White Camel or (َوَضْحه in Arabic)
Thanks, me two
Thanks man.
lool, Thanks man.
Thanks. and don't be scared its super easy to do.
thanks, but I like the 780t its a dream to work with.
soon my friend soon.
Thanks alot man.
Thank you, Camel because its big and powerful, if it was a Micro-ATX build it might be a horse
Thanks.
haha, thank you
-
 MkZ got a reaction from Prokart2000 in Project White Camel or (َوَضْحه in Arabic)
Well, Let's start with the specs
Intel Core i7-5820K Haswell-E 6-Core ASUS ATX DDR4 Motherboard X99-DELUXE G.SKILL Ripjaws 4 series 16GB (4 x 4GB) 288-Pin DDR4 SDRAM 2400 (PC4-19200) Desktop Memory 2x Samsung Electronics 850 Pro-Series 2.5" 256GB in RAID 0 2x Nvidia Geforce GTX 980 in SLI Seagate Desktop 3 TB HDD SATA 6 Gb/s NCQ 64MB Cache 7200 RPM EVGA SuperNOVA 1000w P2 80PLUS Platinum Certified I got all from amazon using linus link expect the 980s I only found them at newegg
This build is for my brother Omar
I'm going to leave this GIF here
I started off by looking at the case and fitting the power supply to decide should i paint it or not...
That Super-Nova paint finish is soo nice it would be a shame to paint over it, So I decided to leave it.
Take a look at those Hard-Drive cages they look soo bad and they are blocking all the air flow from the video cards, they have to go.
Humm..
I will only use the base, its enough for me, but how am I going to fix the hard drive to it though...?
Ok lets get my old dummy and my trusty ruler.
drilling some holes
Now its time to find some screws those won't do
Good thing I keep all my extra screws
the dummy fits perfect
Ok its time to do the RAM's
remember to store your RAMs in an Anti static bag
time to prepare the HDD for painting (oh yeah I'm painting this bad boy)
First phase of painting
second phase
(painting took around 48 hours ...sigh)
lets strip this case and get it ready
okay lets get the GTXs ready
removing the LEDs and started sanding them off
lets check back on my painting again
installing the motherboard into the case, just for thinking how i'm going to do the wiring.
started wiring and mounting the cooler.
almost done doing a POST test....aaannnd
all good B)
my gtxs LEDs rubbers materials are different, the first one just took a little sanding and it gave a good white glow, the second one though I almost sanded it to the bottom and its still kinda greenish...sigh
anyway...
Here is what you have been waiting for... some large DSLR shots
overclocking results
CPU 24/7 overclock
GPU 24/7 overclock
results
-
 MkZ got a reaction from mikeeginger in Project White Camel or (َوَضْحه in Arabic)
Well, Let's start with the specs
Intel Core i7-5820K Haswell-E 6-Core ASUS ATX DDR4 Motherboard X99-DELUXE G.SKILL Ripjaws 4 series 16GB (4 x 4GB) 288-Pin DDR4 SDRAM 2400 (PC4-19200) Desktop Memory 2x Samsung Electronics 850 Pro-Series 2.5" 256GB in RAID 0 2x Nvidia Geforce GTX 980 in SLI Seagate Desktop 3 TB HDD SATA 6 Gb/s NCQ 64MB Cache 7200 RPM EVGA SuperNOVA 1000w P2 80PLUS Platinum Certified I got all from amazon using linus link expect the 980s I only found them at newegg
This build is for my brother Omar
I'm going to leave this GIF here
I started off by looking at the case and fitting the power supply to decide should i paint it or not...
That Super-Nova paint finish is soo nice it would be a shame to paint over it, So I decided to leave it.
Take a look at those Hard-Drive cages they look soo bad and they are blocking all the air flow from the video cards, they have to go.
Humm..
I will only use the base, its enough for me, but how am I going to fix the hard drive to it though...?
Ok lets get my old dummy and my trusty ruler.
drilling some holes
Now its time to find some screws those won't do
Good thing I keep all my extra screws
the dummy fits perfect
Ok its time to do the RAM's
remember to store your RAMs in an Anti static bag
time to prepare the HDD for painting (oh yeah I'm painting this bad boy)
First phase of painting
second phase
(painting took around 48 hours ...sigh)
lets strip this case and get it ready
okay lets get the GTXs ready
removing the LEDs and started sanding them off
lets check back on my painting again
installing the motherboard into the case, just for thinking how i'm going to do the wiring.
started wiring and mounting the cooler.
almost done doing a POST test....aaannnd
all good B)
my gtxs LEDs rubbers materials are different, the first one just took a little sanding and it gave a good white glow, the second one though I almost sanded it to the bottom and its still kinda greenish...sigh
anyway...
Here is what you have been waiting for... some large DSLR shots
overclocking results
CPU 24/7 overclock
GPU 24/7 overclock
results
-
 MkZ got a reaction from CrustyTissue in Project White Camel or (َوَضْحه in Arabic)
Well, Let's start with the specs
Intel Core i7-5820K Haswell-E 6-Core ASUS ATX DDR4 Motherboard X99-DELUXE G.SKILL Ripjaws 4 series 16GB (4 x 4GB) 288-Pin DDR4 SDRAM 2400 (PC4-19200) Desktop Memory 2x Samsung Electronics 850 Pro-Series 2.5" 256GB in RAID 0 2x Nvidia Geforce GTX 980 in SLI Seagate Desktop 3 TB HDD SATA 6 Gb/s NCQ 64MB Cache 7200 RPM EVGA SuperNOVA 1000w P2 80PLUS Platinum Certified I got all from amazon using linus link expect the 980s I only found them at newegg
This build is for my brother Omar
I'm going to leave this GIF here
I started off by looking at the case and fitting the power supply to decide should i paint it or not...
That Super-Nova paint finish is soo nice it would be a shame to paint over it, So I decided to leave it.
Take a look at those Hard-Drive cages they look soo bad and they are blocking all the air flow from the video cards, they have to go.
Humm..
I will only use the base, its enough for me, but how am I going to fix the hard drive to it though...?
Ok lets get my old dummy and my trusty ruler.
drilling some holes
Now its time to find some screws those won't do
Good thing I keep all my extra screws
the dummy fits perfect
Ok its time to do the RAM's
remember to store your RAMs in an Anti static bag
time to prepare the HDD for painting (oh yeah I'm painting this bad boy)
First phase of painting
second phase
(painting took around 48 hours ...sigh)
lets strip this case and get it ready
okay lets get the GTXs ready
removing the LEDs and started sanding them off
lets check back on my painting again
installing the motherboard into the case, just for thinking how i'm going to do the wiring.
started wiring and mounting the cooler.
almost done doing a POST test....aaannnd
all good B)
my gtxs LEDs rubbers materials are different, the first one just took a little sanding and it gave a good white glow, the second one though I almost sanded it to the bottom and its still kinda greenish...sigh
anyway...
Here is what you have been waiting for... some large DSLR shots
overclocking results
CPU 24/7 overclock
GPU 24/7 overclock
results
-
 MkZ got a reaction from nixproducer in Project White Camel or (َوَضْحه in Arabic)
Well, Let's start with the specs
Intel Core i7-5820K Haswell-E 6-Core ASUS ATX DDR4 Motherboard X99-DELUXE G.SKILL Ripjaws 4 series 16GB (4 x 4GB) 288-Pin DDR4 SDRAM 2400 (PC4-19200) Desktop Memory 2x Samsung Electronics 850 Pro-Series 2.5" 256GB in RAID 0 2x Nvidia Geforce GTX 980 in SLI Seagate Desktop 3 TB HDD SATA 6 Gb/s NCQ 64MB Cache 7200 RPM EVGA SuperNOVA 1000w P2 80PLUS Platinum Certified I got all from amazon using linus link expect the 980s I only found them at newegg
This build is for my brother Omar
I'm going to leave this GIF here
I started off by looking at the case and fitting the power supply to decide should i paint it or not...
That Super-Nova paint finish is soo nice it would be a shame to paint over it, So I decided to leave it.
Take a look at those Hard-Drive cages they look soo bad and they are blocking all the air flow from the video cards, they have to go.
Humm..
I will only use the base, its enough for me, but how am I going to fix the hard drive to it though...?
Ok lets get my old dummy and my trusty ruler.
drilling some holes
Now its time to find some screws those won't do
Good thing I keep all my extra screws
the dummy fits perfect
Ok its time to do the RAM's
remember to store your RAMs in an Anti static bag
time to prepare the HDD for painting (oh yeah I'm painting this bad boy)
First phase of painting
second phase
(painting took around 48 hours ...sigh)
lets strip this case and get it ready
okay lets get the GTXs ready
removing the LEDs and started sanding them off
lets check back on my painting again
installing the motherboard into the case, just for thinking how i'm going to do the wiring.
started wiring and mounting the cooler.
almost done doing a POST test....aaannnd
all good B)
my gtxs LEDs rubbers materials are different, the first one just took a little sanding and it gave a good white glow, the second one though I almost sanded it to the bottom and its still kinda greenish...sigh
anyway...
Here is what you have been waiting for... some large DSLR shots
overclocking results
CPU 24/7 overclock
GPU 24/7 overclock
results
-
MkZ got a reaction from TheSLSAMG in Project White Camel or (َوَضْحه in Arabic)
Well, Let's start with the specs
Intel Core i7-5820K Haswell-E 6-Core ASUS ATX DDR4 Motherboard X99-DELUXE G.SKILL Ripjaws 4 series 16GB (4 x 4GB) 288-Pin DDR4 SDRAM 2400 (PC4-19200) Desktop Memory 2x Samsung Electronics 850 Pro-Series 2.5" 256GB in RAID 0 2x Nvidia Geforce GTX 980 in SLI Seagate Desktop 3 TB HDD SATA 6 Gb/s NCQ 64MB Cache 7200 RPM EVGA SuperNOVA 1000w P2 80PLUS Platinum Certified I got all from amazon using linus link expect the 980s I only found them at newegg
This build is for my brother Omar
I'm going to leave this GIF here
I started off by looking at the case and fitting the power supply to decide should i paint it or not...
That Super-Nova paint finish is soo nice it would be a shame to paint over it, So I decided to leave it.
Take a look at those Hard-Drive cages they look soo bad and they are blocking all the air flow from the video cards, they have to go.
Humm..
I will only use the base, its enough for me, but how am I going to fix the hard drive to it though...?
Ok lets get my old dummy and my trusty ruler.
drilling some holes
Now its time to find some screws those won't do
Good thing I keep all my extra screws
the dummy fits perfect
Ok its time to do the RAM's
remember to store your RAMs in an Anti static bag
time to prepare the HDD for painting (oh yeah I'm painting this bad boy)
First phase of painting
second phase
(painting took around 48 hours ...sigh)
lets strip this case and get it ready
okay lets get the GTXs ready
removing the LEDs and started sanding them off
lets check back on my painting again
installing the motherboard into the case, just for thinking how i'm going to do the wiring.
started wiring and mounting the cooler.
almost done doing a POST test....aaannnd
all good B)
my gtxs LEDs rubbers materials are different, the first one just took a little sanding and it gave a good white glow, the second one though I almost sanded it to the bottom and its still kinda greenish...sigh
anyway...
Here is what you have been waiting for... some large DSLR shots
overclocking results
CPU 24/7 overclock
GPU 24/7 overclock
results
-
MkZ got a reaction from Shalashaska in Project White Camel or (َوَضْحه in Arabic)
Well, Let's start with the specs
Intel Core i7-5820K Haswell-E 6-Core ASUS ATX DDR4 Motherboard X99-DELUXE G.SKILL Ripjaws 4 series 16GB (4 x 4GB) 288-Pin DDR4 SDRAM 2400 (PC4-19200) Desktop Memory 2x Samsung Electronics 850 Pro-Series 2.5" 256GB in RAID 0 2x Nvidia Geforce GTX 980 in SLI Seagate Desktop 3 TB HDD SATA 6 Gb/s NCQ 64MB Cache 7200 RPM EVGA SuperNOVA 1000w P2 80PLUS Platinum Certified I got all from amazon using linus link expect the 980s I only found them at newegg
This build is for my brother Omar
I'm going to leave this GIF here
I started off by looking at the case and fitting the power supply to decide should i paint it or not...
That Super-Nova paint finish is soo nice it would be a shame to paint over it, So I decided to leave it.
Take a look at those Hard-Drive cages they look soo bad and they are blocking all the air flow from the video cards, they have to go.
Humm..
I will only use the base, its enough for me, but how am I going to fix the hard drive to it though...?
Ok lets get my old dummy and my trusty ruler.
drilling some holes
Now its time to find some screws those won't do
Good thing I keep all my extra screws
the dummy fits perfect
Ok its time to do the RAM's
remember to store your RAMs in an Anti static bag
time to prepare the HDD for painting (oh yeah I'm painting this bad boy)
First phase of painting
second phase
(painting took around 48 hours ...sigh)
lets strip this case and get it ready
okay lets get the GTXs ready
removing the LEDs and started sanding them off
lets check back on my painting again
installing the motherboard into the case, just for thinking how i'm going to do the wiring.
started wiring and mounting the cooler.
almost done doing a POST test....aaannnd
all good B)
my gtxs LEDs rubbers materials are different, the first one just took a little sanding and it gave a good white glow, the second one though I almost sanded it to the bottom and its still kinda greenish...sigh
anyway...
Here is what you have been waiting for... some large DSLR shots
overclocking results
CPU 24/7 overclock
GPU 24/7 overclock
results
-

-
 MkZ got a reaction from SaleemVFX in Zotac OI520 Plus
This is something I would put under my TV and stream Videos and Games from. I like it
-
 MkZ got a reaction from NohbdyKnows in Samsung Galaxy Note 3 Video review (Arabic)
that part is removed now

.thumb.gif.ad36bec38a1dbf5dfb79fb9feda55ee5.gif)


