Apparently Speedtest.net now actually saves the result on speedtests that go beyond several gbps in speed. And I've found a speedtest server that can handle more than 10Gbps (AT&T in Seattle). All the other servers in the region are capped right below 10Gbps at best. So here's a result with a download speed of 17.8Gbps and 4.8Gbps for upload.
https://www.speedtest.net/result/c/7a2916bd-73ef-4ac7-ab1d-7726c72fb1c0
I often find that the documentation on this subject either leaves a bit to be desired, doesn't emphasize some really important aspects, or is just downright hard to follow at times.
Because of this, I wrote my own tutorial that primarily sources personal experience on the topic in an effort to drastically improve the available documentation on the subject (in a sort-of verbose nature).
One of the goals of the tutorial is to show the reader examples and explain why things are being done so that the reader comes away from the tutorial with a better understanding of how PCI-e passthrough works overall.
Feedback is highly encouraged! Submit an issue or pull request if you think the tutorial needs further improvement. I'm also open to suggestions of any kind.
Well if you don’t mind losing your data and setting it back to “like new” condition then go for it as it can’t hurt. But I’d still do a backup to be on the safe side just in case you did want to do a restore. The other option would be to get in contact with support to see if they can help you. Never know it could be a common feature / bug.
Hardware: Server: HP Proliant DL380G7 (FreeNAS running Plex Media Server and SMB shares)
PSU: 2x 460W redundant (balancing mode)
CPU: 2x Xeon X5660 (12 cores, 24 threads total)
RAM: 96 GB 1333Mhz (12x8GB)
Network: 4x1Gb onboard
Boot Disk: 2x 8GB Sata SSD (RAID1) running FreeNAS
Plex jail: 192GB (3x64GB HP SSD RAIDz)
The following hard disks are in 4x Dell MD1000 shelfs, connected to LSI HBA via SAS 6Gb/s 4x
HDD 1: 60TB (15x4TB 7200rpm SAS RAIDz)
HDD 2: 12TB (12x1TB 7200rpm SATA RAIDz)
HDD 3: 8TB (4x2TB 7200rpm SATA RAIDz)
HDD 4: 5.25TB (7x750GB 7200rpm SATA RAIDz)
HDD 5: 2.4TB (8x300GB 15000rpm SAS)
Hardware: Server: HP Proliant DL580G5 (Just a downloading whore, I RDP into her a lot)
PSU: 4x 1200W redundant (balancing mode)
CPU: 4x Xeon 7330 (16 cores total)
RAM: 32GB 533Mhz (32x1GB lol)
Network: 2x1Gb onboard
Boot Disk: 2x 250GB 860 EVO (RAID0) running Windows Server 2019
HDD 1: 2TB (14x146GB 2.5" 15000 rpm SAS
Current plans are: buying another 45 4TB disks to put in the MD1000 shelfs. Sell the other disks.
I also have two HP shelfs that are empty right now that I want to put in the rack as well. That means I need to move the ethernet switch and the KVM switch to the back of the rack. Upgrade the Windows machine to 32x4GB=128GB RAM to increase the PrimoCache size, so I don't have to write to the SSD's as much. Re-do the wiring on the backside, installing a HP PDU, etc.
If you have a 2560x1080p 21:9 ultrawide the BEST configuration and trust me on this one, I played Counter-Strike since 1.4, is go for 16:10 1680x1050p stretched
If you have a nVidia card just set your preference for stretching (full screen) here, click the overide for games and set cs:go resolution to 1680x1050p:
This is not an inherently bad plan. It's a good foundation.
This is how I personally run my home server - I use ESXi as the base OS (Type 1 Hypervisor), and then I have 1x FreeNAS VM for my storage server, and 3x Windows VM's for various other tasks.
Basically you want to choose either:
1. A Type 1 Hypervisor (Which is an OS that runs directly on your hardware and is designed around allowing VM management as the primary function of the OS)
2. A Storage Server OS that also doubles as a Hypervisor (Examples: unRAID, FreeNAS, Proxmox, Windows, etc)
Note: some OS's will fall into both categories.
Personally I would NOT do this. Mixing Hardware RAID w/ Software RAID on top of it, is just asking for trouble. You should pick one or the other and stick with it. You'd be better off either having one single RAID Card large enough to access all drives, or a RAID Card + a SAS Expander, enabling the single (smaller) RAID Card to assign all drives into the pool you want.
When you say "unraided", please explain. How do you imagine the drive setup on the FreeNAS server? There's nothing wrong with FreeNAS - it's a great File Server OS, and even has some VM capabilities (though not as robust as, say, ESXi).
With that in mind, the primary benefit of FreeNAS is ZFS "raid-like" arrays. If you're not utilizing ZFS arrays, then I wouldn't bother with FreeNAS.
But I also question why you would specifically want the backup server unraided? Of course, if all your backup needs fit onto a single large HDD, that's great. But I would be skeptical (Unless you're simply not backing up all your data, on purpose).
Anyway, if you're just backing up to a single HDD, and everything can fit? FreeNAS would be fine, but also overkill. A basic Linux or Windows install would also fill this gap easily.
You certainly can use Windows as the Storage Server - nothing wrong with that. Many here use FreeNAS for that purpose, but FreeNAS has some recommended requirements.
FreeNAS needs direct access to the physical HDD's to work best. So if you're using a Hardware RAID Card, the virtual drive that is presented to FreeNAS does not allow that low level access it wants. Not to mention that VM software creates another level on top of that, for the OS to interpret.
So to get around that, FreeNAS VM setups use something called "PCI Passthrough", which allows the VM OS (ESXi, for example) to "pass" a piece of hardware directly to the VM. This fools the VM into thinking it's connected to that hardware as if it was a bare metal non-VM install.
The problem with PCI Passthrough is that it requires hardware support (CPU + motherboard) - for Intel, this is "VT-d", and AMD has "AMD-Vi". So check your CPU specs (Basically any Xeon will support VT-d, for example), if you intend on using this.
However, this is only stage one of getting FreeNAS to work as a VM. The other thing you need to do is remove the Hardware RAID Card from the build, and replace it with a Hardware HBA Card (Host Bus Adapter), which looks identical to a RAID Card, but without the battery or RAM. Alternatively, you can flash a Hardware RAID Card into "IT" mode ("IT" - Initiator Target, which basically just shuts off the RAID functionality internally and passes the drives over directly).
There are numerous guides on how to flash some of the popular RAID cards into IT mode.
So VT-d + HBA Card, will allow you to use FreeNAS properly in a VM, as your storage server.
But that's pretty complicated, and requires some specific planning.
Alternatives to ESXi + FreeNAS VM:
1. Proxmox - Proxmox is a Hypervisor OS based on Linux KVM. The Benefit of Proxmox is that it supports ZFS and creating Software RAID arrays, along with sharing network drives. Proxmox can work as your File Server and your Hypervisor. Note: You'd still want an HBA unless the motherboard has enough SATA Ports (or a RAID Card in IT mode), but you wouldn't need Hardware PCI Passthrough support, or anything.
2. unRAID - the biggest downside to unRAID is that it costs money, when other solutions don't. It has software RAID support, File Server/network sharing, and VM support. It's similar to Proxmox or FreeNAS in the basic features it supports, but does it in different ways. It's supposed to be easier to use, but may not perform as well as other solutions.
3. Windows - just use Windows. Windows works fine with Hardware RAID arrays, or you can use Storage Spaces (Windows version of something like ZFS) for Software RAID. You can also use Hyper-V for VM's. If you use Windows Server, these functions also have more features (or easier to use GUI to configure/manage).
There may be other options but these are some of the obvious ones.
No worries - there's a lot of planning to do before you even buy any hardware, and the planning will actually decide a lot of what you will need to buy.
EDIT: This is heavily outdated and half the stuff in here doesn't work anymore due to some repos no longer being maintained. I probably won't be updating it though since A - time, B - my current setup is pretty different, C - I think other people can do this better.
Steps:
What is unraid and how does it work
Components
installing unraid
setting up the shares
configuring your router
plugins and docker
OpenVPN
Plex
Apache
MineOS
backups
crontab
further reading
1-Preamble
When it comes down to it unraid is a linux distribution, under the hood it uses a standard linux kernel and kvm, so in theory you can do everything unraid can with open-source freeware. Note however, that the UI and a few of the plugins definitely are worth the 50 bucks you pay for it.
The NAS side works the following way:
You have shares, which can be exported via SMB or NFS, so you can access them over the network like any other drive. The files are then distributed on the actual drives, but not striped, so even if you lose 2 drives at the same time, you wouldn't lose all the data. Each share has its own privacy rules. but non are encrypted by default.
The parity is something rather interesting, each part of the parity drive holds the value of all other drives x-ored, so you can rebuild any one drive. Note that this only works, when you replace that drive on its own, not, when you replace 1 failed drive with 2. Adding a second parity allows any 2 drives to fail but that math is orders of magnitude harder.
2-Components
Here is what you need for a server:
CPU (should go with at least a modern dualcore)
Motherboard
Power Supply
Case
A USB drive (should go with at least 8GB)
2 or more Harddrives (see below)
With the harddrives there are a few things to consider, first, a failing harddrive is a real danger to your data, no matter what you do, so you shouldn't go with the sketchiest drives you can find, but you also don't need anything fancy. Also: you should get a drive that is at least as large, as the largest drive you want to add in the future.
If you want to have a proper backup, you need all the components twice of course.
3-installing unraid
First start downloading the unraid server zip from this page, then insert your USB drive, rightclick in the explorer, hit format, select FAT32 and name it 'UNRAID'.
After that, put all files from the zip onto the flashdrive and execute "makebootable.bat" as administrator. Now insert it into the newly built computer.
Go into the BIOS and set USB as the top boot priority.
Now you can unplug keyboard and screen from the server, you won't need them anymore.
Go to your normal PC, open a browser and type in "http://tower" and hit enter. On the page you will land on you can either get a trial key or copy-paste your key.
First things first: you want to set a password for your "root" (admin) account:
Go to the "users" tab, click on the "root" account and add a password. Hit "done".
After you got that sorted out, go to the "Main" tab. Now select your largest drive as parity and put the others in as disks.
Now just hit the format button and, when finished, start the array.
4-shares
Now this depends heavily on usecase, I decided that the best option for me is giving each server 2 shares, one being the "main" share of that server, the other one holding backups of the other one's main share.
To create shares, go to the "Shares" tab, click add share, type in the name and optionally select "use cache drive", I would advise to keep the rest unchanged. Hit "add share".
Now, you can select the export settings, if your household is only using windows (apart from the unraid server(s)) you can just hit "done". If you have linux machines that are supposed to be able to access the data, you need to enable NFS.
If you want to make it only accessible to certain people, hit "done" for the moment, go to the "users" tab, create a new user, go back to the "shares" tab, click the name of the share, and select "private" or "secure" for all exports. "secure" means only the selected users have write access, but everyone has read access, "private" gives no permission to other users.
Usually you should make it "secure" with read/write for root.
5-The router
First, you should think about what parts of the server you want to make public. I would recommend only making a potential website, a VPN and potentially your Plex public.
Here are some common ports:
HTTP (Websites) Port 80
Plex Port 32400
OpenVPN Port 1194 (changeable)
Minecraft Port 25565
CoD 4 Ports 28960 20800 20810
Now go to your router page (most commonly 192.168.0.1) and add a port forward from port 80 to port 80 on the IP of your server. Use a page like this one to check whether it is open or not and immediately delete this port forward!
If the port did not show up as open, give your ISP a call and ask whether you are on IPv4 and whether your IP is capsuled. Try to sound annoyed and ask them to give you your own IPv4, while you are at it, you could also ask, whether you have a DNS running, and what the domain for it is and, if not, whether your IP is static. After they worked their magic, try again.
Now just forward all the ports to your server. If you want to host a website (public port needs to be 80), do not forward to the internal port 80, use 8080 internally instead, otherwise anyone can access the settings of you unraid server and thus your private network.
6-plugins and docker
Time to add stuff to listen to these ports.
First, lets add the unofficial, "app store". Go to the plugins tab, install plugins and copy paste this url:
After this is done, go to the new "Apps" tab and search for "openvpn". Install the "OpenVPN Server" and, if you want to back up the server to another one in a different network, install the "OpenVPN Client" on the other one. While you are at it, go to the "docker" tab, click add container, select the "plex" template and hit "done".
7-OpenVPN
Now go to "settings", openVPN Server, "OpenVPN Server Cert/Misc" and configure to your desire, 2048bit RSA is still considered safe, but the only trade off for using 4096bit is a bit of time during signing and connecting. I'd also change the path to store server and client certificates to "/boot/config/plugins/openvpnserver/" for convince sake. Hit "save configuration" and go to the next tab. Here you could leave anything at default as well, but if you already have a DNS it doesn't hurt to specify your domain.
Hit "save" and go to the first tab.
Install EasyRSA with the button and generate the server certificate. Go to the clients, keep the default selected and type in the certificate name (doesn't really matter). Go to the first tab again and start the openvpn server.
Now navigate to the path you specified for the client certificates to be stored in ("boot" is exported as "flash") and go into the folder with the name of your client certificate. Copy the ".ovpn" file.
On the client side (could be another unraid server, or your PC, install the client software and navigate to the openVPN folder.
Windows: C:\Program Files\OpenVPN\config , unraid with plugin: \\[ServerIP]\flash\config\plugins\openvpnclient and store the certificate there.
At this point you really want a either a static IP or a DNS. I decided to buy a domain from No-IP, but this service also offers free (ugly) domains.After you registered your domain and account, go to the "apps" tab and search for "noip" and install. Now navigate to \\[ServerIP]\appdata\No-Ip\ and edit the .config file (I'd recommend Notepad++) and fill in your information. Save, go to the "Docker" tab and start No-IP (might also want it to auto-start), if your information in the .config file is correct it will start, otherwise it won't.
Now you can navigate back to the .ovpn file on your client, edit it with Notepad++ and change the first line to "remote [yourdomain].[tld]".
Congratulations, after saving you should now be able to remote into the network where your server is at any time like
8-Plex
Plex is way easier to set up, after you added a container using the plex preset, you are almost good to go. Click the plex-icon under "Docker", click "edit", "Add another path/port/variable" name it however you please, under container path just type /plex or /movies etc. under host path type /mnt/user/[your share]/[folder] give it read/write access and hit "apply". Now start the plex server, click the icon again to open the "web-ui". Login or register, press "add library" and select the folder you specified as /plex or /movies in the last step. Press "next" and "done".
Now you can access your movies from everywhere by either getting a plex app or just typing "[yourdomain].[tld]:32400" into your browser.
[If you want something similar for mine-os (minecraft server) and or apache (a website), please comment. I think these are pretty niche things]
9-Apache
So, you want a website and already have your website as a .html file(s), but are wondering how to get it out there? My answer: get a professional web-hosting service.
But if you really want to host it yourself Apache is a good solution.
First step: go to your router again and add a forward from port 80 to port 8080 on your server, I can only say it again, do not forward anything to port 80 on your server!
Now go to the "Apps" tab, search for "Apache" and "Apache" by "linuxserver".
You will be send to a Docker configuration page. Here you need to change "Host Port 1" from 80 to 8080.
Hit "apply", then "done".
Go to the "Docker" tab, click on the Apache icon and press restart. Now wait for the page to reload.
Open explorer and navigate to apache on the "appdata" share.
Place your .html file(s) directly in the folder "www" and make sure the page people are supposed to land on is named "index.html"
Hit the apache logo in the "Docker" tab again, restart and wait for the page to refresh.
Now you should have a nicely working website!
10-MineOS
To get a (or in fact multiple) Minecraft servers running, you should install MineOS. To to "apps" search for MineOS and install.
On the docker configuration page change the variable in "key1" to change your password, then hit apply and done.
Go to the "Docker" tab, click the MineOS icon and open the WebUI. If you have a decent browser installed you will now get a warning, pass that warning and login with account name "minecraft" and your password.
Click on "manage profiles" now it depends a bit on what you want to do:
If you just want a vanilla server click on "create stock profile" and select your version. Now wait for the page to refresh and press the green "update" button next to the new profile. Wait for the page to refresh again and check that there is a check mark in the "ok" column.
Now click "create server" name it and continue to the next page. Configure to your liking (I'd leave the port at 25565). Hit next again and select "vanilla[game version]" as the profile and hit submit.
You'll be redirected to the "Dashboard", click the name of your server and hit start.
The server will shut down after a few moments, refresh the page and navigate to the server again. Where there used to be the "start server" button, there should now be a "accept EULA" one. Accept the EULA and start your server.
If you something more sophisticated, like a forge server click "create custom profile" and use a variation on the following settings
profile name: "forge-installer"
type: standalone, runnable jar
Download URL: http://files.minecraftforge.net/maven/net/minecraftforge/forge/1.11.2-13.20.0.2228/forge-1.11.2-13.20.0.2228-installer.jar
save download as: forge-installer-1-11-2
jarfile to run: forge-installer-1-11-2
jarfile arguments: --installServer
Hit the update button and wait for the refresh and check that the check-mark is there under "ok".
Now click "create server" name it and continue to the next page. Configure to your liking (I'd leave the port at 25565). Hit next again and select "forge-installer" as the profile and hit submit.
You'll be redirected to the "Dashboard", click the name of your server and hit start.
After a few moments the server will shut down again.
Create another profile with a variation of the following settings:
profile name: forge-1-11-2
type: unmanaged
jarfile to run: forge-1.11.2-13.20.0.2228-universal.jar
jarfile arguments:
Now click the name of your server on the Dashboard again, go to "server.config" and change the first variable to "forge-1-11-2".
Now start your server.
You might need to refresh the page and accept the EULA before the server starts.
11-backups
Now we come to the nice parts: For this you need 2 servers that can see each other (eg over the vpn you set up). The IP of the main server will be 1.2.3.4 the IP of the backup server will be 1.2.3.5 from now on. The folder you want to backup is in the share "share" and is called "important" and the backup shall be stored in the share "backup".
I will now assume you are working on windows. Open the old control panel, programs, programs and feature. On the left hand side, select "active windows features" and select the "Telnet client".
Hit windows and r, to open the "execute" window, type in "telnet 1.2.3.4" and hit enter. Use "root" as your login.
Type in:
rsync -avz -e ssh /mnt/user/share/important root@1.2.3.5:/mnt/user/backup
you might need to confirm and enter your credentials now, so this isn't good for regular backups, but a great way to test, whether it works at all.
Assuming that it works, you now want a certificate, so you can back up without prompts whenever you want. So execute the following command:
"ssh-keygen -t rsa -b 2048 -f /root/.ssh/rsync-key"
when promted for a password just hit enter.
scp /root/.ssh/rsync-key.pub root@1.2.3.5:/root/
now switch to the other server with
telnet 1.2.3.5
here you need to make the newly generated key an authorised key (hit enter after each like):
then mkdir .ssh
chmod 700 .ssh
fi
mv rsync-key.pub .ssh/
cd .ssh/
if [ ! -f authorized_keys ]; then touch authorized_keys ; chmod 600 authorized_keys ; fi
cat rsync-key.pub >> authorized_keys
chmod 700 .ssh/
chmod 600 .ssh/rsync-key.pub
chmod 644 .ssh/authorized_keys
Now go back top the other server:
telnet 1.2.3.4
And check out if it works or not:
rsync -avz -e "ssh -i /root/.ssh/rsync-key" /mnt/user/share/important root@1.2.3.5:/mnt/user/backup
Now you just need to make it sick for the next reboot:
cp /root/.ssh/* /boot/config/sshroot/
cd /root/.ssh
cp /boot/config/sshroot/* /root/.ssh/
chmod 600 *
[Big thanks to tr0910 who wrote this post on the unraid forum, this ssh based solution is way more elegant than my previous one]
Also note, that rsync works both ways: by switching the order of the folders, you copy data the other way
12-cron
So, now you have a simple 1 line solution to back up folders, but you don't want to do it manually, you want the machine to remember. A solution for this is cron.
First step is making sure cron is doing its thing, just execute:
crontab -l
If you see a whole bunch of commented lines roll by, you are good.
Open up explorer and navigate to \\1.2.3.4\flash\config\plugins and make a folder called "cron", make a new text file and rename it to "backup.cron" (make sure you override the .txt ending)
I will now assume you want to back up at 3:30 every tuesday, here you can read more on the time format of cron.
30 3 * * 2 rsync -avu --numeric-ids --progress -e "ssh -i /root/.ssh/rsync-key -T -o Compression=no -x " /mnt/user/share/important root@1.2.3.5:/mnt/user/backup/
save the file.
Now go back into the telnet window and execute:
cd /boot/config/plugins/cron
crontab backup.cron
crontab -l
if it displays the line inside your cron file, you are good.
But note this will only move new files to the backup share.
To get the IMO best possible result, jump over to the backup server
telnet 1.2.3.5
and repeat the process for a new cron file on that server called "movebackup.cron" containing the following code:
20 3 * * 2 shopt -s extglob
21 3 * * 2 cd /mnt/user/SyncedShare/
22 3 * * 2 mkdir "Backup-$(date +%Y-%m-%d)"
23 3 * * 2 mv ls !("Backup-"*) "Backup-$(date +%Y-%m-%d)"
This will create a folder with the date of the backup in the name and move the synced files there every week
If there are folders that only contain files that don't change and are too big to reasonable sustain this process (like movies or pictures) create folders for them in the "important" folder and replace the last line in movebackup.cron with:
23 3 * * 2 mv ls !("Backup-"*|movies|pictures) "Backup-$(date +%Y-%m-%d)"
Note that from my understanding the "ls" shoudn't be needed, but without it it did not work in my case.
13-Further reading:
Getting started with unraid
ssh rsync setup
cron
a random linux shell tutorial i just googled
Thanks for the reply.
I managed somehow to boot it up after booting the Macbook from a windows hard drive. I saw that it was working fine so it couldn't be the GPU, so turned it off and did a PRAM reset and a internet recovery. After fixing the HDD with the Mac's tools it booted up, but it took like 5 minutes. The programs were so slow to open up so I thought it was something wrong with the HDD. After opening up Safari I had a blue screen and it shutted down. I took away the HDD and did a full sector scan and it had a damaged sector. I thought it had both GPU and HDD problems so I bought a Samsung Evo 860 500GB and after hours of trying to get into recovery mode again I managed to make a clone to the SSD which took over 3 hours for 185GB. After that it took like 10 seconds to boot it up but after 2 minutes I had a weird blue screen (attached picture) so I thought I had to replace the logic board or I had to figure out to disable the dedicated GPU and use the integrated one. I attached a secondary monitor and made a 2 hours stress, then I used the Mac with the dedicated GPU for a couple of hours without getting artifacts or anything, maybe it was just a random driver crash.
Ding ding ding, we have a winner! It ended up being a firewall issue. Managed to find my way to the Kaspersky firewall settings (Where one should probably look first...) and there seems to be quiet a few things that are restricted.
So then, now on to the final stretch! When it comes to this kind of stuff I am a real newb, any pointers as to which on these settings I should change and what consequences that might have? It works great when I disable the firewall completely, but I kind of like the firewall, it is my friend, so I'd like to keep it but still allow file transfer traffic between my two machines through.
so it looks like my Synology won't qualify here, but that's fine...it's only 32TB
instead, here's my unRAID system that I use to house my modest Plex system
I'm not providing my case/psu/mobo as I honestly don't remember what they are and I'm too lazy to look
Software and Configuration: OS: unRAID
RAID config: unRAID High Water
File system: btrfs File system capacity: 32TB presented, 40TB raw (add'l 22TB presented via NFS from my Synology DS1515 w/4x 8TB WD80EFZX)
Usage:
Plex. I have a lot of stuff. 724 movies, 233 TV shows with 18,224 episodes. I share this with close friends and family so uptime and performance is very important. I have at least 6 concurrent transcodes going at any point in time, most 1080P with some 4K. It's essentially full at this point so I'm looking at replacing it with a Norco RPC-4224 and consolidating all of my storage into a single chassis. Going to get rid of the R710/MD1200 and the Xserve/Xserve RAID - they're power hogs and are not expandable any further
Backup:
I back up my most important media to my grandfathered Google Apps account.
Photos:
The system in question is the top one. Couldn't help but show off the rest, though. Might do other posts for them later. Yes, I know it's dusty as shit. I'm in the process of moving and all this will be torn apart, cleaned piece by piece and reassembled with dust filtration in the new rack.
It's more about not letting one game server be able to overun the resources of the system. With 2 VMs you can limit the resources so if something goes wrong like a memory leak or an annoying person tries to take down the server the other one isn't effected as much or at all.
Running more VMs than you should is also bad though, no matter how small a VM is or little work it does the hypervisor still has to schedule CPU time for each and every VM so the overhead gets worse and VMs start to experience CPU wait which directly effect performance i.e. performance loss.
No. It's not. I have the exact same components in my computer and power usage howers around 400-450 wats at load. That is too much for 500W PSU. I'd say at least 550W, so you always have at least 100W more than you can draw. If you calculate on the cooler master site or sth, you will get around 380W total power draw, but in real live with all the devices runing and everything it's higher. If i were you, i'd get a 600W. But a 550W will do as well. Cheers
P.S. remember the efficiency curve of a PSU. the best is around 70/80% usage.
if you switch to integrated graphics as these guys said it functions as it should, it is definitely a issue with your gpu, but before you do that check that the issue is not your connection and try different cables and ports. if neither works then your gpu is dying.


 Brian Furious reacted to Cree340 in How fast is the LTT member's internet connection?
.png "Funny")


 Brian Furious got a reaction from Sauron in MacBook Pro white screen after boot
 Brian Furious got a reaction from mineblaster in Windows 10 not detecting raid 0 at all on instal
 Brian Furious got a reaction from Mirdon in Cheapest router that has the option to set time limits per device?
 Brian Furious got a reaction from Matt_98 in Should I trust this site
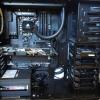 Brian Furious got a reaction from Luc401 in Homeserver build - need help


