Meelobee
-
Posts
74 -
Joined
-
Last visited


Meelobee's Achievements
")
-
Thanks Dorian I totally agree and I'll raise you, Imo it's one of the best cases ever, has a timeless design Thanks Monty, I wish I could. Over here (The Netherlands) these cases are are hard to find in a good condition, so even getting one was quite a challenge Thanks man
-
Thanks Banano
-
Progress is a bit slow lately because I didn't have as much modding time as I wanted and I was waiting for some of the parts I ordered to arrive. First up is the controller panel, it now fits below the midplates and I've made the second panel from 1mm aluminium sheet which will sit in front of the controller panel. In between the alu panels will be a 3mm plexi sheet. from the inside I'll put in some leds, so the edge of the plexi will glow. The packages I've been waiting for contained the gpu blocks and some of the fittings I'll need for the loop. For the gpu's I chose the EK- FC R9 280X DCII Nickel Acetal blocks, with a pair of matching backplates. This thing is heavy :huh: The first batch of fittings I love these new 90degree corners, finally a nice single fitting for 90degree hard tubes Something that bothered me in one of my previous builds (Inverted) is the gpu. Because of the weight/gravity the pcb of the gpu gets bend over time, to prevent this I came up with this
-
It's an Aquaero 6 XT so basicly everything, it can connect to; Pumps, fans (4 channel controller expandable to 10 channels), flowmeters and temp sensors, and it has rgb led output, external power output, a remote control and it's programmable. It's quite fancy Thank you both very much lol
-
on with the show, it's been a while again and in the mean time I bought a better backdrop for my pictures. So from now on some of my pics will look a bit more decent (Not all, cause it's quite some work to setup the 'photoboot') I've used the backdrop to make some pics with the current state of the build I've added 2 angled pieces in the top of the case, they will hold a 360 slimline radiator and they add to the structure of the case. This alows the top top come off which will be usefull later on when filling the loop. The Aquaero Controller also needs a place, in the front of the case isn't an option, so I came up with this Measured the controller, put it in Sketchup, exported it to Layer and printed it on a sticker so I could cut/file it into shape [imghttp://www.zdmods.com/builds/720/120.png And after some cutting and filing this is the result
-
Oh man I couldn't be happier right now, after some talks Corsair decided to sponsor this build too and wow when they decide to help, they do it good.. They have send me a big box full of parts, way more than I could imagine! The box was filled with: 16Gb Corsair Dominator Platinum (CMD16GX3M4A2400C10) 2x Light bar upgrade for the memory modules 2x Neutron GTX 240Gb SSD 10x Corsair AF120 LED Fan White Thanks so much Corsair! Harry you rock!:thumb: Even though the 720 is a big case I still managed to run into a problem with the space. Below the midplate there is not enough room to put the pump and reservoir next to eachother, both are quite big (D5 pump with Aquacomp top & Aqualis 880Ml res) so I've ordered an adapter that allows the pump to be installed directly onto the reservoir. And to complete the hardware I've also ordered the following parts: - Aquaero 6 XT USB Fan-Controller :cooldude: - Aquaero Flow sensor "high flow USB" G1/4 These and the adapter should arrive somewhere next week
-
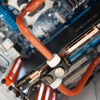
A while ago I came into contact with Asus Benelux. When they saw this build and heard about the plans for the rest of the build they decided to step up and sponsor the project with not just one, but two of their Radeon R9 280x cards! A pair of very awesome cards, that will take this build to a new level hardware wise! Thanks alot Asus! Ofcourse both cards go in the build, so I had to make the holes for them: Both cards just in The left sides of the cards hang a bit because of the weight of the heatsink, the waterblocks weigh less, so it should be ok then. Made a simple lock for the videocards Took the midplate assembly apart and drilled a 10mm hole (biggest drill I have) through all the plates (18mm thick in total) and filed the hole to 25mm Made a ring from 3mm alu sheet, inner diameter is the same as the inner diameter of the tube Ring is epoxied to the bottom of the lowest midplate, preventing the tube to fall all the way through. The tube will be used for the 24Pin wiring, it should be just big enough to hold 24 sleeved cables, but it's going to be a tight squeeze
-
Thanks man, the fans are 120mm, Corsair SP120's Thanks, these cases deserve some love, they're one of the best looking stock models. Not sure if that is a good or bad thing, should I be worried?!
-
Thanks guys Not a real scratchbuild actually, it's based on a Dell XPS 720 Yes, I thought so too., great canvas for a build Thanks lazer Welcome, enjoy the show Thanks man, that was partially the idea behind the multi midplates
-
Update time! Made a mobotray from a 3mm aluminium plate (32x49cm) and installed the standoffs for the mobo. Decided not to use a rear i/o bracket, but instead installed the i/o panel right into the backside of the case; I've cut almost half of the mobotray away to get a more open feel/look The mobotray is held in place by small aluminium corners, on this picture the first two are done And here the third is done too (The small corner on the top right) Installed some parts to get an idea of the look, hmm not too bad at all B) The 5h plate is measured and filed so it wraps around the mobo Hard to see, but the double bottom is also installed, under the white plate on the bottom there is 15mm space to hide cables That's it for now..
-
Thanks Rob (Wie ben je op Tweakers?) Thanks DieselWeasel, I hope so
-
Thanks guys so yeah about time for an update! First up, the reservoir I'm going to use, a big fat Aqualis 880ml Gotit 2nd hand, but it looks brand new The box is a bit damaged But the reservoir is in perfect condition and looks awesome From Coolermaster Benelux I got a set of white Jetflo 120 fans, 7 in total, thanks Ruben, you rock! :rock: The sticker on the fanhub was replaced by a custom ZdMods logo made by plakjesuf Then the midplates, the part that was most time consuming so far. Did quite alot of filing to get all the plates to the right size. The 2 plates on top need some additional work so I can fit the mobo and mobotray, but thats for later. The plates are connected with countersunk sleevenuts with a brass 20mm tube around them. To support the midplates I cut a couple of 20x20mm alu corners and attached them to the front and back of the case And one last pic with the front
-
Been a while since the last update (I should patent that phrase!) but I've continued working on the case in the meantime I'd planned some time to take pictures of the progress yesterday, but both my camera and my camera skills let me down. Out of 60+ pics not a single one was decent enough to show in the logs. Either the colortemp is all messed up (way too orange) or the pic is just too dark to see the details.. Problem is I don't have a decent space to photograph my build, I have a small computer room with terrible lightning for taking photo's. Tips and tricks for better photo's are very welcome ( So for now a small update with the progress, pictures are taken with an iPad, sorry for that.. The acrylic strips in the front of the case will be lit with UV leds, in the 4th strip from the left the led is visible With power it looks like this, in reality the whole strip is lit like the bottom half, pink/purple. The camera makes it look alot more blue than it really is. Continuing on the internals of the case, first made a small Sketchup to see the idea before building it So I ordered 6 plates of aluminium (493x210x3mm) and started to cut and file it. First plate I finished was the midplate After that I started on the rest of the plates, made a drawing in Sketchup, converted it to Layer and made 1on1 stencils on stickersheets. (May thanks to Waynio for explaining this to me!) Cutting Alot of filing And done! I finished 4 of 6 plates, for the other 2 I need a mobo to get the correct measurements so the plates won't touch the hardware And I've been playing around with Sketchup a bit Comments are welcome
-
I know you were, but there is some truth in it, I'm really not the fastest modder.. Can't wait to continue either, hopefully I can spend time on the case tomorrow
-
Sweet build. Love the colors!