


F.A.T.
-
Posts
79 -
Joined
-
Last visited
Content Type
Forums
Status Updates
Blogs
Events
Gallery
Downloads
Store Home
Posts posted by F.A.T.
-
-

So this is the final Update on this small build called FLUX
!I'm really pleased with the outcome, it has been a very experimental project with a lot of new techniques.
Hope you liked to read (or just check pictures) it!
The build is still featured in Bit-Tech's Intel NUC competition and voting is possible until the 30th of june (still 5 days left!! exciting!!)
Check out the competition in this link below, there is some pretty awesome stuff there
!http://www.bit-tech.net/modding/2015/06/08/intel-nuc-case-design-competition-finished/1
So just to compare the renders of the design with the "real deal"
And the final pictures of the build!Thanks again !- Stefan1024 and flibberdipper
-
 2
2
-
Andddd.... the last update before the final pictures...!Tiny bird, Tiny computerI made some copper letters and goldplated them so they give a nice finishing touch to the pie, like icing on a cake!The small screws are now also gold-plated and mounted to the top of the alumimium cover (like a cherry on the icing of the pie ?! :hehe: )
- flibberdipper and Stefan1024
-
2
-
So this time everything is almost done, all the parts are there. They just need te be finished and fit together.The fitting together is the most tedious part....I refined the top aluminium frame, gave it a texture and spray painted it afterwards!The water-cooling assembly plate.The copper cooling block is made using a de-soldered part from the original cooler added with new copper fins. Everything is soldered with REAL silver solder, not the terribly conducting tin solder that all mass produced coolers use. Only Silver conducts more heat then copper so this should help a lot.The copper cooling block is mounted in a black plexiglass cases with a transparent top plate! The tubes are permanently fixed on the sides so it doesn't make the case higher.The casing, cut out a nice big part for the cables (this will be covered up nicely don't worry )The cable extenders need to be stripped so they fit snugly in the casingSo thats it, all the parts are there!now I just need to assemble everything !on to the final result!!!
-
So, this is almost the most important part of FLUX. Making the top cover plate look very awesome.It was quite tricky because I had already bended some plexiglas with heat but never a shape like this. To make it a bit more nerve wrecking was that this was the only piece left of the plexiglas plate big enough for this shape. You don't want to burn the plexiglas because than you will get all these bubbles.I made a nice construction ( n a steel IKEA Bowl) and put it into the oven.I used a low heat and kept on turning it up after I tried to bend the material. At first I was a bit to careful pushing the material by hand but in the end I took drastic measures and .... SAT (thats right..in like a chair: sat) on the constructionThat worked really well haha!Below you see the results!I made a short video of cutting the top plate in aluminium:I had to fixate the plexiglas to the aluminium to keep it in the right place. Afterwards I will take the extra material away.The plexiglas I use is Fluor edge so sometimes you have these amazing colours and sometimes it looks a bit dull.Here you see the first and second attempt.After that the drastic measures.... haha :hehe::worried:But(t) it worked really well ! You can see there is a pattern on the Plexiglas, this is due to the towel I used to press the plexiglas into shape. It looks quite nice actually but I will polish it away!So I've got the shape that I wanted now and will need to refine everything!
-
So in this video below you can see the progress of the case as it is forged into shape.I also added some pictures of the different stages of the case.To forge the case into its form I use a steel tool to press the plate against the mould.To keep the material smooth and nice to work with on the lathe I use some soap. It makes the steel tool glide over the aluminium.After shaping the case I used some sandpaper to get a finer matt finish.Also I got rid of the extra material by using a trimming tool.Below some more pictures of the aluminium casing (with Pixel the blue bird )This is the cooler that I will be using, well....just a small part of it..Here is the victimTo make the cooling parts for the Intel NUC I'm using the laser again. I've made a design in illustrator and engraved the plexiglas plate at CityLab Rotterdam.So now I have a lot of loose elements that will have to come together!Time to start this puzzle!
- flibberdipper and Stefan1024
-
2
-
Here you have the the mounting plate for the NUC inside the case.The mounting plate will be build up out of several plates on top of each other. Otherwise the 3D printer will be busy for days! Also, maybe I will have have to adjust some component inside the case, so that I can make some changes in the plates later on.This 3D Printer is called ‘The Builder’ . The fillament is a funky green PLA which will be painted afterwards.Here you can see the drawing which was made in Solidworks and then imported in the builders software, ‘Cura’.You can see it takes quite some time to build up the plate!Also I’ve been working on the mould for the aluminium casing. The wood has been cut in circles and glued together. In the middle you can see a hole which has been centered andInside there you can see there is a thread 1’’ x 8This way it will be easy to give shape to the mould on a lathe. Later on will shape the mould and make the first aluminium casing.I've made a nice video whit that part so that you can see the technique 'live' !So this is the result of 'the builder' adventure. This is the plate straight from the machine so it looks still pretty unfinished (use a bit of imagination )! The colour is really funky, but it will change into something more "subtle".Next in line, an other piece of the puzzle... LasercutterSo I've made a cover plate to go with the mounting plate inside the case.The plate of clear blue plexiglass is cut and engraved with the laser.Next update will be the spinning of the metal case !
- flibberdipper and Stefan1024
-
2
-
This is gonna be so awsome!
People like you makes this forum intersting. Once finished you build must be here: http://linustechtips.com/main/topic/360050-featured-build-logs-competition-003-submission-thread/
Thanks
! Well I don't know about adding this one to the featured builds, there are some seriously beautiful builds there!! Woah. That build is crazy nice. Just looked at the log and damn that some mighty fine work. Ghetto watercooling ftw! Also looking at the contestants they don't stand a chance against your build. I r8 8/8 m8. :lol:
Great that you like the log and the outcome
! Thanks! And Maki Role is indeed one of the other contestants !No we really don't and the voting results show that. Flux got my vote too.
You are too kind
!!! But we don't know what will happen yet, the voting is still on till the end of the month. So we will see -
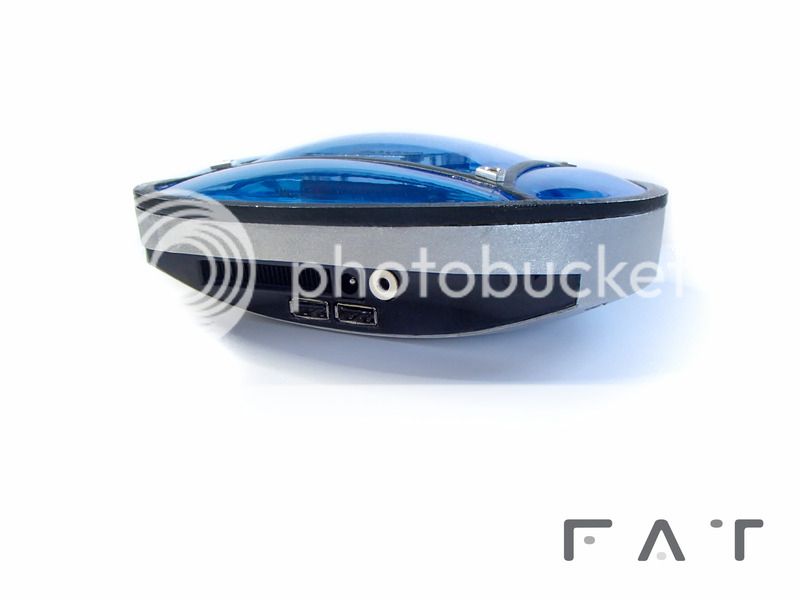
Thanks for your comments!Indeed the I/O panel is on the back of the cage. Thanks for adding that picture Minibois!Later in the buildlog I will show you more ! So here is the first update on the buildlog of FLUXI thought it would be a nice idea to add a few videos to the buildlog along the way.Hope you like it, and otherwise….there are enough pictures !Here are a few pictures of the package I received!I have taken apart the NUC just to check what is under the hood!I was surprised to see that the aluminium frame was made with a lot of care! The solid frame looks really good!Just thought it was funny that they only covered a very small part in black paint!So from now on I will start building up in stead of demolishing!
- Stefan1024 and flibberdipper
-
2
-
Hi!This is the project I've been working on lately, thats why there is no progress on '7L'I made this design for the Bit-tech Intel NUC competition. This design has been chosen together with 4 other contestants by Intel and Bit-Tech to be made real!The other 4 designs are also worth looking at, interesting to see what kind of techniques they useYou can find the article hereAnd of course you can vote till 30 June for you favorite design!I will post the buildlog this upcoming week so you can check out the techniques I used to make FLUX.First, to start off! Here are the renders of the design and the final result.And this is the final result:Hope you like the result!
- CtW, flibberdipper, Dacho and 4 others
-
7
-
nice build, awesome bird
I sooooooo love case mods
Looks so sick. Please keep us updated.
Great
! Thanks for the comments!This time a very short update! December is always a crazy busy month so the progress on 7L is a little slower!
I have a few pictures of the Motherboard and graphicscard fit inside the build.
Hope you like it and maybe it gives a better view on the placement of all the hardware
!Here can see how the motherboard fits inside the case.
The graphicscard fits really nice and the back of it will be completely covered with a custom made backplate
!The back of the case.
Ok, so that was it for today
!As I said earlier, December is always a very busy month! And this saturday I have a exposition where I will show my own jewellery collection and “freshly made” new USB drives.
Just to give you an idea..
My first collection of jewellery, Frivolité!
And…. A silver USB with Fluor plexiglass and a Yellowgolden USB with a wooden inlay!
Big difference in style between the two of them but that keeps things interesting
!- Stefan1024, Nup, Rheinwasser and 1 other
-
4
-
Thanks for the Info. will look around if i get this then suerly will solder them to my case.
Great! If you need any advice feel free to ask
!I'm curious to know how the motherboard is going to be mounted. It looks amazing already though.
Thanks, the next update I will show you how the GPU and Motherboard are placed inside the frame! Hope you like it!
Anndddd another update...
This time the case feet.Ofcourse I used the transparant plexi again so when you install a red LED the whole thing will illuminate!Cut with the laser: black plexi, transparent plexi and black foam.First sandpaper everything, and than creating a matt surface with a scotch brite pad.Than...creating a hamburger! In the bottom of the case I made 4 holes where I can install leds that lead directly into the second transparant plexi layer. Then you will get red illuminated case feet!I used sandpaper on the plexiglass to help te glue stick better to the surface. A matt surface means better attachment.Everything glued together with epoxy...Just a few small tests with a red LED light. The battery that I use doesn't have so much power but just to give you an idea!Pixel is also enjoying himself with the LEDsPCI express cable also mounted into the frame.Next step is to fit everything inside the case- mr.squishy, Rheinwasser, Frankie and 1 other
-
4
-
Update number 3
!The GPU fits excactly inside the case!
This is the Sugo 11L and the GPU just doesn’t fit.
The plexiglass parts have all been made to fit the case perfectly!
There will be black plexiglass on the inside of the case to cover up all the seams. And to give a nice change in finish (matt paint and shiny plexi). In the Plexiglass plates I drilled holes for ventilation.
I made all of the corners of the plexi fit to the frame. Not very precisely but In the end you will not see the edges! And ofcourse a picture with my bird; “pixel’
Completely covered my workshop before spray painting! (been there, done that
last time everything was covered in yellow paint)Because the case has been build out of zinc plated steel I had to use a special kind of spray paint.
I painted the case with a matt black finish!
Thats it for today
!- Nup, Rheinwasser and Frankie
-
3
-
How did you create those mesh type parts into the parts directly...? I want to know since i also want to create a mesh type hole on the top of my Case for more air flow... and installl fans or radiators(if i go for water cooling in future) there. Otherwise will go for full hole cut using a hole saw for dual fans.
For the vents I used mesh sheet metal. I cut out the shapes I wanted en then soldered them inside de case. I used tin/silver solder for the entire case with a torch because then you get invisible seams.
Much easier then drilling all the holes yourself
This is the type of Mesh sheet metal I used!
-
Thanks for the comments!
The colour scheme for this build will be:
Mysterious Black, Dangerous Red and Glorious Gold…
Or.. just Black, red and gold 8-)
The case will be matt black and on the inside there will be a lot of plexiglass ellements
below you can see a few tests with a LED and transparent red acryllics.
pieces cut out with a lasercutter:
Always fun to take off the protection foil!
Unfortunately the Red plexiglass is not suitable for transmitting the light. Even when I sand the surface it just doesn’t want to glow. So in the end I decided to use transparent plexiglass and added some nice engraved lines to the parts.
This works perfectly!
As you see everything has to be made fit by hand. Unfortunately the laser cant fix this for me so I just have to do it the good old fasioned way! -
Hi
!Time for a new Scratch Build!
(Last one I did was Little Scratch:
http://linustechtips.com/main/topic/26897-first-scratch-build-ecs-modmen-contest/ )
This new build is also going to be a “Little” Build, with this time enough room for a real GPU!
But still a super compact gaming PC!
The main goal is to make a 7 liter case. To give you an idea of how small that actually is:
In this case there has to be room for;
mini-ITX MoBo,
5x 2,5 inch harddiscs,
SFX powersupply
and a big graphics card like the GTX 980!
Ofcourse everything has to be cooled quietly
!I used material from this old Dell server case that I got from my uncle. Lots of material for a very small case!
All of the parts are cut out by hand, the good old fashioned way!
Soldering with a soft solder containing tin and silver.
The frame as it is now.
Next update I'll finish the framework and start making the plexiglass parts!
- Rheinwasser, TheSLSAMG, Raboo and 4 others
-
7
-
Super Cool!! Love it!!
-
Your sleeving looks absolutely amazing!! :lol:
-
Very nice build.
We hebben best heel veel getalenteerde mensen in Nederland (had to type it in Dutch ;D)
Haha dankjewel! Nederland rulez ;)
-
that's amazing maybe with your next build you can have a little more room to work with and BTW have you thought of engraving gold, aluminium, zinc and silver keycaps i have seen some of those around on ebay?
Working on it ;) ! Keep an eye on my FAT page on FB!
-
If thats the case, then I would say this a beautiful piece of modern art, but a horrible computer. For Christ sake, she all but destroyed the CPU heatsink. I can't see this system running stable for longer than a few hours. It looks nice, but thats it.
Haha, I have to admit it was a worry I had in the beginning. But... After stress testing the highest temperature measured was 49 degrees, Which is very respectable for an Ivy Bridge CPU. It has been running stable for the whole week at computex with tropical temperatures ;)
-
Looks awesome!
-
This is amazing. How hot does it get, actually? There seems to be barely any fins over on that heat sink :P
Under stress-testing the max. temperature measured was 49 degree celcius. So he'll live ;) ! He even survived the tropical temperatures of Taiwan!
-
incredible work... :D
the ring is simply a work of art :ph34r: .. i'll PM you my mailing address, so you can have it sent over immediately :lol:
Haha Thanx :) ! I'm working on a next version; 'Little Scratch 2' ill let you know when its done haha ;)
Ok Linus, here is another build for the live stream pick of the week, get on it Linus. Nice work F.A.T. Where did your build come in the contest? Do you think you can do a water cooled build that is unique like this?
Cool :D ! I got in the top 5 and I won the 'Viewers Choice' Award. I'm planning on doing a water-cooled pc, that would be really cool B). After my next project !
- DARKMATTER, Beskamir and chirag.rh
-
3
-
That build is awesome, and you have so much skill, I hope you'll have more builds (or electronic-related crafting) to show in the future.
By the way, I remember slick covered your build at Computex, I'm just being curious, did he invite you on the LTT forum ?
Thanx! and Yes, There will be more builds ;) !
I met Slick at the Computex, and being quite new to this 'scene', he pointed me to the LTT Forum.
On this forum there are some pretty cool builds I haven't seen before!!


FLUX by FAT - Intel NUC Competition
in Build Logs
Posted
Thank you very much!
I'm really glad you like the build !!
!!
I've send FLUX to Intel UK so they can showcase the 5 designs that were made for the contest (and they will return them to us afterwards).
So maybe the have already started a production line haha!
haha!
When I start massproducing I will let you know !
!