parky559
-
Posts
57 -
Joined
-
Last visited
parky559's Achievements
")
-
Thanks
-
CONCLUSIONS This is the project completed... There are however a few things that I would change about the project if I was to do it again. These are; I would use a different speaker - the speaker I selected was just too quiet and had too much hissing I would try to neaten up the cables inside the case as when they got in a mess, some crocodile clips were touching others and were completing the wrong circuits causing random sounds to be played. I would definitely insulate the connections if I was to do this again. I would try to make the device a lot smaller - the case is just too big I would find a way of making the code of the raspberry pi launch when the pi is started up. With how the project is now, I have to connect a keyboard and press shortcuts to launch a command window and run this command "/home/pi/piboard/run.sh" . This is very annoying when you mess up because you don't have a monitor to see where you messed up and I often had to restart the pi and try again. Overall though, the project was a lot of fun and I think I succeeded in making a Soundboard powered by the Raspberry Pi and the MakeyMakey. If you would like to see a video demonstrating the soundboard, I do have a video on my YouTube channel. However, this is not the final version of the project. This is me demo-ing the prototype (shoebox) version although it works in the same way. If you would like to see a updated video with the completed project, please be patient, I will upload one eventually. Anyway, here is the video: https://www.youtube.com/watch?v=isJ1DOuKW-c Thanks for reading this thread
-
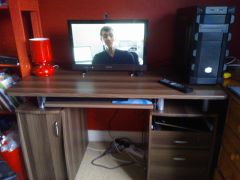
BUILDING THE CUSTOM CASE So now all I needed to do was to make the custom case for this thing. As woodwork is not my strong point, I tried to find an easy way out of it and I think I just about got away with it. A year or two earlier, I was making a flatpack desk and realised that the set did not come with some of the screws needed to make one of the drawers so I was left with the front of a drawer and the handle... This gave me an idea for the case Yes, that's right, my case was made from an old drawer.... I started off by mounting the raspberry pi to a bit of board with some screws. I then built the case around it with the bits I could salvage from the old drawer by screwing them together. When the case was built, I needed to make holes in the top for the metal studs just like with the shoe box. So I drilled some holes so that part of the stud was poking out through the board so that I could attach crocodile clips to the bottom of it. Once all the holes had been drilled, I got a hinge and a door knob and screwed them to the top panel so that I could open up the case when I needed to. And I drilled a large hole in the side of the case so that I could route the usb power cable to the raspberry pi. Then the custom case was completed....

-
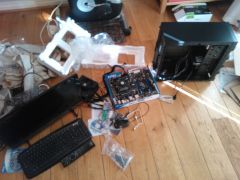
Testing The MakeyMakey with the Program On The Raspberry Pi This was the bit I was looking forward to. At this point, I needed to put all the parts together, I currently had; the working usb-powered speaker the raspberry pi running the soundboard code and the makeymakey converting touches on the studs to key presses I first tested it the shoe box as I didn't want to make the case just yet if I needed to add anything later. So... a run down of whats going on currently - the user will touch one of the studs on the shoe box and also the ground stud. This completes a circuit and the MakeyMakey recognises that and sends that information to the raspberry pi through usb in the form of a keyboard key press The raspberry pi soundboard program recognises the key press and matches that with a certain sound. The program then activates that sound and plays it through the speaker. After testing this, it all worked well. I then proceeded to add all of the custom sounds that I wanted. Including all the piano notes (C to C) and some other sound effects like a couple of bongo drums, a gunshot and a cow mooing After this, I started to think about how I wanted the whole thing to be laid out and then how to build the custom case!
-
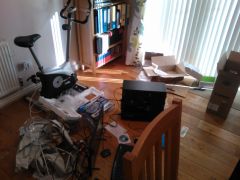
Next, the makeymakey arrived! I therefore tried to see if I could create a simple piano out of the makeymakey. I plugged it into my PC, cracked out the PlayDoh and got to work. I was extremely impressed at how easy it was to set up. When testing the piano, I used this online piano site : http://www.bgfl.org/bgfl/custom/resources_ftp/client_ftp/ks2/music/piano/ A short video of the testing can be found here: I later wanted to start planning how the makeymakey would work in the custom case so to demonstrate, I found an old shoe box and punched holes in the top and placed the metal studs (PC case thumbscrews in this case) in the holes. Then, I connected crocodile clips to the studs from inside the shoe box and connected them to the makeymakey. Again, testing with the piano can be found here: https://www.youtube.com/watch?v=uHSa6kBhJZI
-
Next I took delivery of the Raspberry Pi I would be using. Seeing as this was the first Pi I had owned, I tried to first get myself used to to Operating System. I chose Raspbian as my OS btw. For the actual program needed to turn the button touches into sounds, I needed a specific program running on the Raspberry Pi. As I did not want to create my own (I have no programming knowledge at all!) I searched the internet for a while and finally found a bit of code available here : http://blog.dalethatcher.com/2012/07/makey-makey-raspberry-pi-soundboard.html This code was perfect as it lets you add your own sound files and add an unlimited number of sounds. As I mentioned before, this program plays sounds when certain keyboard keys are pressed.
-
Firstly, whilst the MakeyMakey and Raspberry Pi were yet to be ordered, I needed to sort out the speaker situation. I had an old portable battery powered speaker that had a standard 3.5inch jack that I used to use as a speaker for my phone. I decided to disassemble this speaker to use in my project. I knew this speaker would be able to work with the Pi's 3.5 inch audio jack so that would be fine. After disassembling the speaker, I noticed that the battery pack was very large and would create a lot of weight and bulk in the final box so I decided to get rid of it. This meant rewiring the speaker to draw power from a usb connection form the Raspberry Pi. in short, this speaker would be powered by the raspberry pi. I therefore wired in a usb connector up to the speaker power wires and would plug it in to the Pi later. When soldering the usb connector, I noticed that some of the wires were breaking free of their solder so I went round and made sure each connection was soldered again to prevent wires from falling off. I also noticed that the wires to the speaker were very thin and broke easily so I replaced them with thicker gauged wire that still kept the same sound quality. After completing the project, I noticed that there was a slight static hissing coming from the speakers when no sound was being emitted so I therefore wired in a power switch for the speaker separately so that I could individually turn off the speaker if I wanted to.
-
Hey there, I'm Will, a 17 year old college student from England. As I wish to go into a career in Electronic Engineering, I've heard that certain companies like to see what you can do in a practical way in the form of a personal project. To show my skills (and boost my employability!) I thought I should give it a try. I wanted to do a small project including a makeymakey and a raspberry pi and decided a small soundboard would fit the bill. Since I took photos along the way and the project is now completed, the following posts will show the steps I took to create the soundboard. I knew that I wanted the soundboard to; be contained in a box no bigger than a shoe box have metal studs that you touch to activate the sound (not press like a button) be able to change what studs make which sounds very easily easily switch between different sounds or add sounds have a full octave of piano key sounds (a C note to the next C note) only have one lead coming out of it (power cable) Since the basic idea of how the project would work seemed like it made sense in my head, I decided to try and work out how the system would function. The raspberry pi would need a program to be running to convert key presses into sound (more on that later) and the makeymakey would convert touches (complete circuits in terms of the MakeyMakey) into different key presses. The sounds played would obviously need to play out of some kind of speaker that I would have to find small enough to fit inside the custom case. I would also need the selected program to have the ability to add custom sounds and a custom number of sounds. (to find out how a makeymakey works click here: http://makeymakey.com/) I would need the following; Raspberry Pi (I chose the Pi 2 Model B ) MakeyMakey Speaker (I chose a usb powered one) Custom Case Metal Studs The total budget for the project was about £100 (GBP). This was an easy budget to stick to as the MakeyMakey + the Raspberry Pi was about £70 and the extra things would later add up to only about £10. So... total money spent on the project was probably about £75-£80.
-

Advice on starting a PC Building business?
parky559 replied to Sentient68k's topic in General Discussion
Great advice, build for friends. If they like your work. But unless people are actually very interested in their computer, they'll just go to a store and buy the cheapest pc. And from my experience, people who are interested in their computer and want a really good one, will just go to the store and find a pc with good specs. Not much real estate for custom pc building in this age. -
$1300, kept some parts from my mum's old pc AMD Athlon II X3 425 OC'ed @ 3.30Ghz Stock AMD AM2 Cooler MSI 990XA-GD55 AM3+ Motherboard Corsair XMS3 2x4gb 2000Mhz Memory Asus Radeon HD 7770 2gb Corsair CX500 Modular PSU Zalman Z11 Plus Case
-
I did exactly the same thing with my mum's old computer when I was about 12 years old and when I knew nothing about computers...
-
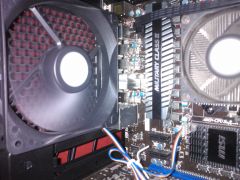
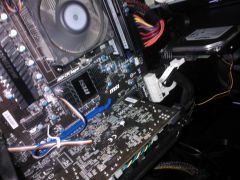
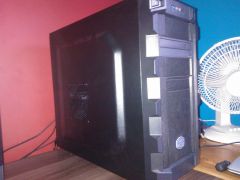
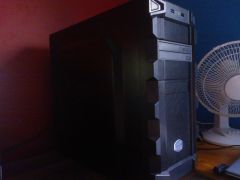
So yeah, I made a gaming pc... AMD Athlon II X3 435 Corsair XMS3 2x4gb 8gb DDR3 RAM Corsair CXM 500W Modular PSU MSI Radeon HD 7770 1GB Asus Radeon HD 7770 2gb MSI 990XA-GD55 Motherboard Cooler Master K280 Case Microsoft Sidewinder X4 Keyboard Generic £5 Optical Mouse Windows 8 64-bit
-
-
Hi, I recently installed Windows 8 onto a new hard drive (western digital caviar blue 1tb) and now, every time I turn my computer on, it goes in the EFI Shell thing... it says EFI Shell Version 2.31 [4.653] Current running mode 1.1.2 map: Cannot find required map name. Press ESC in 1 seconds to skip startup.nsh, any other key to continue. Shell> How do I just boot to Windows 8 again and stop going into this weird thing, I want to get to the BIOS as well please UPDATE I've now managed to get out of the EFI, I am able to access the BIOS. However, when I select to boot from my wd hard drive, nothing happens, it just has a flashing line in the top left hand corner and I can't type anything UPDATE 2 F*ck... Just basically found out that instead of installing the OS onto my 1tb HDD, I managed to install it onto a 20gb 2.5inch HDD that was from my xbox that had my ubuntu OS on it... Sh*t
-
Ah, nice chart, thanks I can't put a crossfire bridge between them though because my msi card doesn't have the required connecter..
-
Well, when I get Windows 8 again, I'll have a look at what's working and what's not At the moment they're both sitting in my pc both running, I'm not seeing any boost in performance when I play games in ubuntu...