


Dovin
-
Posts
35 -
Joined
-
Last visited
Reputation Activity
-

 Dovin got a reaction from HellaflushMcSwaggins in Uni render box | Sugo SG09
Edit: I have now finished the post, sorry about that.
I made this build about 2 months ago. I built it because I was going to England (from Norway) to get a Masters in architectural visualisation (3d graphics with focus on photorealism and heavy rendering).
I had to build the PC before I went over to England and I wanted to make the smallest most powerful rendering machine I could, within reason. I had been working hard in my summer job so that I could build a proper PC that was easy to move around (e.g bring it home during the holidays). I started working 12h/7d a week so I could afford the PC and a 30" Ultrasharp, but I ended up getting two 24" Ultrasharps instead, since I would be moving about in a year or so, they are much easier to deal with.
Quick just a few notes: Firstly as I said I'm from Norway, I'm trying to write this as good as I can, but my English grammar is not award winning. Second: I will do the pictures from the build in several spoilers, some of the pictures are a little bit big (1800x1200) also I have a few of them. Third: I had to use a 3 year old cheapo digital camera during the building process, so they are not the best. I did take some of the recent pictures with my phone and some with a Nikon I borrowed from school, but I'm not very good with it. Sorry for the quality in advance.
Specs:
Components I bought:
Silverstone Sugo SG09B
Asus Rampage IV Gene X79 M-ATX
Intel Core i7 3930k
Corsair H80i
Seagate Barracuda 4TB
Corsair Air SP120 PWM Quiet ed
Component I had:
Corsair HX 850W
Gigabyte GTX 690
Seagate Barracuda 2TB
Corsair Force GT 120 GB
Intel 520 180 GB
Peripheral
Had:
Logitech MX518
Corsair K60 (MX red)
Bought:
2x Dell U2412M IPS (1920x1200)
Epiphany Acoustics E-HP-O2 and E-DAC (It is NwAvGuy's O2 and ODAC, as far as I have read, it's exactly the same except for the gain button)
Sennheiser HD650
So you are probably thinking "why the hell did he buy the 3930k and not the 4930k?" I simply had to build the PC and could not wait for the release, from what I can tell, I really didn't lose out on much.
I'll just have some pictures of the build and my battlestation then I'll put the progress pictures in spoilers, I'll try and explain what I did and why I did it over each picture.
First is just a picture of my battlestation, my shelves are a little messy, but you should have seen everything before I cleaned. The TP is for killing insects, they have so many god damn insects in England.
Slightly different angle (sorry for the bad colors) also look at that beautiful cable management, just beautiful.
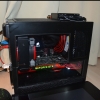
Two pictures of the computer itself. I have minimal lighting in the case itself, I don't want to be blinded by my PC when I'm working or gaming. The two LEDs under the cable GPU cables are not noticeable, they only stand out in the pictures. I have some pictures with a LED strip, but I was not attractive, It became way to bright. This case is not easy to light properly. I just wanted the two LED to light up my GPU since it's suppose to draw the eye.
One of the PC taken with my phone. This was when I had the LED strip and after I changed the terrible plexiglass I had. As you can see, it's way to intense with the LED strip, I could have tried to dile it down, but to be honest big flashy lighting in PCs does not appeal to me. Also I did clean the dust on the inside of the window when I removed the LED strip.
Tried some pictures with flash, so I used my Wacom to remove some of the reflection from the desk.
Now to the progress pictures.
[spoiler Window]
It will be some jumping back and forth in time with the pictures since I didn't really do one thing then the next, it was more of the work a little on everything at the same time.
The template I used for the window, I wanted it to be big enough to see everything. Having a window in this case is not easy or practical.
First cut, it took me some time to figure out that my fathers jigsaw pulled massively to the right. I straighten out the cut, that was a very stupid idea as I barely had enough room to fit the plexi glass.
This was how I was planning on having the window, I later decided to get some U-channel to clean up the look. Don't know if you can see, but the plexiglass is a very old one my father had in the basement that I used, it was scratched to oblivion. It has been changed with a new one as you can see in pictures at the start.
The reason I got U-channel, some of the damages I did.
With U-channel, it looks so much better. I had to use double sided tape to fix the plexiglass to the sidepanel. It sits very well despite the fact that it is not touching the sidepanel itself, only the U-channel. You do have to struggle to get it off, so I'm not worried, did just fine in transport.
[spoiler GPU]
So... yeah, I painted my GTX 690 red.
First of all, why? Well when the GTX Titan came out I actually dreamed about getting 3 of them and building an insane computer and then I would paint it red and call it something cheezy like "The Red Titans". I gave up on the idea because I never won the lottery. I thought I could still do it with my GTX 690 since the Titans cooler is based on the 690. So when I got accepted into Uni I started researching for my new build with the intention of making a red/black themed mini PC. I wanted to change the green GEFORCE GTX logo from green to red if I was going to paint the card. So I started googleing and came across this build: http://www.overclock.net/t/1396669/build-log-red-titan-2xtitan-350d-first-build-in-17ish-yrs/70 "Red Titan" by "Panther Al" on Overclock.net. Same concept as I wanted to do, even the same fukkin name.
He was not done with the build when I saw it, he still had not changed the logo to red from green, but i thought it looked fantastic in the original Nvidia green. The color cut very nice through the red and black PC and gave a nice focus point for your eyes.
So I decided I could paint the cooler and leave the logo. Also go have a look if you didn't at Panther Al's build, it's far better than mine.
Also I didn't take many pictures during the painting process, note, can't seem to find any in progress pictures, sorry. I used three light layers of grey primer and three light layers of red spray paint/lacquer, the color was called signal red or something, bought it at a local paint shop. Anyway, pictures:
[spoiler Fitting the H80i]
I had to modify the mounting holes slightly for the SG09 to be able to fit the H80i with the tubing coming out at the to of the rad and not the bottom. I did this to be able to fit the GTX 690 in the top PCI-E slot. The way the cooler is maid the part with the tubing is longer/higher than the other part. So mounting it with the tubing at the bottom would block the first PCI-E slot.
It was quite easy the only thing I had to do was to make the holes for the mounting screws a little lower, I did this with the use of a round file.
If you can see I'm pointing at a piece of folded metal (not sure if it alu or whatever) that make up the hole for the 180mm fan in the top. It makes it so you can fit the rad in two of the mounting holes, but because of the folded piece, the rad is not leveled.
Just showing clearance.
So these pictures show how much I had to lower the mounting
I also had to remove the screw for the 180mm fan that was over the rad, If you screw it all the way in it would probably puncture the rad. Removing the screw does not increase the nice of the fan.
Proving clearance
The file i used.
[spoiler Cables]
So I got myself some sleeving from Nils at MDPC-X, my god was that some nice sleeving. I got sleeving for the powersupply and some wider for sata cables.
I don't have pictures form the sleeving prosess, because well it's sleeving, it is boring and tedious.
This is after I sleeved the cables, I did sleeve the 8 pin CPU (although you can't see it), the 24pin and the two 8pin PCI-E cables. I also did the USB cable for the H80i and the front panel connectors.
Just sew the two 8 pins together
24pin sleeved
Front panel connectors sleeved. Had to take them out of the case to get it done properly.
Reattached to the front panel, also removed the front panel audio, since I have a DAC/AMP setup
8pin CPU cable.
24pin stitching (or whatever you call it). Used something my mother had called bear thread "It's called that because they can hold a bear". LIES, I had to start over 3 times because it snapped.
Had excatly enough of the SATA sleeve to sleeve my HD650 cable.
[spoiler Improvements]
So first of all, air flow. Since the GTX 690 blows air out the back and the front it recycled a lot of the air inside the case, so I had make an opening somewhere so it could exit the case.
started drilling holes, the one to the far left was a mistake and removed the threds for the screw holding in the front panel conncetors... woops.
Also the part of the side panel that I kept had to be covered up, the holes looked awful. I tried to use pieces of metal, but ended up cutting up the fan filter cover you get with the case. Much better:
[spoiler Cable management]
If you are planning on building in this case, don't do individual sleeving, it takes so much space! Or get the short cables with a Silverstone PSU that Linus used, God how I wished I had one of those when I was doing the cable management.
As you can see, I didn't do a very good job at the back with the sleeving, I just could not be bothered, no one will ever see it IRL. Aslo cut off some cables that I didn't use and didn't have the space for.
So I guess that was it for the pictures. When I was planning this build I told myself I want to make something that made people think "Jesus, I wish I could have a PC that looked this good". I also wanted to make something that was good enough for build logs of the week, but this is far from as good as what the pros are making.
I'm very happy with this PC, if is easy to move around, it looks good and it is powerful.
I didn't really like how the window cut came out, i should have done some practicing before I started on the case, but that's in the past.
Hope you enjoy.
-
 Dovin got a reaction from ososa in Uni render box | Sugo SG09
Edit: I have now finished the post, sorry about that.
I made this build about 2 months ago. I built it because I was going to England (from Norway) to get a Masters in architectural visualisation (3d graphics with focus on photorealism and heavy rendering).
I had to build the PC before I went over to England and I wanted to make the smallest most powerful rendering machine I could, within reason. I had been working hard in my summer job so that I could build a proper PC that was easy to move around (e.g bring it home during the holidays). I started working 12h/7d a week so I could afford the PC and a 30" Ultrasharp, but I ended up getting two 24" Ultrasharps instead, since I would be moving about in a year or so, they are much easier to deal with.
Quick just a few notes: Firstly as I said I'm from Norway, I'm trying to write this as good as I can, but my English grammar is not award winning. Second: I will do the pictures from the build in several spoilers, some of the pictures are a little bit big (1800x1200) also I have a few of them. Third: I had to use a 3 year old cheapo digital camera during the building process, so they are not the best. I did take some of the recent pictures with my phone and some with a Nikon I borrowed from school, but I'm not very good with it. Sorry for the quality in advance.
Specs:
Components I bought:
Silverstone Sugo SG09B
Asus Rampage IV Gene X79 M-ATX
Intel Core i7 3930k
Corsair H80i
Seagate Barracuda 4TB
Corsair Air SP120 PWM Quiet ed
Component I had:
Corsair HX 850W
Gigabyte GTX 690
Seagate Barracuda 2TB
Corsair Force GT 120 GB
Intel 520 180 GB
Peripheral
Had:
Logitech MX518
Corsair K60 (MX red)
Bought:
2x Dell U2412M IPS (1920x1200)
Epiphany Acoustics E-HP-O2 and E-DAC (It is NwAvGuy's O2 and ODAC, as far as I have read, it's exactly the same except for the gain button)
Sennheiser HD650
So you are probably thinking "why the hell did he buy the 3930k and not the 4930k?" I simply had to build the PC and could not wait for the release, from what I can tell, I really didn't lose out on much.
I'll just have some pictures of the build and my battlestation then I'll put the progress pictures in spoilers, I'll try and explain what I did and why I did it over each picture.
First is just a picture of my battlestation, my shelves are a little messy, but you should have seen everything before I cleaned. The TP is for killing insects, they have so many god damn insects in England.
Slightly different angle (sorry for the bad colors) also look at that beautiful cable management, just beautiful.
Two pictures of the computer itself. I have minimal lighting in the case itself, I don't want to be blinded by my PC when I'm working or gaming. The two LEDs under the cable GPU cables are not noticeable, they only stand out in the pictures. I have some pictures with a LED strip, but I was not attractive, It became way to bright. This case is not easy to light properly. I just wanted the two LED to light up my GPU since it's suppose to draw the eye.
One of the PC taken with my phone. This was when I had the LED strip and after I changed the terrible plexiglass I had. As you can see, it's way to intense with the LED strip, I could have tried to dile it down, but to be honest big flashy lighting in PCs does not appeal to me. Also I did clean the dust on the inside of the window when I removed the LED strip.
Tried some pictures with flash, so I used my Wacom to remove some of the reflection from the desk.
Now to the progress pictures.
[spoiler Window]
It will be some jumping back and forth in time with the pictures since I didn't really do one thing then the next, it was more of the work a little on everything at the same time.
The template I used for the window, I wanted it to be big enough to see everything. Having a window in this case is not easy or practical.
First cut, it took me some time to figure out that my fathers jigsaw pulled massively to the right. I straighten out the cut, that was a very stupid idea as I barely had enough room to fit the plexi glass.
This was how I was planning on having the window, I later decided to get some U-channel to clean up the look. Don't know if you can see, but the plexiglass is a very old one my father had in the basement that I used, it was scratched to oblivion. It has been changed with a new one as you can see in pictures at the start.
The reason I got U-channel, some of the damages I did.
With U-channel, it looks so much better. I had to use double sided tape to fix the plexiglass to the sidepanel. It sits very well despite the fact that it is not touching the sidepanel itself, only the U-channel. You do have to struggle to get it off, so I'm not worried, did just fine in transport.
[spoiler GPU]
So... yeah, I painted my GTX 690 red.
First of all, why? Well when the GTX Titan came out I actually dreamed about getting 3 of them and building an insane computer and then I would paint it red and call it something cheezy like "The Red Titans". I gave up on the idea because I never won the lottery. I thought I could still do it with my GTX 690 since the Titans cooler is based on the 690. So when I got accepted into Uni I started researching for my new build with the intention of making a red/black themed mini PC. I wanted to change the green GEFORCE GTX logo from green to red if I was going to paint the card. So I started googleing and came across this build: http://www.overclock.net/t/1396669/build-log-red-titan-2xtitan-350d-first-build-in-17ish-yrs/70 "Red Titan" by "Panther Al" on Overclock.net. Same concept as I wanted to do, even the same fukkin name.
He was not done with the build when I saw it, he still had not changed the logo to red from green, but i thought it looked fantastic in the original Nvidia green. The color cut very nice through the red and black PC and gave a nice focus point for your eyes.
So I decided I could paint the cooler and leave the logo. Also go have a look if you didn't at Panther Al's build, it's far better than mine.
Also I didn't take many pictures during the painting process, note, can't seem to find any in progress pictures, sorry. I used three light layers of grey primer and three light layers of red spray paint/lacquer, the color was called signal red or something, bought it at a local paint shop. Anyway, pictures:
[spoiler Fitting the H80i]
I had to modify the mounting holes slightly for the SG09 to be able to fit the H80i with the tubing coming out at the to of the rad and not the bottom. I did this to be able to fit the GTX 690 in the top PCI-E slot. The way the cooler is maid the part with the tubing is longer/higher than the other part. So mounting it with the tubing at the bottom would block the first PCI-E slot.
It was quite easy the only thing I had to do was to make the holes for the mounting screws a little lower, I did this with the use of a round file.
If you can see I'm pointing at a piece of folded metal (not sure if it alu or whatever) that make up the hole for the 180mm fan in the top. It makes it so you can fit the rad in two of the mounting holes, but because of the folded piece, the rad is not leveled.
Just showing clearance.
So these pictures show how much I had to lower the mounting
I also had to remove the screw for the 180mm fan that was over the rad, If you screw it all the way in it would probably puncture the rad. Removing the screw does not increase the nice of the fan.
Proving clearance
The file i used.
[spoiler Cables]
So I got myself some sleeving from Nils at MDPC-X, my god was that some nice sleeving. I got sleeving for the powersupply and some wider for sata cables.
I don't have pictures form the sleeving prosess, because well it's sleeving, it is boring and tedious.
This is after I sleeved the cables, I did sleeve the 8 pin CPU (although you can't see it), the 24pin and the two 8pin PCI-E cables. I also did the USB cable for the H80i and the front panel connectors.
Just sew the two 8 pins together
24pin sleeved
Front panel connectors sleeved. Had to take them out of the case to get it done properly.
Reattached to the front panel, also removed the front panel audio, since I have a DAC/AMP setup
8pin CPU cable.
24pin stitching (or whatever you call it). Used something my mother had called bear thread "It's called that because they can hold a bear". LIES, I had to start over 3 times because it snapped.
Had excatly enough of the SATA sleeve to sleeve my HD650 cable.
[spoiler Improvements]
So first of all, air flow. Since the GTX 690 blows air out the back and the front it recycled a lot of the air inside the case, so I had make an opening somewhere so it could exit the case.
started drilling holes, the one to the far left was a mistake and removed the threds for the screw holding in the front panel conncetors... woops.
Also the part of the side panel that I kept had to be covered up, the holes looked awful. I tried to use pieces of metal, but ended up cutting up the fan filter cover you get with the case. Much better:
[spoiler Cable management]
If you are planning on building in this case, don't do individual sleeving, it takes so much space! Or get the short cables with a Silverstone PSU that Linus used, God how I wished I had one of those when I was doing the cable management.
As you can see, I didn't do a very good job at the back with the sleeving, I just could not be bothered, no one will ever see it IRL. Aslo cut off some cables that I didn't use and didn't have the space for.
So I guess that was it for the pictures. When I was planning this build I told myself I want to make something that made people think "Jesus, I wish I could have a PC that looked this good". I also wanted to make something that was good enough for build logs of the week, but this is far from as good as what the pros are making.
I'm very happy with this PC, if is easy to move around, it looks good and it is powerful.
I didn't really like how the window cut came out, i should have done some practicing before I started on the case, but that's in the past.
Hope you enjoy.
-
 Dovin got a reaction from Marvzl1357 in [WIP] Window for Silverstone Sugo SG09
This is the first time I have the money, time and tools to do some custom modification to my computer. I wanted to do something that, to my knowledge and google skills, no one have done before. I've seen a SG09 that had a small window on the top side window and never the whole side.
So I'm calling this a WIP because I need to put some u-channel around the edges to make it look better. I have to acquire it first though, so I will check some local shops in the next few days and will update this post when i have done it.
The only camera I have access to is about 3-4 years old, so the quality is not the best and my camera skills are rusty as well. The pictures of the case with the window was taken at night, so it was somewhat dark. When I have finished I will take the shots in daylight so it looks better.
There is a lack of progress pictures because I was ashamed of my work and I didn't want to advertise it too much.
Now, why did I get the SG09? In two weeks I'm going to England, from Norway, to get my masters degree. It is in 3D rendering, that's not the title, but it involves a lot of photo realistic rendering. So I wanted to upgrade to a 3930k from a 2500k. So I had to get a new motherboard. So I thought I might make myself a SFF pc since I would have to bring it with me on a plane. The SG09 takes less then half the space of a suitcase, so it will be easy to more around.
Why was I stupid enough to make a window in my case? As I said this is the first time I have had money and time to do something like this. So naturally I wanted to make something that would look beautiful, something people would look at and this: " Wow, why can't I make something like that".
So why did you do such a piss poor job? This was my first time, I think it will look much better when I get the U-channel on it and when it gets full of hardware it will look even better. What contributed most to the bad looks was bad planning and lack of experience.
Putting pictures in a spoiler, they might be a little big, sorry if it fucks your browser up.
[spoiler=WIP 03.09]
This is a rough idea of the size I wanted the window to be.
Now this is a picture of my first cut, the jigsaw pulled to the right, I only discovered this after I made the bad cut. I'm using a square to show how bad it acutely was. I did make a new cut closer to the edge afterwards.
Finished cutting the lower side panel.
This is how it looks now, with the window. As you can see I need to put a U-channel on the edges. I did create some problems for myself. There is only about 6-7 mm of spaces at the back to attach the window, this is something that happened because I had to redo my first cut. I did not cover the whole side with glass, simply because I wanted the PSU to exhaust out of the case and not in it. I also left about 10 cm of the overlapping metal, where you would screw the upper and lower side panels together, where you can see the white piece in the picture below. It is double sided tape that's going to hold the two side panels together when I'm finishing the build. The window Is attached to the lower side panel and will be attached to the upper side panel when I'm ready to finish the build. It will be a rather permanent solution, but I won't open it too often. I will be able to open it, but then I would probably need to add new double sided tape again.
Not sure how I'm going to cover up the bottom part of the lower side panel, where you can see the punch out for the fans, but I have some ideas.
Now I know you probably want to criticize my work, but you can save it, I already know it :\
Lastly I'm terribly sorry if my English is appalling to read, writing is the weakest form of my English skills.
Have a nice day.
-Dovin
-
 Dovin got a reaction from helping in Reduce GPU usage while folding?
Didn't even consider that. Thank you for the tips, i'll try and see if I can get it to work.
-Tore
-
 Dovin reacted to helping in Reduce GPU usage while folding?
You can probably have folding allocated to only one core if you want to fold and do work at the same time.
IIRC there is currently no way to throttle GPU folding, you can instead creative profiles in Afterburner or Precision or whatever you use and have an undervolted and downclocked profile.
-
 Dovin got a reaction from Old Man Snail in Uni render box | Sugo SG09
Edit: I have now finished the post, sorry about that.
I made this build about 2 months ago. I built it because I was going to England (from Norway) to get a Masters in architectural visualisation (3d graphics with focus on photorealism and heavy rendering).
I had to build the PC before I went over to England and I wanted to make the smallest most powerful rendering machine I could, within reason. I had been working hard in my summer job so that I could build a proper PC that was easy to move around (e.g bring it home during the holidays). I started working 12h/7d a week so I could afford the PC and a 30" Ultrasharp, but I ended up getting two 24" Ultrasharps instead, since I would be moving about in a year or so, they are much easier to deal with.
Quick just a few notes: Firstly as I said I'm from Norway, I'm trying to write this as good as I can, but my English grammar is not award winning. Second: I will do the pictures from the build in several spoilers, some of the pictures are a little bit big (1800x1200) also I have a few of them. Third: I had to use a 3 year old cheapo digital camera during the building process, so they are not the best. I did take some of the recent pictures with my phone and some with a Nikon I borrowed from school, but I'm not very good with it. Sorry for the quality in advance.
Specs:
Components I bought:
Silverstone Sugo SG09B
Asus Rampage IV Gene X79 M-ATX
Intel Core i7 3930k
Corsair H80i
Seagate Barracuda 4TB
Corsair Air SP120 PWM Quiet ed
Component I had:
Corsair HX 850W
Gigabyte GTX 690
Seagate Barracuda 2TB
Corsair Force GT 120 GB
Intel 520 180 GB
Peripheral
Had:
Logitech MX518
Corsair K60 (MX red)
Bought:
2x Dell U2412M IPS (1920x1200)
Epiphany Acoustics E-HP-O2 and E-DAC (It is NwAvGuy's O2 and ODAC, as far as I have read, it's exactly the same except for the gain button)
Sennheiser HD650
So you are probably thinking "why the hell did he buy the 3930k and not the 4930k?" I simply had to build the PC and could not wait for the release, from what I can tell, I really didn't lose out on much.
I'll just have some pictures of the build and my battlestation then I'll put the progress pictures in spoilers, I'll try and explain what I did and why I did it over each picture.
First is just a picture of my battlestation, my shelves are a little messy, but you should have seen everything before I cleaned. The TP is for killing insects, they have so many god damn insects in England.
Slightly different angle (sorry for the bad colors) also look at that beautiful cable management, just beautiful.
Two pictures of the computer itself. I have minimal lighting in the case itself, I don't want to be blinded by my PC when I'm working or gaming. The two LEDs under the cable GPU cables are not noticeable, they only stand out in the pictures. I have some pictures with a LED strip, but I was not attractive, It became way to bright. This case is not easy to light properly. I just wanted the two LED to light up my GPU since it's suppose to draw the eye.
One of the PC taken with my phone. This was when I had the LED strip and after I changed the terrible plexiglass I had. As you can see, it's way to intense with the LED strip, I could have tried to dile it down, but to be honest big flashy lighting in PCs does not appeal to me. Also I did clean the dust on the inside of the window when I removed the LED strip.
Tried some pictures with flash, so I used my Wacom to remove some of the reflection from the desk.
Now to the progress pictures.
[spoiler Window]
It will be some jumping back and forth in time with the pictures since I didn't really do one thing then the next, it was more of the work a little on everything at the same time.
The template I used for the window, I wanted it to be big enough to see everything. Having a window in this case is not easy or practical.
First cut, it took me some time to figure out that my fathers jigsaw pulled massively to the right. I straighten out the cut, that was a very stupid idea as I barely had enough room to fit the plexi glass.
This was how I was planning on having the window, I later decided to get some U-channel to clean up the look. Don't know if you can see, but the plexiglass is a very old one my father had in the basement that I used, it was scratched to oblivion. It has been changed with a new one as you can see in pictures at the start.
The reason I got U-channel, some of the damages I did.
With U-channel, it looks so much better. I had to use double sided tape to fix the plexiglass to the sidepanel. It sits very well despite the fact that it is not touching the sidepanel itself, only the U-channel. You do have to struggle to get it off, so I'm not worried, did just fine in transport.
[spoiler GPU]
So... yeah, I painted my GTX 690 red.
First of all, why? Well when the GTX Titan came out I actually dreamed about getting 3 of them and building an insane computer and then I would paint it red and call it something cheezy like "The Red Titans". I gave up on the idea because I never won the lottery. I thought I could still do it with my GTX 690 since the Titans cooler is based on the 690. So when I got accepted into Uni I started researching for my new build with the intention of making a red/black themed mini PC. I wanted to change the green GEFORCE GTX logo from green to red if I was going to paint the card. So I started googleing and came across this build: http://www.overclock.net/t/1396669/build-log-red-titan-2xtitan-350d-first-build-in-17ish-yrs/70 "Red Titan" by "Panther Al" on Overclock.net. Same concept as I wanted to do, even the same fukkin name.
He was not done with the build when I saw it, he still had not changed the logo to red from green, but i thought it looked fantastic in the original Nvidia green. The color cut very nice through the red and black PC and gave a nice focus point for your eyes.
So I decided I could paint the cooler and leave the logo. Also go have a look if you didn't at Panther Al's build, it's far better than mine.
Also I didn't take many pictures during the painting process, note, can't seem to find any in progress pictures, sorry. I used three light layers of grey primer and three light layers of red spray paint/lacquer, the color was called signal red or something, bought it at a local paint shop. Anyway, pictures:
[spoiler Fitting the H80i]
I had to modify the mounting holes slightly for the SG09 to be able to fit the H80i with the tubing coming out at the to of the rad and not the bottom. I did this to be able to fit the GTX 690 in the top PCI-E slot. The way the cooler is maid the part with the tubing is longer/higher than the other part. So mounting it with the tubing at the bottom would block the first PCI-E slot.
It was quite easy the only thing I had to do was to make the holes for the mounting screws a little lower, I did this with the use of a round file.
If you can see I'm pointing at a piece of folded metal (not sure if it alu or whatever) that make up the hole for the 180mm fan in the top. It makes it so you can fit the rad in two of the mounting holes, but because of the folded piece, the rad is not leveled.
Just showing clearance.
So these pictures show how much I had to lower the mounting
I also had to remove the screw for the 180mm fan that was over the rad, If you screw it all the way in it would probably puncture the rad. Removing the screw does not increase the nice of the fan.
Proving clearance
The file i used.
[spoiler Cables]
So I got myself some sleeving from Nils at MDPC-X, my god was that some nice sleeving. I got sleeving for the powersupply and some wider for sata cables.
I don't have pictures form the sleeving prosess, because well it's sleeving, it is boring and tedious.
This is after I sleeved the cables, I did sleeve the 8 pin CPU (although you can't see it), the 24pin and the two 8pin PCI-E cables. I also did the USB cable for the H80i and the front panel connectors.
Just sew the two 8 pins together
24pin sleeved
Front panel connectors sleeved. Had to take them out of the case to get it done properly.
Reattached to the front panel, also removed the front panel audio, since I have a DAC/AMP setup
8pin CPU cable.
24pin stitching (or whatever you call it). Used something my mother had called bear thread "It's called that because they can hold a bear". LIES, I had to start over 3 times because it snapped.
Had excatly enough of the SATA sleeve to sleeve my HD650 cable.
[spoiler Improvements]
So first of all, air flow. Since the GTX 690 blows air out the back and the front it recycled a lot of the air inside the case, so I had make an opening somewhere so it could exit the case.
started drilling holes, the one to the far left was a mistake and removed the threds for the screw holding in the front panel conncetors... woops.
Also the part of the side panel that I kept had to be covered up, the holes looked awful. I tried to use pieces of metal, but ended up cutting up the fan filter cover you get with the case. Much better:
[spoiler Cable management]
If you are planning on building in this case, don't do individual sleeving, it takes so much space! Or get the short cables with a Silverstone PSU that Linus used, God how I wished I had one of those when I was doing the cable management.
As you can see, I didn't do a very good job at the back with the sleeving, I just could not be bothered, no one will ever see it IRL. Aslo cut off some cables that I didn't use and didn't have the space for.
So I guess that was it for the pictures. When I was planning this build I told myself I want to make something that made people think "Jesus, I wish I could have a PC that looked this good". I also wanted to make something that was good enough for build logs of the week, but this is far from as good as what the pros are making.
I'm very happy with this PC, if is easy to move around, it looks good and it is powerful.
I didn't really like how the window cut came out, i should have done some practicing before I started on the case, but that's in the past.
Hope you enjoy.
-
 Dovin got a reaction from Sundanc3 in Uni render box | Sugo SG09
Edit: I have now finished the post, sorry about that.
I made this build about 2 months ago. I built it because I was going to England (from Norway) to get a Masters in architectural visualisation (3d graphics with focus on photorealism and heavy rendering).
I had to build the PC before I went over to England and I wanted to make the smallest most powerful rendering machine I could, within reason. I had been working hard in my summer job so that I could build a proper PC that was easy to move around (e.g bring it home during the holidays). I started working 12h/7d a week so I could afford the PC and a 30" Ultrasharp, but I ended up getting two 24" Ultrasharps instead, since I would be moving about in a year or so, they are much easier to deal with.
Quick just a few notes: Firstly as I said I'm from Norway, I'm trying to write this as good as I can, but my English grammar is not award winning. Second: I will do the pictures from the build in several spoilers, some of the pictures are a little bit big (1800x1200) also I have a few of them. Third: I had to use a 3 year old cheapo digital camera during the building process, so they are not the best. I did take some of the recent pictures with my phone and some with a Nikon I borrowed from school, but I'm not very good with it. Sorry for the quality in advance.
Specs:
Components I bought:
Silverstone Sugo SG09B
Asus Rampage IV Gene X79 M-ATX
Intel Core i7 3930k
Corsair H80i
Seagate Barracuda 4TB
Corsair Air SP120 PWM Quiet ed
Component I had:
Corsair HX 850W
Gigabyte GTX 690
Seagate Barracuda 2TB
Corsair Force GT 120 GB
Intel 520 180 GB
Peripheral
Had:
Logitech MX518
Corsair K60 (MX red)
Bought:
2x Dell U2412M IPS (1920x1200)
Epiphany Acoustics E-HP-O2 and E-DAC (It is NwAvGuy's O2 and ODAC, as far as I have read, it's exactly the same except for the gain button)
Sennheiser HD650
So you are probably thinking "why the hell did he buy the 3930k and not the 4930k?" I simply had to build the PC and could not wait for the release, from what I can tell, I really didn't lose out on much.
I'll just have some pictures of the build and my battlestation then I'll put the progress pictures in spoilers, I'll try and explain what I did and why I did it over each picture.
First is just a picture of my battlestation, my shelves are a little messy, but you should have seen everything before I cleaned. The TP is for killing insects, they have so many god damn insects in England.
Slightly different angle (sorry for the bad colors) also look at that beautiful cable management, just beautiful.
Two pictures of the computer itself. I have minimal lighting in the case itself, I don't want to be blinded by my PC when I'm working or gaming. The two LEDs under the cable GPU cables are not noticeable, they only stand out in the pictures. I have some pictures with a LED strip, but I was not attractive, It became way to bright. This case is not easy to light properly. I just wanted the two LED to light up my GPU since it's suppose to draw the eye.
One of the PC taken with my phone. This was when I had the LED strip and after I changed the terrible plexiglass I had. As you can see, it's way to intense with the LED strip, I could have tried to dile it down, but to be honest big flashy lighting in PCs does not appeal to me. Also I did clean the dust on the inside of the window when I removed the LED strip.
Tried some pictures with flash, so I used my Wacom to remove some of the reflection from the desk.
Now to the progress pictures.
[spoiler Window]
It will be some jumping back and forth in time with the pictures since I didn't really do one thing then the next, it was more of the work a little on everything at the same time.
The template I used for the window, I wanted it to be big enough to see everything. Having a window in this case is not easy or practical.
First cut, it took me some time to figure out that my fathers jigsaw pulled massively to the right. I straighten out the cut, that was a very stupid idea as I barely had enough room to fit the plexi glass.
This was how I was planning on having the window, I later decided to get some U-channel to clean up the look. Don't know if you can see, but the plexiglass is a very old one my father had in the basement that I used, it was scratched to oblivion. It has been changed with a new one as you can see in pictures at the start.
The reason I got U-channel, some of the damages I did.
With U-channel, it looks so much better. I had to use double sided tape to fix the plexiglass to the sidepanel. It sits very well despite the fact that it is not touching the sidepanel itself, only the U-channel. You do have to struggle to get it off, so I'm not worried, did just fine in transport.
[spoiler GPU]
So... yeah, I painted my GTX 690 red.
First of all, why? Well when the GTX Titan came out I actually dreamed about getting 3 of them and building an insane computer and then I would paint it red and call it something cheezy like "The Red Titans". I gave up on the idea because I never won the lottery. I thought I could still do it with my GTX 690 since the Titans cooler is based on the 690. So when I got accepted into Uni I started researching for my new build with the intention of making a red/black themed mini PC. I wanted to change the green GEFORCE GTX logo from green to red if I was going to paint the card. So I started googleing and came across this build: http://www.overclock.net/t/1396669/build-log-red-titan-2xtitan-350d-first-build-in-17ish-yrs/70 "Red Titan" by "Panther Al" on Overclock.net. Same concept as I wanted to do, even the same fukkin name.
He was not done with the build when I saw it, he still had not changed the logo to red from green, but i thought it looked fantastic in the original Nvidia green. The color cut very nice through the red and black PC and gave a nice focus point for your eyes.
So I decided I could paint the cooler and leave the logo. Also go have a look if you didn't at Panther Al's build, it's far better than mine.
Also I didn't take many pictures during the painting process, note, can't seem to find any in progress pictures, sorry. I used three light layers of grey primer and three light layers of red spray paint/lacquer, the color was called signal red or something, bought it at a local paint shop. Anyway, pictures:
[spoiler Fitting the H80i]
I had to modify the mounting holes slightly for the SG09 to be able to fit the H80i with the tubing coming out at the to of the rad and not the bottom. I did this to be able to fit the GTX 690 in the top PCI-E slot. The way the cooler is maid the part with the tubing is longer/higher than the other part. So mounting it with the tubing at the bottom would block the first PCI-E slot.
It was quite easy the only thing I had to do was to make the holes for the mounting screws a little lower, I did this with the use of a round file.
If you can see I'm pointing at a piece of folded metal (not sure if it alu or whatever) that make up the hole for the 180mm fan in the top. It makes it so you can fit the rad in two of the mounting holes, but because of the folded piece, the rad is not leveled.
Just showing clearance.
So these pictures show how much I had to lower the mounting
I also had to remove the screw for the 180mm fan that was over the rad, If you screw it all the way in it would probably puncture the rad. Removing the screw does not increase the nice of the fan.
Proving clearance
The file i used.
[spoiler Cables]
So I got myself some sleeving from Nils at MDPC-X, my god was that some nice sleeving. I got sleeving for the powersupply and some wider for sata cables.
I don't have pictures form the sleeving prosess, because well it's sleeving, it is boring and tedious.
This is after I sleeved the cables, I did sleeve the 8 pin CPU (although you can't see it), the 24pin and the two 8pin PCI-E cables. I also did the USB cable for the H80i and the front panel connectors.
Just sew the two 8 pins together
24pin sleeved
Front panel connectors sleeved. Had to take them out of the case to get it done properly.
Reattached to the front panel, also removed the front panel audio, since I have a DAC/AMP setup
8pin CPU cable.
24pin stitching (or whatever you call it). Used something my mother had called bear thread "It's called that because they can hold a bear". LIES, I had to start over 3 times because it snapped.
Had excatly enough of the SATA sleeve to sleeve my HD650 cable.
[spoiler Improvements]
So first of all, air flow. Since the GTX 690 blows air out the back and the front it recycled a lot of the air inside the case, so I had make an opening somewhere so it could exit the case.
started drilling holes, the one to the far left was a mistake and removed the threds for the screw holding in the front panel conncetors... woops.
Also the part of the side panel that I kept had to be covered up, the holes looked awful. I tried to use pieces of metal, but ended up cutting up the fan filter cover you get with the case. Much better:
[spoiler Cable management]
If you are planning on building in this case, don't do individual sleeving, it takes so much space! Or get the short cables with a Silverstone PSU that Linus used, God how I wished I had one of those when I was doing the cable management.
As you can see, I didn't do a very good job at the back with the sleeving, I just could not be bothered, no one will ever see it IRL. Aslo cut off some cables that I didn't use and didn't have the space for.
So I guess that was it for the pictures. When I was planning this build I told myself I want to make something that made people think "Jesus, I wish I could have a PC that looked this good". I also wanted to make something that was good enough for build logs of the week, but this is far from as good as what the pros are making.
I'm very happy with this PC, if is easy to move around, it looks good and it is powerful.
I didn't really like how the window cut came out, i should have done some practicing before I started on the case, but that's in the past.
Hope you enjoy.
-
 Dovin got a reaction from Air tree in Uni render box | Sugo SG09
Edit: I have now finished the post, sorry about that.
I made this build about 2 months ago. I built it because I was going to England (from Norway) to get a Masters in architectural visualisation (3d graphics with focus on photorealism and heavy rendering).
I had to build the PC before I went over to England and I wanted to make the smallest most powerful rendering machine I could, within reason. I had been working hard in my summer job so that I could build a proper PC that was easy to move around (e.g bring it home during the holidays). I started working 12h/7d a week so I could afford the PC and a 30" Ultrasharp, but I ended up getting two 24" Ultrasharps instead, since I would be moving about in a year or so, they are much easier to deal with.
Quick just a few notes: Firstly as I said I'm from Norway, I'm trying to write this as good as I can, but my English grammar is not award winning. Second: I will do the pictures from the build in several spoilers, some of the pictures are a little bit big (1800x1200) also I have a few of them. Third: I had to use a 3 year old cheapo digital camera during the building process, so they are not the best. I did take some of the recent pictures with my phone and some with a Nikon I borrowed from school, but I'm not very good with it. Sorry for the quality in advance.
Specs:
Components I bought:
Silverstone Sugo SG09B
Asus Rampage IV Gene X79 M-ATX
Intel Core i7 3930k
Corsair H80i
Seagate Barracuda 4TB
Corsair Air SP120 PWM Quiet ed
Component I had:
Corsair HX 850W
Gigabyte GTX 690
Seagate Barracuda 2TB
Corsair Force GT 120 GB
Intel 520 180 GB
Peripheral
Had:
Logitech MX518
Corsair K60 (MX red)
Bought:
2x Dell U2412M IPS (1920x1200)
Epiphany Acoustics E-HP-O2 and E-DAC (It is NwAvGuy's O2 and ODAC, as far as I have read, it's exactly the same except for the gain button)
Sennheiser HD650
So you are probably thinking "why the hell did he buy the 3930k and not the 4930k?" I simply had to build the PC and could not wait for the release, from what I can tell, I really didn't lose out on much.
I'll just have some pictures of the build and my battlestation then I'll put the progress pictures in spoilers, I'll try and explain what I did and why I did it over each picture.
First is just a picture of my battlestation, my shelves are a little messy, but you should have seen everything before I cleaned. The TP is for killing insects, they have so many god damn insects in England.
Slightly different angle (sorry for the bad colors) also look at that beautiful cable management, just beautiful.
Two pictures of the computer itself. I have minimal lighting in the case itself, I don't want to be blinded by my PC when I'm working or gaming. The two LEDs under the cable GPU cables are not noticeable, they only stand out in the pictures. I have some pictures with a LED strip, but I was not attractive, It became way to bright. This case is not easy to light properly. I just wanted the two LED to light up my GPU since it's suppose to draw the eye.
One of the PC taken with my phone. This was when I had the LED strip and after I changed the terrible plexiglass I had. As you can see, it's way to intense with the LED strip, I could have tried to dile it down, but to be honest big flashy lighting in PCs does not appeal to me. Also I did clean the dust on the inside of the window when I removed the LED strip.
Tried some pictures with flash, so I used my Wacom to remove some of the reflection from the desk.
Now to the progress pictures.
[spoiler Window]
It will be some jumping back and forth in time with the pictures since I didn't really do one thing then the next, it was more of the work a little on everything at the same time.
The template I used for the window, I wanted it to be big enough to see everything. Having a window in this case is not easy or practical.
First cut, it took me some time to figure out that my fathers jigsaw pulled massively to the right. I straighten out the cut, that was a very stupid idea as I barely had enough room to fit the plexi glass.
This was how I was planning on having the window, I later decided to get some U-channel to clean up the look. Don't know if you can see, but the plexiglass is a very old one my father had in the basement that I used, it was scratched to oblivion. It has been changed with a new one as you can see in pictures at the start.
The reason I got U-channel, some of the damages I did.
With U-channel, it looks so much better. I had to use double sided tape to fix the plexiglass to the sidepanel. It sits very well despite the fact that it is not touching the sidepanel itself, only the U-channel. You do have to struggle to get it off, so I'm not worried, did just fine in transport.
[spoiler GPU]
So... yeah, I painted my GTX 690 red.
First of all, why? Well when the GTX Titan came out I actually dreamed about getting 3 of them and building an insane computer and then I would paint it red and call it something cheezy like "The Red Titans". I gave up on the idea because I never won the lottery. I thought I could still do it with my GTX 690 since the Titans cooler is based on the 690. So when I got accepted into Uni I started researching for my new build with the intention of making a red/black themed mini PC. I wanted to change the green GEFORCE GTX logo from green to red if I was going to paint the card. So I started googleing and came across this build: http://www.overclock.net/t/1396669/build-log-red-titan-2xtitan-350d-first-build-in-17ish-yrs/70 "Red Titan" by "Panther Al" on Overclock.net. Same concept as I wanted to do, even the same fukkin name.
He was not done with the build when I saw it, he still had not changed the logo to red from green, but i thought it looked fantastic in the original Nvidia green. The color cut very nice through the red and black PC and gave a nice focus point for your eyes.
So I decided I could paint the cooler and leave the logo. Also go have a look if you didn't at Panther Al's build, it's far better than mine.
Also I didn't take many pictures during the painting process, note, can't seem to find any in progress pictures, sorry. I used three light layers of grey primer and three light layers of red spray paint/lacquer, the color was called signal red or something, bought it at a local paint shop. Anyway, pictures:
[spoiler Fitting the H80i]
I had to modify the mounting holes slightly for the SG09 to be able to fit the H80i with the tubing coming out at the to of the rad and not the bottom. I did this to be able to fit the GTX 690 in the top PCI-E slot. The way the cooler is maid the part with the tubing is longer/higher than the other part. So mounting it with the tubing at the bottom would block the first PCI-E slot.
It was quite easy the only thing I had to do was to make the holes for the mounting screws a little lower, I did this with the use of a round file.
If you can see I'm pointing at a piece of folded metal (not sure if it alu or whatever) that make up the hole for the 180mm fan in the top. It makes it so you can fit the rad in two of the mounting holes, but because of the folded piece, the rad is not leveled.
Just showing clearance.
So these pictures show how much I had to lower the mounting
I also had to remove the screw for the 180mm fan that was over the rad, If you screw it all the way in it would probably puncture the rad. Removing the screw does not increase the nice of the fan.
Proving clearance
The file i used.
[spoiler Cables]
So I got myself some sleeving from Nils at MDPC-X, my god was that some nice sleeving. I got sleeving for the powersupply and some wider for sata cables.
I don't have pictures form the sleeving prosess, because well it's sleeving, it is boring and tedious.
This is after I sleeved the cables, I did sleeve the 8 pin CPU (although you can't see it), the 24pin and the two 8pin PCI-E cables. I also did the USB cable for the H80i and the front panel connectors.
Just sew the two 8 pins together
24pin sleeved
Front panel connectors sleeved. Had to take them out of the case to get it done properly.
Reattached to the front panel, also removed the front panel audio, since I have a DAC/AMP setup
8pin CPU cable.
24pin stitching (or whatever you call it). Used something my mother had called bear thread "It's called that because they can hold a bear". LIES, I had to start over 3 times because it snapped.
Had excatly enough of the SATA sleeve to sleeve my HD650 cable.
[spoiler Improvements]
So first of all, air flow. Since the GTX 690 blows air out the back and the front it recycled a lot of the air inside the case, so I had make an opening somewhere so it could exit the case.
started drilling holes, the one to the far left was a mistake and removed the threds for the screw holding in the front panel conncetors... woops.
Also the part of the side panel that I kept had to be covered up, the holes looked awful. I tried to use pieces of metal, but ended up cutting up the fan filter cover you get with the case. Much better:
[spoiler Cable management]
If you are planning on building in this case, don't do individual sleeving, it takes so much space! Or get the short cables with a Silverstone PSU that Linus used, God how I wished I had one of those when I was doing the cable management.
As you can see, I didn't do a very good job at the back with the sleeving, I just could not be bothered, no one will ever see it IRL. Aslo cut off some cables that I didn't use and didn't have the space for.
So I guess that was it for the pictures. When I was planning this build I told myself I want to make something that made people think "Jesus, I wish I could have a PC that looked this good". I also wanted to make something that was good enough for build logs of the week, but this is far from as good as what the pros are making.
I'm very happy with this PC, if is easy to move around, it looks good and it is powerful.
I didn't really like how the window cut came out, i should have done some practicing before I started on the case, but that's in the past.
Hope you enjoy.
-
 Dovin got a reaction from hiyayhi in Uni render box | Sugo SG09
Edit: I have now finished the post, sorry about that.
I made this build about 2 months ago. I built it because I was going to England (from Norway) to get a Masters in architectural visualisation (3d graphics with focus on photorealism and heavy rendering).
I had to build the PC before I went over to England and I wanted to make the smallest most powerful rendering machine I could, within reason. I had been working hard in my summer job so that I could build a proper PC that was easy to move around (e.g bring it home during the holidays). I started working 12h/7d a week so I could afford the PC and a 30" Ultrasharp, but I ended up getting two 24" Ultrasharps instead, since I would be moving about in a year or so, they are much easier to deal with.
Quick just a few notes: Firstly as I said I'm from Norway, I'm trying to write this as good as I can, but my English grammar is not award winning. Second: I will do the pictures from the build in several spoilers, some of the pictures are a little bit big (1800x1200) also I have a few of them. Third: I had to use a 3 year old cheapo digital camera during the building process, so they are not the best. I did take some of the recent pictures with my phone and some with a Nikon I borrowed from school, but I'm not very good with it. Sorry for the quality in advance.
Specs:
Components I bought:
Silverstone Sugo SG09B
Asus Rampage IV Gene X79 M-ATX
Intel Core i7 3930k
Corsair H80i
Seagate Barracuda 4TB
Corsair Air SP120 PWM Quiet ed
Component I had:
Corsair HX 850W
Gigabyte GTX 690
Seagate Barracuda 2TB
Corsair Force GT 120 GB
Intel 520 180 GB
Peripheral
Had:
Logitech MX518
Corsair K60 (MX red)
Bought:
2x Dell U2412M IPS (1920x1200)
Epiphany Acoustics E-HP-O2 and E-DAC (It is NwAvGuy's O2 and ODAC, as far as I have read, it's exactly the same except for the gain button)
Sennheiser HD650
So you are probably thinking "why the hell did he buy the 3930k and not the 4930k?" I simply had to build the PC and could not wait for the release, from what I can tell, I really didn't lose out on much.
I'll just have some pictures of the build and my battlestation then I'll put the progress pictures in spoilers, I'll try and explain what I did and why I did it over each picture.
First is just a picture of my battlestation, my shelves are a little messy, but you should have seen everything before I cleaned. The TP is for killing insects, they have so many god damn insects in England.
Slightly different angle (sorry for the bad colors) also look at that beautiful cable management, just beautiful.
Two pictures of the computer itself. I have minimal lighting in the case itself, I don't want to be blinded by my PC when I'm working or gaming. The two LEDs under the cable GPU cables are not noticeable, they only stand out in the pictures. I have some pictures with a LED strip, but I was not attractive, It became way to bright. This case is not easy to light properly. I just wanted the two LED to light up my GPU since it's suppose to draw the eye.
One of the PC taken with my phone. This was when I had the LED strip and after I changed the terrible plexiglass I had. As you can see, it's way to intense with the LED strip, I could have tried to dile it down, but to be honest big flashy lighting in PCs does not appeal to me. Also I did clean the dust on the inside of the window when I removed the LED strip.
Tried some pictures with flash, so I used my Wacom to remove some of the reflection from the desk.
Now to the progress pictures.
[spoiler Window]
It will be some jumping back and forth in time with the pictures since I didn't really do one thing then the next, it was more of the work a little on everything at the same time.
The template I used for the window, I wanted it to be big enough to see everything. Having a window in this case is not easy or practical.
First cut, it took me some time to figure out that my fathers jigsaw pulled massively to the right. I straighten out the cut, that was a very stupid idea as I barely had enough room to fit the plexi glass.
This was how I was planning on having the window, I later decided to get some U-channel to clean up the look. Don't know if you can see, but the plexiglass is a very old one my father had in the basement that I used, it was scratched to oblivion. It has been changed with a new one as you can see in pictures at the start.
The reason I got U-channel, some of the damages I did.
With U-channel, it looks so much better. I had to use double sided tape to fix the plexiglass to the sidepanel. It sits very well despite the fact that it is not touching the sidepanel itself, only the U-channel. You do have to struggle to get it off, so I'm not worried, did just fine in transport.
[spoiler GPU]
So... yeah, I painted my GTX 690 red.
First of all, why? Well when the GTX Titan came out I actually dreamed about getting 3 of them and building an insane computer and then I would paint it red and call it something cheezy like "The Red Titans". I gave up on the idea because I never won the lottery. I thought I could still do it with my GTX 690 since the Titans cooler is based on the 690. So when I got accepted into Uni I started researching for my new build with the intention of making a red/black themed mini PC. I wanted to change the green GEFORCE GTX logo from green to red if I was going to paint the card. So I started googleing and came across this build: http://www.overclock.net/t/1396669/build-log-red-titan-2xtitan-350d-first-build-in-17ish-yrs/70 "Red Titan" by "Panther Al" on Overclock.net. Same concept as I wanted to do, even the same fukkin name.
He was not done with the build when I saw it, he still had not changed the logo to red from green, but i thought it looked fantastic in the original Nvidia green. The color cut very nice through the red and black PC and gave a nice focus point for your eyes.
So I decided I could paint the cooler and leave the logo. Also go have a look if you didn't at Panther Al's build, it's far better than mine.
Also I didn't take many pictures during the painting process, note, can't seem to find any in progress pictures, sorry. I used three light layers of grey primer and three light layers of red spray paint/lacquer, the color was called signal red or something, bought it at a local paint shop. Anyway, pictures:
[spoiler Fitting the H80i]
I had to modify the mounting holes slightly for the SG09 to be able to fit the H80i with the tubing coming out at the to of the rad and not the bottom. I did this to be able to fit the GTX 690 in the top PCI-E slot. The way the cooler is maid the part with the tubing is longer/higher than the other part. So mounting it with the tubing at the bottom would block the first PCI-E slot.
It was quite easy the only thing I had to do was to make the holes for the mounting screws a little lower, I did this with the use of a round file.
If you can see I'm pointing at a piece of folded metal (not sure if it alu or whatever) that make up the hole for the 180mm fan in the top. It makes it so you can fit the rad in two of the mounting holes, but because of the folded piece, the rad is not leveled.
Just showing clearance.
So these pictures show how much I had to lower the mounting
I also had to remove the screw for the 180mm fan that was over the rad, If you screw it all the way in it would probably puncture the rad. Removing the screw does not increase the nice of the fan.
Proving clearance
The file i used.
[spoiler Cables]
So I got myself some sleeving from Nils at MDPC-X, my god was that some nice sleeving. I got sleeving for the powersupply and some wider for sata cables.
I don't have pictures form the sleeving prosess, because well it's sleeving, it is boring and tedious.
This is after I sleeved the cables, I did sleeve the 8 pin CPU (although you can't see it), the 24pin and the two 8pin PCI-E cables. I also did the USB cable for the H80i and the front panel connectors.
Just sew the two 8 pins together
24pin sleeved
Front panel connectors sleeved. Had to take them out of the case to get it done properly.
Reattached to the front panel, also removed the front panel audio, since I have a DAC/AMP setup
8pin CPU cable.
24pin stitching (or whatever you call it). Used something my mother had called bear thread "It's called that because they can hold a bear". LIES, I had to start over 3 times because it snapped.
Had excatly enough of the SATA sleeve to sleeve my HD650 cable.
[spoiler Improvements]
So first of all, air flow. Since the GTX 690 blows air out the back and the front it recycled a lot of the air inside the case, so I had make an opening somewhere so it could exit the case.
started drilling holes, the one to the far left was a mistake and removed the threds for the screw holding in the front panel conncetors... woops.
Also the part of the side panel that I kept had to be covered up, the holes looked awful. I tried to use pieces of metal, but ended up cutting up the fan filter cover you get with the case. Much better:
[spoiler Cable management]
If you are planning on building in this case, don't do individual sleeving, it takes so much space! Or get the short cables with a Silverstone PSU that Linus used, God how I wished I had one of those when I was doing the cable management.
As you can see, I didn't do a very good job at the back with the sleeving, I just could not be bothered, no one will ever see it IRL. Aslo cut off some cables that I didn't use and didn't have the space for.
So I guess that was it for the pictures. When I was planning this build I told myself I want to make something that made people think "Jesus, I wish I could have a PC that looked this good". I also wanted to make something that was good enough for build logs of the week, but this is far from as good as what the pros are making.
I'm very happy with this PC, if is easy to move around, it looks good and it is powerful.
I didn't really like how the window cut came out, i should have done some practicing before I started on the case, but that's in the past.
Hope you enjoy.
-
 Dovin got a reaction from tristan1035 in Uni render box | Sugo SG09
Edit: I have now finished the post, sorry about that.
I made this build about 2 months ago. I built it because I was going to England (from Norway) to get a Masters in architectural visualisation (3d graphics with focus on photorealism and heavy rendering).
I had to build the PC before I went over to England and I wanted to make the smallest most powerful rendering machine I could, within reason. I had been working hard in my summer job so that I could build a proper PC that was easy to move around (e.g bring it home during the holidays). I started working 12h/7d a week so I could afford the PC and a 30" Ultrasharp, but I ended up getting two 24" Ultrasharps instead, since I would be moving about in a year or so, they are much easier to deal with.
Quick just a few notes: Firstly as I said I'm from Norway, I'm trying to write this as good as I can, but my English grammar is not award winning. Second: I will do the pictures from the build in several spoilers, some of the pictures are a little bit big (1800x1200) also I have a few of them. Third: I had to use a 3 year old cheapo digital camera during the building process, so they are not the best. I did take some of the recent pictures with my phone and some with a Nikon I borrowed from school, but I'm not very good with it. Sorry for the quality in advance.
Specs:
Components I bought:
Silverstone Sugo SG09B
Asus Rampage IV Gene X79 M-ATX
Intel Core i7 3930k
Corsair H80i
Seagate Barracuda 4TB
Corsair Air SP120 PWM Quiet ed
Component I had:
Corsair HX 850W
Gigabyte GTX 690
Seagate Barracuda 2TB
Corsair Force GT 120 GB
Intel 520 180 GB
Peripheral
Had:
Logitech MX518
Corsair K60 (MX red)
Bought:
2x Dell U2412M IPS (1920x1200)
Epiphany Acoustics E-HP-O2 and E-DAC (It is NwAvGuy's O2 and ODAC, as far as I have read, it's exactly the same except for the gain button)
Sennheiser HD650
So you are probably thinking "why the hell did he buy the 3930k and not the 4930k?" I simply had to build the PC and could not wait for the release, from what I can tell, I really didn't lose out on much.
I'll just have some pictures of the build and my battlestation then I'll put the progress pictures in spoilers, I'll try and explain what I did and why I did it over each picture.
First is just a picture of my battlestation, my shelves are a little messy, but you should have seen everything before I cleaned. The TP is for killing insects, they have so many god damn insects in England.
Slightly different angle (sorry for the bad colors) also look at that beautiful cable management, just beautiful.
Two pictures of the computer itself. I have minimal lighting in the case itself, I don't want to be blinded by my PC when I'm working or gaming. The two LEDs under the cable GPU cables are not noticeable, they only stand out in the pictures. I have some pictures with a LED strip, but I was not attractive, It became way to bright. This case is not easy to light properly. I just wanted the two LED to light up my GPU since it's suppose to draw the eye.
One of the PC taken with my phone. This was when I had the LED strip and after I changed the terrible plexiglass I had. As you can see, it's way to intense with the LED strip, I could have tried to dile it down, but to be honest big flashy lighting in PCs does not appeal to me. Also I did clean the dust on the inside of the window when I removed the LED strip.
Tried some pictures with flash, so I used my Wacom to remove some of the reflection from the desk.
Now to the progress pictures.
[spoiler Window]
It will be some jumping back and forth in time with the pictures since I didn't really do one thing then the next, it was more of the work a little on everything at the same time.
The template I used for the window, I wanted it to be big enough to see everything. Having a window in this case is not easy or practical.
First cut, it took me some time to figure out that my fathers jigsaw pulled massively to the right. I straighten out the cut, that was a very stupid idea as I barely had enough room to fit the plexi glass.
This was how I was planning on having the window, I later decided to get some U-channel to clean up the look. Don't know if you can see, but the plexiglass is a very old one my father had in the basement that I used, it was scratched to oblivion. It has been changed with a new one as you can see in pictures at the start.
The reason I got U-channel, some of the damages I did.
With U-channel, it looks so much better. I had to use double sided tape to fix the plexiglass to the sidepanel. It sits very well despite the fact that it is not touching the sidepanel itself, only the U-channel. You do have to struggle to get it off, so I'm not worried, did just fine in transport.
[spoiler GPU]
So... yeah, I painted my GTX 690 red.
First of all, why? Well when the GTX Titan came out I actually dreamed about getting 3 of them and building an insane computer and then I would paint it red and call it something cheezy like "The Red Titans". I gave up on the idea because I never won the lottery. I thought I could still do it with my GTX 690 since the Titans cooler is based on the 690. So when I got accepted into Uni I started researching for my new build with the intention of making a red/black themed mini PC. I wanted to change the green GEFORCE GTX logo from green to red if I was going to paint the card. So I started googleing and came across this build: http://www.overclock.net/t/1396669/build-log-red-titan-2xtitan-350d-first-build-in-17ish-yrs/70 "Red Titan" by "Panther Al" on Overclock.net. Same concept as I wanted to do, even the same fukkin name.
He was not done with the build when I saw it, he still had not changed the logo to red from green, but i thought it looked fantastic in the original Nvidia green. The color cut very nice through the red and black PC and gave a nice focus point for your eyes.
So I decided I could paint the cooler and leave the logo. Also go have a look if you didn't at Panther Al's build, it's far better than mine.
Also I didn't take many pictures during the painting process, note, can't seem to find any in progress pictures, sorry. I used three light layers of grey primer and three light layers of red spray paint/lacquer, the color was called signal red or something, bought it at a local paint shop. Anyway, pictures:
[spoiler Fitting the H80i]
I had to modify the mounting holes slightly for the SG09 to be able to fit the H80i with the tubing coming out at the to of the rad and not the bottom. I did this to be able to fit the GTX 690 in the top PCI-E slot. The way the cooler is maid the part with the tubing is longer/higher than the other part. So mounting it with the tubing at the bottom would block the first PCI-E slot.
It was quite easy the only thing I had to do was to make the holes for the mounting screws a little lower, I did this with the use of a round file.
If you can see I'm pointing at a piece of folded metal (not sure if it alu or whatever) that make up the hole for the 180mm fan in the top. It makes it so you can fit the rad in two of the mounting holes, but because of the folded piece, the rad is not leveled.
Just showing clearance.
So these pictures show how much I had to lower the mounting
I also had to remove the screw for the 180mm fan that was over the rad, If you screw it all the way in it would probably puncture the rad. Removing the screw does not increase the nice of the fan.
Proving clearance
The file i used.
[spoiler Cables]
So I got myself some sleeving from Nils at MDPC-X, my god was that some nice sleeving. I got sleeving for the powersupply and some wider for sata cables.
I don't have pictures form the sleeving prosess, because well it's sleeving, it is boring and tedious.
This is after I sleeved the cables, I did sleeve the 8 pin CPU (although you can't see it), the 24pin and the two 8pin PCI-E cables. I also did the USB cable for the H80i and the front panel connectors.
Just sew the two 8 pins together
24pin sleeved
Front panel connectors sleeved. Had to take them out of the case to get it done properly.
Reattached to the front panel, also removed the front panel audio, since I have a DAC/AMP setup
8pin CPU cable.
24pin stitching (or whatever you call it). Used something my mother had called bear thread "It's called that because they can hold a bear". LIES, I had to start over 3 times because it snapped.
Had excatly enough of the SATA sleeve to sleeve my HD650 cable.
[spoiler Improvements]
So first of all, air flow. Since the GTX 690 blows air out the back and the front it recycled a lot of the air inside the case, so I had make an opening somewhere so it could exit the case.
started drilling holes, the one to the far left was a mistake and removed the threds for the screw holding in the front panel conncetors... woops.
Also the part of the side panel that I kept had to be covered up, the holes looked awful. I tried to use pieces of metal, but ended up cutting up the fan filter cover you get with the case. Much better:
[spoiler Cable management]
If you are planning on building in this case, don't do individual sleeving, it takes so much space! Or get the short cables with a Silverstone PSU that Linus used, God how I wished I had one of those when I was doing the cable management.
As you can see, I didn't do a very good job at the back with the sleeving, I just could not be bothered, no one will ever see it IRL. Aslo cut off some cables that I didn't use and didn't have the space for.
So I guess that was it for the pictures. When I was planning this build I told myself I want to make something that made people think "Jesus, I wish I could have a PC that looked this good". I also wanted to make something that was good enough for build logs of the week, but this is far from as good as what the pros are making.
I'm very happy with this PC, if is easy to move around, it looks good and it is powerful.
I didn't really like how the window cut came out, i should have done some practicing before I started on the case, but that's in the past.
Hope you enjoy.
-
Dovin reacted to papaourex in Is Linus homophobic?
I'm gay and I made an account for the sole purpose of replying to this post. The only people that are offended by the term "homo" are the people that have a flag pole up asses about being politically correct. Anybody that listened to what Linus said in context would realise that he obviously wasn't trying to offend anybody by saying it.
-
-
 Dovin got a reaction from airdeano in Any way to turn off power to 4pin fan header on MB?
Thanks for the help. I think I'm going to try and see if I can use an extension cable that leads outside the back of the case so I can physically plug it in when I want the light without having to take the sidepanel off each time.
-Dovin
-
Dovin reacted to BoomLiam in Any way to turn off power to 4pin fan header on MB?
Do not believe there is any software which can do this in your OS, but I found this link. Didn't know it was possible myself, but it's worth a try http://www.ehow.com/how_7181145_disable-fans-pc.html
EDIT - Some motherboards have programs which allow you to access BIOS in OS (ClickBios2) , this may be a compromise... but I cannot be too sure.
-
Dovin reacted to WittItDew in Quick question about cutting PSU cables
You cutting off the connectors/wires that you don't need and then correctly terminating the wires, would do as much damage to the PSU as leaving them there and not plugging any drives/pumps/whatever into those last three connectors. Comprende? Do it right and you're fine
-
Dovin reacted to ShearMe in Does a high end DAC sound better then a lower end DAC?
The bat would continue to act like a bat, and your experiment would yield no data because you don't speak batanese.
-
Dovin reacted to MayflowerElectronics in Does a high end DAC sound better then a lower end DAC?
DAC's generally don't impact the sound a lot. They are more of a tool too input a clean, line level source into your amplifier.
No, it would not be night or dac between the ODAC and the Burson product. I would suggest getting the o2/ODAC combo for most setups as diminishing returns occurs on anything above that particular unit.
-
 Dovin got a reaction from Ethnod in Ubuntu Edge
Not saying it will happen, but here is some date on crowdfunding http://www.kickstarter.com/blog/trends-in-pricing-and-duration
From the article a graph showing how much % funding a project got over % based time of the campaign. This is only 5 project, so I'm not saying this is going to happen, but i think it's a good guideline of how it's going to progress.
"In the above graph, I’ve plotted five different duration-classes of successful projects as distinguished by their duration. (Projects tend to pick durations around common milestones — 30 days, 45 days, and so on. To be more inclusive I used a rounding function to group different projects within 2.5 days of the milestones.)
What’s most significant about this graph is how uniform the shape of the curve is for all project durations. Most projects will get that burst of interest in the beginning and end — the middle is up to the creator to maintain momentum, typically through press, events, and other promotions."


