


Cjoflorida
-
Posts
75 -
Joined
-
Last visited
Content Type
Forums
Status Updates
Blogs
Events
Gallery
Downloads
Store Home
Everything posted by Cjoflorida
-
What part of your rig would you want to upgrade?
Cjoflorida replied to OutlawedConsole's topic in General Discussion
I would upgrade my gpu and get more ram. -
Well um i may have started the desk be for i started the forum post shhhh. When i started working on it i did not have time to make post but now since i have less school work i was able to do more work and make the forum post.
-
I have lived in Florida my whole life.
-
What he said or you could cut holes in the plexi near the gpu fan, i'm guessing the top part will be made out plexi not glass.
-
If everything goes according to plan and there are no delays i will upload and post the final pictures of the desk tomorrow!
-
Desk Build With Twist [Planning]
Cjoflorida replied to LordGarth6's topic in New Builds and Planning
The Laser Etched Acrylic looks great. I hope it turns out good. -
The desk that i striped the paint of and stained had three shallow draws so i decided that it would be nice to have a file draw to store stuff in so i combined two draws with glue and dowels and cut some slots in the side of the draw to put a piece of metal. they are stained the same color as the desk. This is the piece of metal The one on the top is what original drawer looked like This is a picture of them both in the desk. Another thing i did was attached wooden dowels to the desk so that the top of the desk would not rock back and fourth as much.
-
Uploading some pictures right now new post in like 30 min.
-
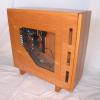
Have you seen my other case build i made it all out of wood it in in my signature. Its called woody
-
oh thanks if you saw how i mounted the hard drive i think it works really good just make sure it is sucure to the wood because hard drives can get heavy. another thing is make sure every thing is STRAIGHT because if one thing is off then is will cause other problems which happened to me the top ended up to not fit perfectly. Also did you see the build log or just my profile pic.
-
I kind of expect dust to accumulate on the glass or on the wood where the mother board will go. and if that happens i could just use a swiffer duster wand thing to take the dust off i would use my air compressor with a air filter and a dehumidifier that is apart of the air loop to dust it off if it after a couple of months once it becomes a problem. hopefully the air hose will be long enough to come from garage to my computer room.
-
Do you know how you will mount the motherboard, hard drives, and power supply. Because when i built my wooden case that was the hardest part.
-
Do you have an idea of what it will be made of wood or metal.
-
How fast is the LTT member's internet connection?
Cjoflorida replied to zephiK's topic in Networking
http://www.speedtest.net/result/3096899382.png -
First up are the SSD brakets. They are made of bent metal bar that is and inch wide or 25mm ish for you metric people. i bent the bar to angle that i thought would let me see the ssd from looking down frome the top of the desk and looking at it from the front. and this is what it will look like once the ssd is mounted This is the finished product the only thing left to do is to mount it to the desk and for that i need to go buy so nutserts. I have already mounted the hard drives and i was test fitting them to see how big i need to make the hole to hide the cables so i decided to take a couple pictures.
-
I have stained the desk today so far the color i chose looks great it is just what i wanted. I'm uploading pictures of the hard drives and the ssd mounts (curse slow internet). I worked on them yesterday and today. The mounts are all back but there are a few issues with the spray paint flaking off. even though i used self etching primer before i painted it.
-
I have finally striped the paint off of the desk and sanded it with 320 grit sand paper so that it is ready for per staining which is a like a stain but it just opens the pours of the wood so that it will absorb the stain a lot better. unfortunately i found out that i need to pre staining some types of wood after i finished staining my wooden computer case "woody" (build log herehttp://linustechtips.com/main/topic/26658-fully-wooden-computer-case-woody/) I realized that the stain looked clouded and smudgy. So i looked around online and found that i should of uses pre stain so that it would look a lot better. So hopfully the internet is right and it turns out much better than last time. By the way the desk is made out of pine which is a pretty soft wood.
-
So I went to the home depot and it turns out that wood is expensive, so instead of building it from scratch I will be using an old desk that i have laying around. the problem is that it is painted which means if i want to make the desk look good which i do i will have to strip the paint of of the desk and that will take a long time hopefully the paint comes of fast.
-
haha the only reason i ever use it is for gta 5
-
Ya your desk looks good. I haven't decided if i am going to do rubber tubing or rigid tubing for the water cooling. Your "bad" weather looks pretty nice for me, i live in south Florida and it is still in the 80's with a lot humidity.
-
If you want you could have the power supply showing instead of in the back because some power supplies look pretty nice and you could just cut a hole in the wood to hide cables. Also you could turn two draws in to one in order to make one tall enough to store files.
-
I have added what i want the top of the desk to look like the the google sketch up model. The poles are made of metal and the distances away from the edge and the position is not exact and will change in the final design. the middle of the top will be glass and the top is only supported by the post hence the open design.
-
Oh by the way the google sketch up is just showing where the parts will go i will upload anther one soon to so the top of the desk. sorry if i confused you.
