


Moddinger
-
Posts
9 -
Joined
-
Last visited
6 Followers


Moddinger's Achievements
")
-

My "Scrapyard Wars" Build - $296.25 CDN Spent (Including Paint)
Moddinger replied to Moddinger's topic in Build Logs
Have you got any leads on parts yet? I checked it out, it looks great! Really good deal to get that Q6600 and that GPU aswell. A little to be desired aesthetically, but almost all systems are to a degree . Keep updating, I am enjoying the progress! And thanks everyone for checking back in with my build aswell! I know it's been a few days. Life gets crazy! -
Hey, that's a great deal you got there! That Q6600 is still an excellent performer. There are some pretty straightforward mods you can do to greatly improve the aesthetic. I just used some black "Krylon BBQ and Stove" paint to paint my optical drive, IO shield, PSU and CPU / chipset heatsinks in my Scrapyard build and it looks a ton better. Helps the cables blend in to boot . I was a little concerned that the paint would affect temps, but it has been great. Dries in no time (<15 minutes) and doesn't require primer (just a wash / maybe a light sanding). Keep up the good work!
-
My "Scrapyard Wars" Build - $296.25 CDN Spent (Including Paint)
Moddinger replied to Moddinger's topic in Build Logs
It's not cheating in my books . OS price was not a requirement in the LMG contest. I personally wish they had judged the machines in more categories than performance (such as aesthetics, cable management, airflow, noise, etc...) Stay tuned... I have some more updates planned. I work full time, but I am really excited about this thing and can't wait to get it fired up and start benching and overclocking and GAMING!!. I plan to bench with stock clocks and test the temps at stock aswell before moving into max safe OC for my warmest ambient DOTY. Oooh... that quad core really helps with the frames though. It's so pricey to get DDR2 right now!! I was blown away when I was looking at some 800 for a friend. Great PSU!! Love Antec stuff! Send me a link to your build log when you get some pics up and I'll check it out! -
My "Scrapyard Wars" Build - $296.25 CDN Spent (Including Paint)
Moddinger replied to Moddinger's topic in Build Logs
More to come tonight as well. I have started building already, but I'm not very far. I have some more dirt porn photos to share (of the beasts below the chipset and the solid mass of dirt on the inside of the PSU). Check back soon to see that, as well as some pics of the build process (I am going to have to modify my PSU a little for cable management purposes). -
My "Scrapyard Wars" Build - $296.25 CDN Spent (Including Paint)
Moddinger replied to Moddinger's topic in Build Logs
I hope you do. Let me know when you do one and I'll check out your build log. It is really fun. There's something therapeutic about recycling old, dirty and unloved PC components. No kidding! I'm still blown away by it. I think the big thing is if you are knowledgable about the parts you can find a deal on something that is marketed poorly. The machine was dirty, ugly and broken, but the parts are full of potential. -
My "Scrapyard Wars" Build - $296.25 CDN Spent (Including Paint)
Moddinger replied to Moddinger's topic in Build Logs
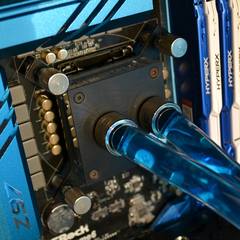
That's a crazy awesome 775 OC guide, thanks! I included a pic today of my CPU and it looks like I scored a pretty decent B2 stepping. The clocks I've seen in the brief time I've looked range from 3.3GHz - 3.5GHz with the P35. We'll have to wait and see! Stay tuned; I will end up posting OC number / benchmarks for both CPU and GPU once I get things together. I know, It's naaaasty!!.. I do love that about buying new stuff; you could basically eat off the parts. I just spend about 2 hours leisurely cleaning the motherboard and applying new thermal paste to the chipset (because I figured, 8 years of nasty old thermal interface is probably not going to help with longevity) and they were VERY disturbing on the underside! Wish I had taken some pics of that, but it totally slipped my mind. That copper is getting a stove paint coating at some point in the future. I want to get it up and running and play with it a bit first (frankly it's effing cold here right now and I don't want to set up a paint booth. Will probably end up doing it though, lol! It's more like a dessert. Sweet and getting sweeter all the time! B) Thanks guys; more to come soon! Don't touch that dial! -
My "Scrapyard Wars" Build - $296.25 CDN Spent (Including Paint)
Moddinger replied to Moddinger's topic in Build Logs
Thanks! I figured I was getting a pretty decent deal, but everything keeps coming up aces with this thing! The dust is easy... the cigarette tar is the hard part. This guy was definitely a smoker. Everything is yellow and smells like ashtray! I'm glad someone other than me thinks so. I will be making regular updates, so check back soon! so tar much isopropyl very spray air Thanks! I am still SMH wondering how I managed to find it. It is insane value ($12.50 per component by my math, excluding the possibly still fine HDD). That's what I thought too... this guy was a smoker unfortunately. The elbow grease quotient of this project has greatly increased. I will update soon with some pics to give you an idea of how BAD it truly is! :lol: -
My "Scrapyard Wars" Build - $296.25 CDN Spent (Including Paint)
Moddinger replied to Moddinger's topic in Build Logs
IKR, it's not often you can get a deal like that! Bunnys are cute and harmless... you're a monster! JK, I have a giant can of air I am unwrapping as I type this. Better than good... thoroughly amazeballs! Wish I had gotten a Q6600, but you can't catch all the breaks. -
[Update 11/03/2015: How time flies! Sorry about the lack of updates, but life got in the way. I ended up returning my USB 3.0 card because it was giving me some trouble with disconnection. Couldn't walk out of the store without something though, so I splurged and bought a 120GB Kingston SSD. VERY happy! Pic below! Also, I'm sick of my photos being so terrible so I'm working out some lighting and a makeshift tripod for my phone so I can stop using the flash and play around with exposure settings. So hopefully more AND better pics to come). [Update 07/03/2015 (later): Lots of work got done. Still not fully built, but getting there. I uploaded some more dirt porn pics (I took my PSU apart), as well as some pics of the progress I've made (hint... it involves modifying my PSU and also spraypaint). Check it out at the bottom of this post! [Update 07/03/2015: I found a surprise, I bought some things and I cleaned some stuff! Details below! [Update 06/03/2015: Corrected the heatsink / fan model below. Couldn't tell that it was the LED model thanks to the amount of dirt / cigarette tar on the fins :wacko: ] [Update 06/03/2015: Day 1 "Arrival" pics now on Imgur at http://imgur.com/a/PEjQN] Hello Linus Tech Tips Forum Members / Crew! I loved watching "Scrapyard Wars" so much that I've decided to work on my own piece of useful junk (plus I'm broke as hell and need a computer!). I sold my gaming rig in college to pay some bills and haven't had time or money to build another decent machine. No $300 budget here, but I want to see what I could build on the cheap in my area. I picked this PC up from a dude in my area on Kijiji (I'm Canadian aswell) for $100 (including 19" LCD, keyboard and mouse). She may not look like much now, but I think she's a diamond in the rough. Here are the initial specs of the machine (before the fun began): Case: Unknown Generic ATX Mid Tower (complete with scratches, dings and obligatory warped side panels). If you know what this case is called, please let me know and we'll record it for posterity (it is important, okay! LOL). Power Supply: Enermax Whisper II EG565P-VE (http://tinyurl.com/pznonod). I expected to get a piece of junk generic 250W or some nonsense. I was pleasantly surprised when I found this 535W baby in there. It's no sleeved, fully modular 80 Plus Platinum business, but it should do a reliable job! Motherboard: ASUS P5KC LGA 775 (http://tinyurl.com/k3lbtrd) Better motherboard than I was expecting aswell; I must be a pessimist. This thing has COMBO MEMORY!! (DDR2 / DDR3 Compatible). Also, the P35 chipset should allow me to do a decent OC. Processor: Intel® Core™2 Duo Processor E6600 - 4M Cache, 2.40 GHz (before the touching begins), 1066 MHz FSB (http://tinyurl.com/kxvaxd8) Heatsink / Fan: Zalman CNPS9500 LED (http://tinyurl.com/8ws2t99) Aftermarket HSF? Another bonus! With the price of copper right now, I could probably make my money back on this lump alone! Memory: 2 x 2GB (4GB) ADATA Premier Series DDR3 1333MHz (http://tinyurl.com/o7slhmv) Another pleasant surprise in a $100 cash purchase; $50 worth of DDR3! Dual-Channel bitches! my friends! Video Card: ASUS GeForce GTX 550 Ti DirectCU (http://tinyurl.com/pspomxq) wow. such cooler. many frames. so geforce. Storage / Optical: I was told ahead of time that the optical drive door is busted and that the HDD is dead. I have a spare 500GB 7200RPM Seagate SATA-2 drive around (I don't like Seagate, but it will have to do for now). Details to come. Airflow: 1 x ungodly, unbranded 140mm stove fan (yes, a fan from a fireplace) exhaust attached by 1 screw to the rear mount. I doubt I will be re-using this. Except maybe in my stove. I hope to get cracking tonight (because what else should I do at 3:30AM) with the disassembly and component cleaning. Tomorrow I will be taking a trip to Canada Computers for some MX-4, a couple case fans and other miscellany. Thank you guys for checking out this log. If you have any questions, suggestions or requests please let me know. ------------------------------------------------------------------------------------------------------------------------------------------- Update 1 "The Arrival" - 06/03/2015: These are pics of the machine as I got it. I haven't begun to dig into it yet. More pics to follow. http://imgur.com/a/PEjQN Update 2 "The Plan" - 07/03/2015: I have a few new things to report. As I was tearing down the system, I found a surprise. The fellow had left me a very dusty Western Digital Green 2TB SATA-3 drive!!... It has since been cleaned and tested; works great! (he told me the HDD was dead; it was merely sleeping ). See pics, along with some more dirt porn in the album by the same name here: http://imgur.com/a/5JRwH Now... why is this update called "The Plan" you ask? Well I'll tell you. I bought some goodies for the build. Originally I wanted to keep the case, but it was seriously busted up. Very bent, missing some bits and the video card was screwed in with a very large self-tapping screw which stripped the hole. It is now like throwing a little tiny threaded hotdog down a hallway. I may do something with the case in the future, but if I'm gonna use this machine I figured WTH, I'll buy another cheap case! I decided on the DeepCool Tessaract BF (http://tinyurl.com/jvzrn6q). I was able to pick one up in-store at Canada Computers for $34.99. It's truly amazing what you get for that money! Cheap cases have come a LONG way! There are a few other parts I picked up like a cheap SATA DVD-RW, Case fans, a Wi-Fi adapter and USB 3.0 card w/ header. Check 'em out here: http://imgur.com/a/UE8fA. I spend $145.40 in total (yipes!) Total spent now is $245.40 (still good in my books!). Thanks again for tuning in and giving me your feedback. I am really enjoying playing with a PC of my own for once. I do a ton of un-satisfying work on other people's Dells and HPs, but this is the life! Any questions or comments, please don't hesitate! Update 3 "Paint it Black" - 07/03/2015 (later): So I bit the bullet and decided to brave the cold to bring you guys some sweet, sweet blackness. Gonna make this short as I have to head to work for 11, but needless to say... there has been great progress made today. Painting was fairly straightforward. Masked the areas I didn't want to paint, sanded the PSU lightly with 800 grit sandpaper then went crazy. Light coats are key to avoid drips. I should have put more coats on, as I noticed a little chipping (nothing a black Sharpie can't handle). Oh yeah, if you want better flow in cold climates, warm the can in the sink with warm water and put a sock over the can (preferably an old one). Check out these galleries for some pixies: Dirt Porn 3: Dirt Gone Wild (http://imgur.com/a/zwFmk) Paint It Black (http://imgur.com/a/tBhyb) Update 4 "It's Alive!" - 11/03/2015: So the system POSTed on the first try! Windows 8.1 x64 installed along with some games and utilites (benchmarks / OC to come). I have changed a couple things on the component side aswell. I returned my USB 3.0 card due to a weird disconnection issue with 3.0 devices and I now have a 120GB Kingston SSD as my primary drive (which is ballin'). It is limited by the SATA-II interface, but it definitely still feels really zippy! The return brought my cost down to $217.16, and the SSD brought it up to $296.25. I'm sorry about the poor photo quality. I have been shooting handheld from my phone in my low-light basement. I am working on some diffuse lighting stuff and a tripod mount for my HTC M8 so that I can mess around with exposure stuff and get you guys some nice images of the final machine (I have never been a strong photographer, but I have read a lot in the past couple days so I'm sure I can figure out something ). I will get some more pics up soon. I have a few more things I want to sort out on the aesthetic side before doing the glamour shots. Thanks for stopping in!. Oh yeah, pics... here you go (http://imgur.com/a/tpiC3).
