


Mnpctech
-
Posts
494 -
Joined
-
Last visited
Reputation Activity
-

 Mnpctech got a reaction from flibberdipper in Fractal Design Define S ASUS Maximus VII Watercooled PC
this mod is fun, but Jurassic World or Fury Road theme would be even more FUN (hint, hint)... The chassis and exterior was painted House of Kolor Kandy Blue with Matte Clear finish, so it looks anodized. The paint and side panel design was inspired by the Swedish Supercar, Koenigsegg Agera R
SSD with LEDS
-
 Mnpctech got a reaction from Anthony10 in Fractal Design Define S ASUS Maximus VII Watercooled PC
Final photos of my Define S build taken by Fractal Design's Office in Taiwan
-
 Mnpctech got a reaction from Homicidium in Fractal Design Define S ASUS Maximus VII Watercooled PC
Final photos of my Define S build taken by Fractal Design's Office in Taiwan
-
 Mnpctech got a reaction from Darkman in Fractal Design Define S ASUS Maximus VII Watercooled PC
this mod is fun, but Jurassic World or Fury Road theme would be even more FUN (hint, hint)... The chassis and exterior was painted House of Kolor Kandy Blue with Matte Clear finish, so it looks anodized. The paint and side panel design was inspired by the Swedish Supercar, Koenigsegg Agera R
SSD with LEDS
-
 Mnpctech got a reaction from MasterRaceFanBoy in Fractal Design Define S ASUS Maximus VII Watercooled PC
This is the case mod I did for Fractal Design's event in Computex this week. The Define S chassis allows you to mount three 120mm or two 140mm cooling fans directly behind the bezel. This feature allows more interior space for larger radiators or push-pull fan configurations. The bezel's ventilated sides provide sufficient airflow for the factory default fan locations configurations. Opening the front of the bezel will improve airflow even more.
Supplies & Tools Needed for this Case Mod:
1. 3M Scotch 233+ Green Professional Masking Tape,
2. 12" Measuring Square and Pen or Pencil
3. Dremel or Rotary Tool with Reinforced Cutting Wheels,
4. Jigsaw with 18 TPI or higher Bi-Metal cutting blade
5. Hand File
6. Medium Grit Sandpaper or 3M Red Scotchbrite pads,
7. 24" x 12" Round Modder's Mesh Sheet,
8. 3M ScotchWeld DP-190 Two Part Epoxy with Applicator Tip
9. Wire Clip or Tin Snip (Optional)
10. PETG Tube for PC Liquid Cooling. $.99 per 12" long tube, 1/2" OD x 3/8" ID PETG clear tube for Custom PC liquid cooling loops offers the same clear quality as standard Acrylic with an excellent impact strength and easy bend-ability.
PETG Clear Tube works with these 1/2" hard line compression fittings that include,
Alphacool HT 13mm OD hard tube
Monsoon Free Center Hardline Fitting - 3/8" ID x 1/2" OD
Monsoon Chain Gun Hardline Fitting - 3/8" ID x 1/2" OD
Primochill Ghost Hardline Fitting - 3/8" ID x 1/2" OD
Primochill Revolver Hardline Fitting - 3/8" ID x 1/2" OD
The Define S bezel is factory molded from ABS plastic, which is very durable and resilient to cracking. Removing a majority of the face plate didn't effect overall rigidity.
The backside of the bezel shows it's simplicity in design.
The first step is to cover the bezel with 3M Scotch 233+ Masking tape. This allows you to write measurements onto the bezel and protects it from being scratched by the Jigsaw.
Measure and mark off the portion of material you wish to remove. This cut-out will have 1" bordered frame of material remaining. Put on your Safety Glasses and use Rotary Tool with cutting wheel to make incision cuts in each corner. This will allow you to use a Jigsaw to make the long straight cuts efficiently.
Use Jigsaw with 18 TPI or higher Bi-Metal cutting blade to make the long cuts as straight as possible.
After finishing all of the cuts with the jigsaw, use a hand file and medium grit sand paper to clean and fix all of the edges.
Inspecting progress before moving onto the next stage.
These are two of the multiple mounting pegs on the backside of the bezel. We've chosen to remove the inner facing base support of each peg with a Wire cutter, so the mesh can be cut as rectangular piece. This step isn't required if you cut the Modder's Mesh sheet to fit around each mounting peg.
Use medium sand paper to smooth over the surface after cutting the one side of each peg base.
The Define S bezel's new intake grill will be cut from a 24" x 12" sheet, http://mnpctech.com/case-mods-gaming-pc-liquid-modding-custom-computer-mnpctech-overclock-cooling-fan-grills/modders-mesh-perforated-aluminum-steel-honeycomb-grill-intake-front-fan-slotted-diamond-round-hex
This material is 22 gauge perforated plain steel. 5/32" holes 3/16" staggered centers. 33 holes per square inch.
It's great for creating custom fan guards, grills, and cooling vents like this. It does need to be painted or clear coated otherwise it is a bare steel and will oxidize over time.
The mesh grill will be attached with 3M Scotch Weld DP-190 two part epoxy with mixture applicator attachment.
Place bezel on it's face. Apply the epoxy with it's applicator over the mesh overlapping the back of the bezel. It will ooze and sink into the individual holes of the mesh.
Use c-clamps or spring loaded clamps to hold the mesh in position as it cures for 24 hours.
Place some heavy objects on the mesh. This will prevent the mesh from bowing or warping as the DP-190 epoxy during it's 24 hour cure time.
The bezel will be ready to handle 24 hours after the epoxied mesh has cured.
-
Mnpctech got a reaction from Homicidium in Fractal Design Define S ASUS Maximus VII Watercooled PC
I want to add that I was really impressed with these new high static pressure fans from Fractal Design. The HP-120s are Quiet with Fluid Dynamic Bearings, rubber mounts to reduce vibration. 31.7 dBA @ 61.4 CFM with long sleeved PWM connectors
Blue Vandal PC Power or Reset Button, http://mnpctech.com/bulgin-modmytoys-computer-pc-power-reset-switch-mounting-plates-vandal-anti-resitant-lamptron/
-
Mnpctech got a reaction from flibberdipper in Fractal Design Define S ASUS Maximus VII Watercooled PC
Final photos of my Define S build taken by Fractal Design's Office in Taiwan
-
Mnpctech got a reaction from Darkman in Fractal Design Define S ASUS Maximus VII Watercooled PC
Final photos of my Define S build taken by Fractal Design's Office in Taiwan
-
 Mnpctech got a reaction from godsarmy in Fractal Design Define S ASUS Maximus VII Watercooled PC
Final photos of my Define S build taken by Fractal Design's Office in Taiwan
-
 Mnpctech got a reaction from Monty007 in Fractal Design Define S ASUS Maximus VII Watercooled PC
Final photos of my Define S build taken by Fractal Design's Office in Taiwan
-
 Mnpctech got a reaction from colinreay in Fractal Design Define S ASUS Maximus VII Watercooled PC
Final photos of my Define S build taken by Fractal Design's Office in Taiwan
-
 Mnpctech got a reaction from mikeeginger in Fractal Design Define S ASUS Maximus VII Watercooled PC
Final photos of my Define S build taken by Fractal Design's Office in Taiwan
-
 Mnpctech got a reaction from hooh888 in Phanteks Windows...
video of phanteks pro & luxe clear side panel details, http://mnpctech.com/phanteks-case-mods/
-
 Mnpctech got a reaction from stconquest in Phanteks Windows...
video of phanteks pro & luxe clear side panel details, http://mnpctech.com/phanteks-case-mods/
-
 Mnpctech got a reaction from airdeano in Phanteks Windows...
@cd5josh, customer response favored a full clear view panel instead of replacements
@snarkycoder, video of NZXT smoked window, same material as S340 version with White LED is at 9:00 minutes,
-

-
 Mnpctech got a reaction from ciobanulx in TOXIC CHROME (modded Corsair 250D)
coming together nice Alex
-
Mnpctech got a reaction from hooh888 in Phanteks Windows...
Clear replacement side panel full view windows for Phanteks Pro & Luxe are just about finished, they're CNC machined from 3/8" thick cast acrylic and should be listed this week, http://mnpctech.com/phanteks-case-mods/
-
 Mnpctech got a reaction from TheKleen in Phanteks Windows...
Clear replacement side panel full view windows for Phanteks Pro & Luxe are just about finished, they're CNC machined from 3/8" thick cast acrylic and should be listed this week, http://mnpctech.com/phanteks-case-mods/
-
 Mnpctech got a reaction from FLUFFYJELLO in Phanteks Windows...
Clear replacement side panel full view windows for Phanteks Pro & Luxe are just about finished, they're CNC machined from 3/8" thick cast acrylic and should be listed this week, http://mnpctech.com/phanteks-case-mods/
-
Mnpctech got a reaction from flibberdipper in Fractal Design Define S ASUS Maximus VII Watercooled PC
This is the case mod I did for Fractal Design's event in Computex this week. The Define S chassis allows you to mount three 120mm or two 140mm cooling fans directly behind the bezel. This feature allows more interior space for larger radiators or push-pull fan configurations. The bezel's ventilated sides provide sufficient airflow for the factory default fan locations configurations. Opening the front of the bezel will improve airflow even more.
Supplies & Tools Needed for this Case Mod:
1. 3M Scotch 233+ Green Professional Masking Tape,
2. 12" Measuring Square and Pen or Pencil
3. Dremel or Rotary Tool with Reinforced Cutting Wheels,
4. Jigsaw with 18 TPI or higher Bi-Metal cutting blade
5. Hand File
6. Medium Grit Sandpaper or 3M Red Scotchbrite pads,
7. 24" x 12" Round Modder's Mesh Sheet,
8. 3M ScotchWeld DP-190 Two Part Epoxy with Applicator Tip
9. Wire Clip or Tin Snip (Optional)
10. PETG Tube for PC Liquid Cooling. $.99 per 12" long tube, 1/2" OD x 3/8" ID PETG clear tube for Custom PC liquid cooling loops offers the same clear quality as standard Acrylic with an excellent impact strength and easy bend-ability.
PETG Clear Tube works with these 1/2" hard line compression fittings that include,
Alphacool HT 13mm OD hard tube
Monsoon Free Center Hardline Fitting - 3/8" ID x 1/2" OD
Monsoon Chain Gun Hardline Fitting - 3/8" ID x 1/2" OD
Primochill Ghost Hardline Fitting - 3/8" ID x 1/2" OD
Primochill Revolver Hardline Fitting - 3/8" ID x 1/2" OD
The Define S bezel is factory molded from ABS plastic, which is very durable and resilient to cracking. Removing a majority of the face plate didn't effect overall rigidity.
The backside of the bezel shows it's simplicity in design.
The first step is to cover the bezel with 3M Scotch 233+ Masking tape. This allows you to write measurements onto the bezel and protects it from being scratched by the Jigsaw.
Measure and mark off the portion of material you wish to remove. This cut-out will have 1" bordered frame of material remaining. Put on your Safety Glasses and use Rotary Tool with cutting wheel to make incision cuts in each corner. This will allow you to use a Jigsaw to make the long straight cuts efficiently.
Use Jigsaw with 18 TPI or higher Bi-Metal cutting blade to make the long cuts as straight as possible.
After finishing all of the cuts with the jigsaw, use a hand file and medium grit sand paper to clean and fix all of the edges.
Inspecting progress before moving onto the next stage.
These are two of the multiple mounting pegs on the backside of the bezel. We've chosen to remove the inner facing base support of each peg with a Wire cutter, so the mesh can be cut as rectangular piece. This step isn't required if you cut the Modder's Mesh sheet to fit around each mounting peg.
Use medium sand paper to smooth over the surface after cutting the one side of each peg base.
The Define S bezel's new intake grill will be cut from a 24" x 12" sheet, http://mnpctech.com/case-mods-gaming-pc-liquid-modding-custom-computer-mnpctech-overclock-cooling-fan-grills/modders-mesh-perforated-aluminum-steel-honeycomb-grill-intake-front-fan-slotted-diamond-round-hex
This material is 22 gauge perforated plain steel. 5/32" holes 3/16" staggered centers. 33 holes per square inch.
It's great for creating custom fan guards, grills, and cooling vents like this. It does need to be painted or clear coated otherwise it is a bare steel and will oxidize over time.
The mesh grill will be attached with 3M Scotch Weld DP-190 two part epoxy with mixture applicator attachment.
Place bezel on it's face. Apply the epoxy with it's applicator over the mesh overlapping the back of the bezel. It will ooze and sink into the individual holes of the mesh.
Use c-clamps or spring loaded clamps to hold the mesh in position as it cures for 24 hours.
Place some heavy objects on the mesh. This will prevent the mesh from bowing or warping as the DP-190 epoxy during it's 24 hour cure time.
The bezel will be ready to handle 24 hours after the epoxied mesh has cured.
-
Mnpctech got a reaction from flibberdipper in Fractal Design Define S ASUS Maximus VII Watercooled PC
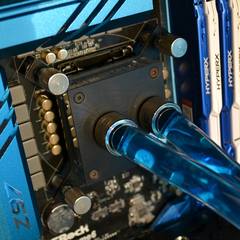
970 GTXs with EK waterblocks and back plates. I'm utilizing two Hardware labs 360 GTS Stealth Radiators with XSPC Photon Res, D5 waterpump, EK cpu block.
-
Mnpctech got a reaction from Monty007 in Fractal Design Define S ASUS Maximus VII Watercooled PC
This is the case mod I did for Fractal Design's event in Computex this week. The Define S chassis allows you to mount three 120mm or two 140mm cooling fans directly behind the bezel. This feature allows more interior space for larger radiators or push-pull fan configurations. The bezel's ventilated sides provide sufficient airflow for the factory default fan locations configurations. Opening the front of the bezel will improve airflow even more.
Supplies & Tools Needed for this Case Mod:
1. 3M Scotch 233+ Green Professional Masking Tape,
2. 12" Measuring Square and Pen or Pencil
3. Dremel or Rotary Tool with Reinforced Cutting Wheels,
4. Jigsaw with 18 TPI or higher Bi-Metal cutting blade
5. Hand File
6. Medium Grit Sandpaper or 3M Red Scotchbrite pads,
7. 24" x 12" Round Modder's Mesh Sheet,
8. 3M ScotchWeld DP-190 Two Part Epoxy with Applicator Tip
9. Wire Clip or Tin Snip (Optional)
10. PETG Tube for PC Liquid Cooling. $.99 per 12" long tube, 1/2" OD x 3/8" ID PETG clear tube for Custom PC liquid cooling loops offers the same clear quality as standard Acrylic with an excellent impact strength and easy bend-ability.
PETG Clear Tube works with these 1/2" hard line compression fittings that include,
Alphacool HT 13mm OD hard tube
Monsoon Free Center Hardline Fitting - 3/8" ID x 1/2" OD
Monsoon Chain Gun Hardline Fitting - 3/8" ID x 1/2" OD
Primochill Ghost Hardline Fitting - 3/8" ID x 1/2" OD
Primochill Revolver Hardline Fitting - 3/8" ID x 1/2" OD
The Define S bezel is factory molded from ABS plastic, which is very durable and resilient to cracking. Removing a majority of the face plate didn't effect overall rigidity.
The backside of the bezel shows it's simplicity in design.
The first step is to cover the bezel with 3M Scotch 233+ Masking tape. This allows you to write measurements onto the bezel and protects it from being scratched by the Jigsaw.
Measure and mark off the portion of material you wish to remove. This cut-out will have 1" bordered frame of material remaining. Put on your Safety Glasses and use Rotary Tool with cutting wheel to make incision cuts in each corner. This will allow you to use a Jigsaw to make the long straight cuts efficiently.
Use Jigsaw with 18 TPI or higher Bi-Metal cutting blade to make the long cuts as straight as possible.
After finishing all of the cuts with the jigsaw, use a hand file and medium grit sand paper to clean and fix all of the edges.
Inspecting progress before moving onto the next stage.
These are two of the multiple mounting pegs on the backside of the bezel. We've chosen to remove the inner facing base support of each peg with a Wire cutter, so the mesh can be cut as rectangular piece. This step isn't required if you cut the Modder's Mesh sheet to fit around each mounting peg.
Use medium sand paper to smooth over the surface after cutting the one side of each peg base.
The Define S bezel's new intake grill will be cut from a 24" x 12" sheet, http://mnpctech.com/case-mods-gaming-pc-liquid-modding-custom-computer-mnpctech-overclock-cooling-fan-grills/modders-mesh-perforated-aluminum-steel-honeycomb-grill-intake-front-fan-slotted-diamond-round-hex
This material is 22 gauge perforated plain steel. 5/32" holes 3/16" staggered centers. 33 holes per square inch.
It's great for creating custom fan guards, grills, and cooling vents like this. It does need to be painted or clear coated otherwise it is a bare steel and will oxidize over time.
The mesh grill will be attached with 3M Scotch Weld DP-190 two part epoxy with mixture applicator attachment.
Place bezel on it's face. Apply the epoxy with it's applicator over the mesh overlapping the back of the bezel. It will ooze and sink into the individual holes of the mesh.
Use c-clamps or spring loaded clamps to hold the mesh in position as it cures for 24 hours.
Place some heavy objects on the mesh. This will prevent the mesh from bowing or warping as the DP-190 epoxy during it's 24 hour cure time.
The bezel will be ready to handle 24 hours after the epoxied mesh has cured.
-
Mnpctech got a reaction from Homicidium in Fractal Design Define S ASUS Maximus VII Watercooled PC
This is the case mod I did for Fractal Design's event in Computex this week. The Define S chassis allows you to mount three 120mm or two 140mm cooling fans directly behind the bezel. This feature allows more interior space for larger radiators or push-pull fan configurations. The bezel's ventilated sides provide sufficient airflow for the factory default fan locations configurations. Opening the front of the bezel will improve airflow even more.
Supplies & Tools Needed for this Case Mod:
1. 3M Scotch 233+ Green Professional Masking Tape,
2. 12" Measuring Square and Pen or Pencil
3. Dremel or Rotary Tool with Reinforced Cutting Wheels,
4. Jigsaw with 18 TPI or higher Bi-Metal cutting blade
5. Hand File
6. Medium Grit Sandpaper or 3M Red Scotchbrite pads,
7. 24" x 12" Round Modder's Mesh Sheet,
8. 3M ScotchWeld DP-190 Two Part Epoxy with Applicator Tip
9. Wire Clip or Tin Snip (Optional)
10. PETG Tube for PC Liquid Cooling. $.99 per 12" long tube, 1/2" OD x 3/8" ID PETG clear tube for Custom PC liquid cooling loops offers the same clear quality as standard Acrylic with an excellent impact strength and easy bend-ability.
PETG Clear Tube works with these 1/2" hard line compression fittings that include,
Alphacool HT 13mm OD hard tube
Monsoon Free Center Hardline Fitting - 3/8" ID x 1/2" OD
Monsoon Chain Gun Hardline Fitting - 3/8" ID x 1/2" OD
Primochill Ghost Hardline Fitting - 3/8" ID x 1/2" OD
Primochill Revolver Hardline Fitting - 3/8" ID x 1/2" OD
The Define S bezel is factory molded from ABS plastic, which is very durable and resilient to cracking. Removing a majority of the face plate didn't effect overall rigidity.
The backside of the bezel shows it's simplicity in design.
The first step is to cover the bezel with 3M Scotch 233+ Masking tape. This allows you to write measurements onto the bezel and protects it from being scratched by the Jigsaw.
Measure and mark off the portion of material you wish to remove. This cut-out will have 1" bordered frame of material remaining. Put on your Safety Glasses and use Rotary Tool with cutting wheel to make incision cuts in each corner. This will allow you to use a Jigsaw to make the long straight cuts efficiently.
Use Jigsaw with 18 TPI or higher Bi-Metal cutting blade to make the long cuts as straight as possible.
After finishing all of the cuts with the jigsaw, use a hand file and medium grit sand paper to clean and fix all of the edges.
Inspecting progress before moving onto the next stage.
These are two of the multiple mounting pegs on the backside of the bezel. We've chosen to remove the inner facing base support of each peg with a Wire cutter, so the mesh can be cut as rectangular piece. This step isn't required if you cut the Modder's Mesh sheet to fit around each mounting peg.
Use medium sand paper to smooth over the surface after cutting the one side of each peg base.
The Define S bezel's new intake grill will be cut from a 24" x 12" sheet, http://mnpctech.com/case-mods-gaming-pc-liquid-modding-custom-computer-mnpctech-overclock-cooling-fan-grills/modders-mesh-perforated-aluminum-steel-honeycomb-grill-intake-front-fan-slotted-diamond-round-hex
This material is 22 gauge perforated plain steel. 5/32" holes 3/16" staggered centers. 33 holes per square inch.
It's great for creating custom fan guards, grills, and cooling vents like this. It does need to be painted or clear coated otherwise it is a bare steel and will oxidize over time.
The mesh grill will be attached with 3M Scotch Weld DP-190 two part epoxy with mixture applicator attachment.
Place bezel on it's face. Apply the epoxy with it's applicator over the mesh overlapping the back of the bezel. It will ooze and sink into the individual holes of the mesh.
Use c-clamps or spring loaded clamps to hold the mesh in position as it cures for 24 hours.
Place some heavy objects on the mesh. This will prevent the mesh from bowing or warping as the DP-190 epoxy during it's 24 hour cure time.
The bezel will be ready to handle 24 hours after the epoxied mesh has cured.
-
 Mnpctech got a reaction from Samsterstorm in TOXIC CHROME (modded Corsair 250D)
received your message, great progress!


