

JordanMac
-
Posts
1,478 -
Joined
-
Last visited
Reputation Activity
-

 JordanMac got a reaction from apoKhallipsa in [Finished] Project: Cobalt (Chromed Copper Piping, Laser Etching, Cable Sleeving and More)
Image Courtesy of "therussianpotato"
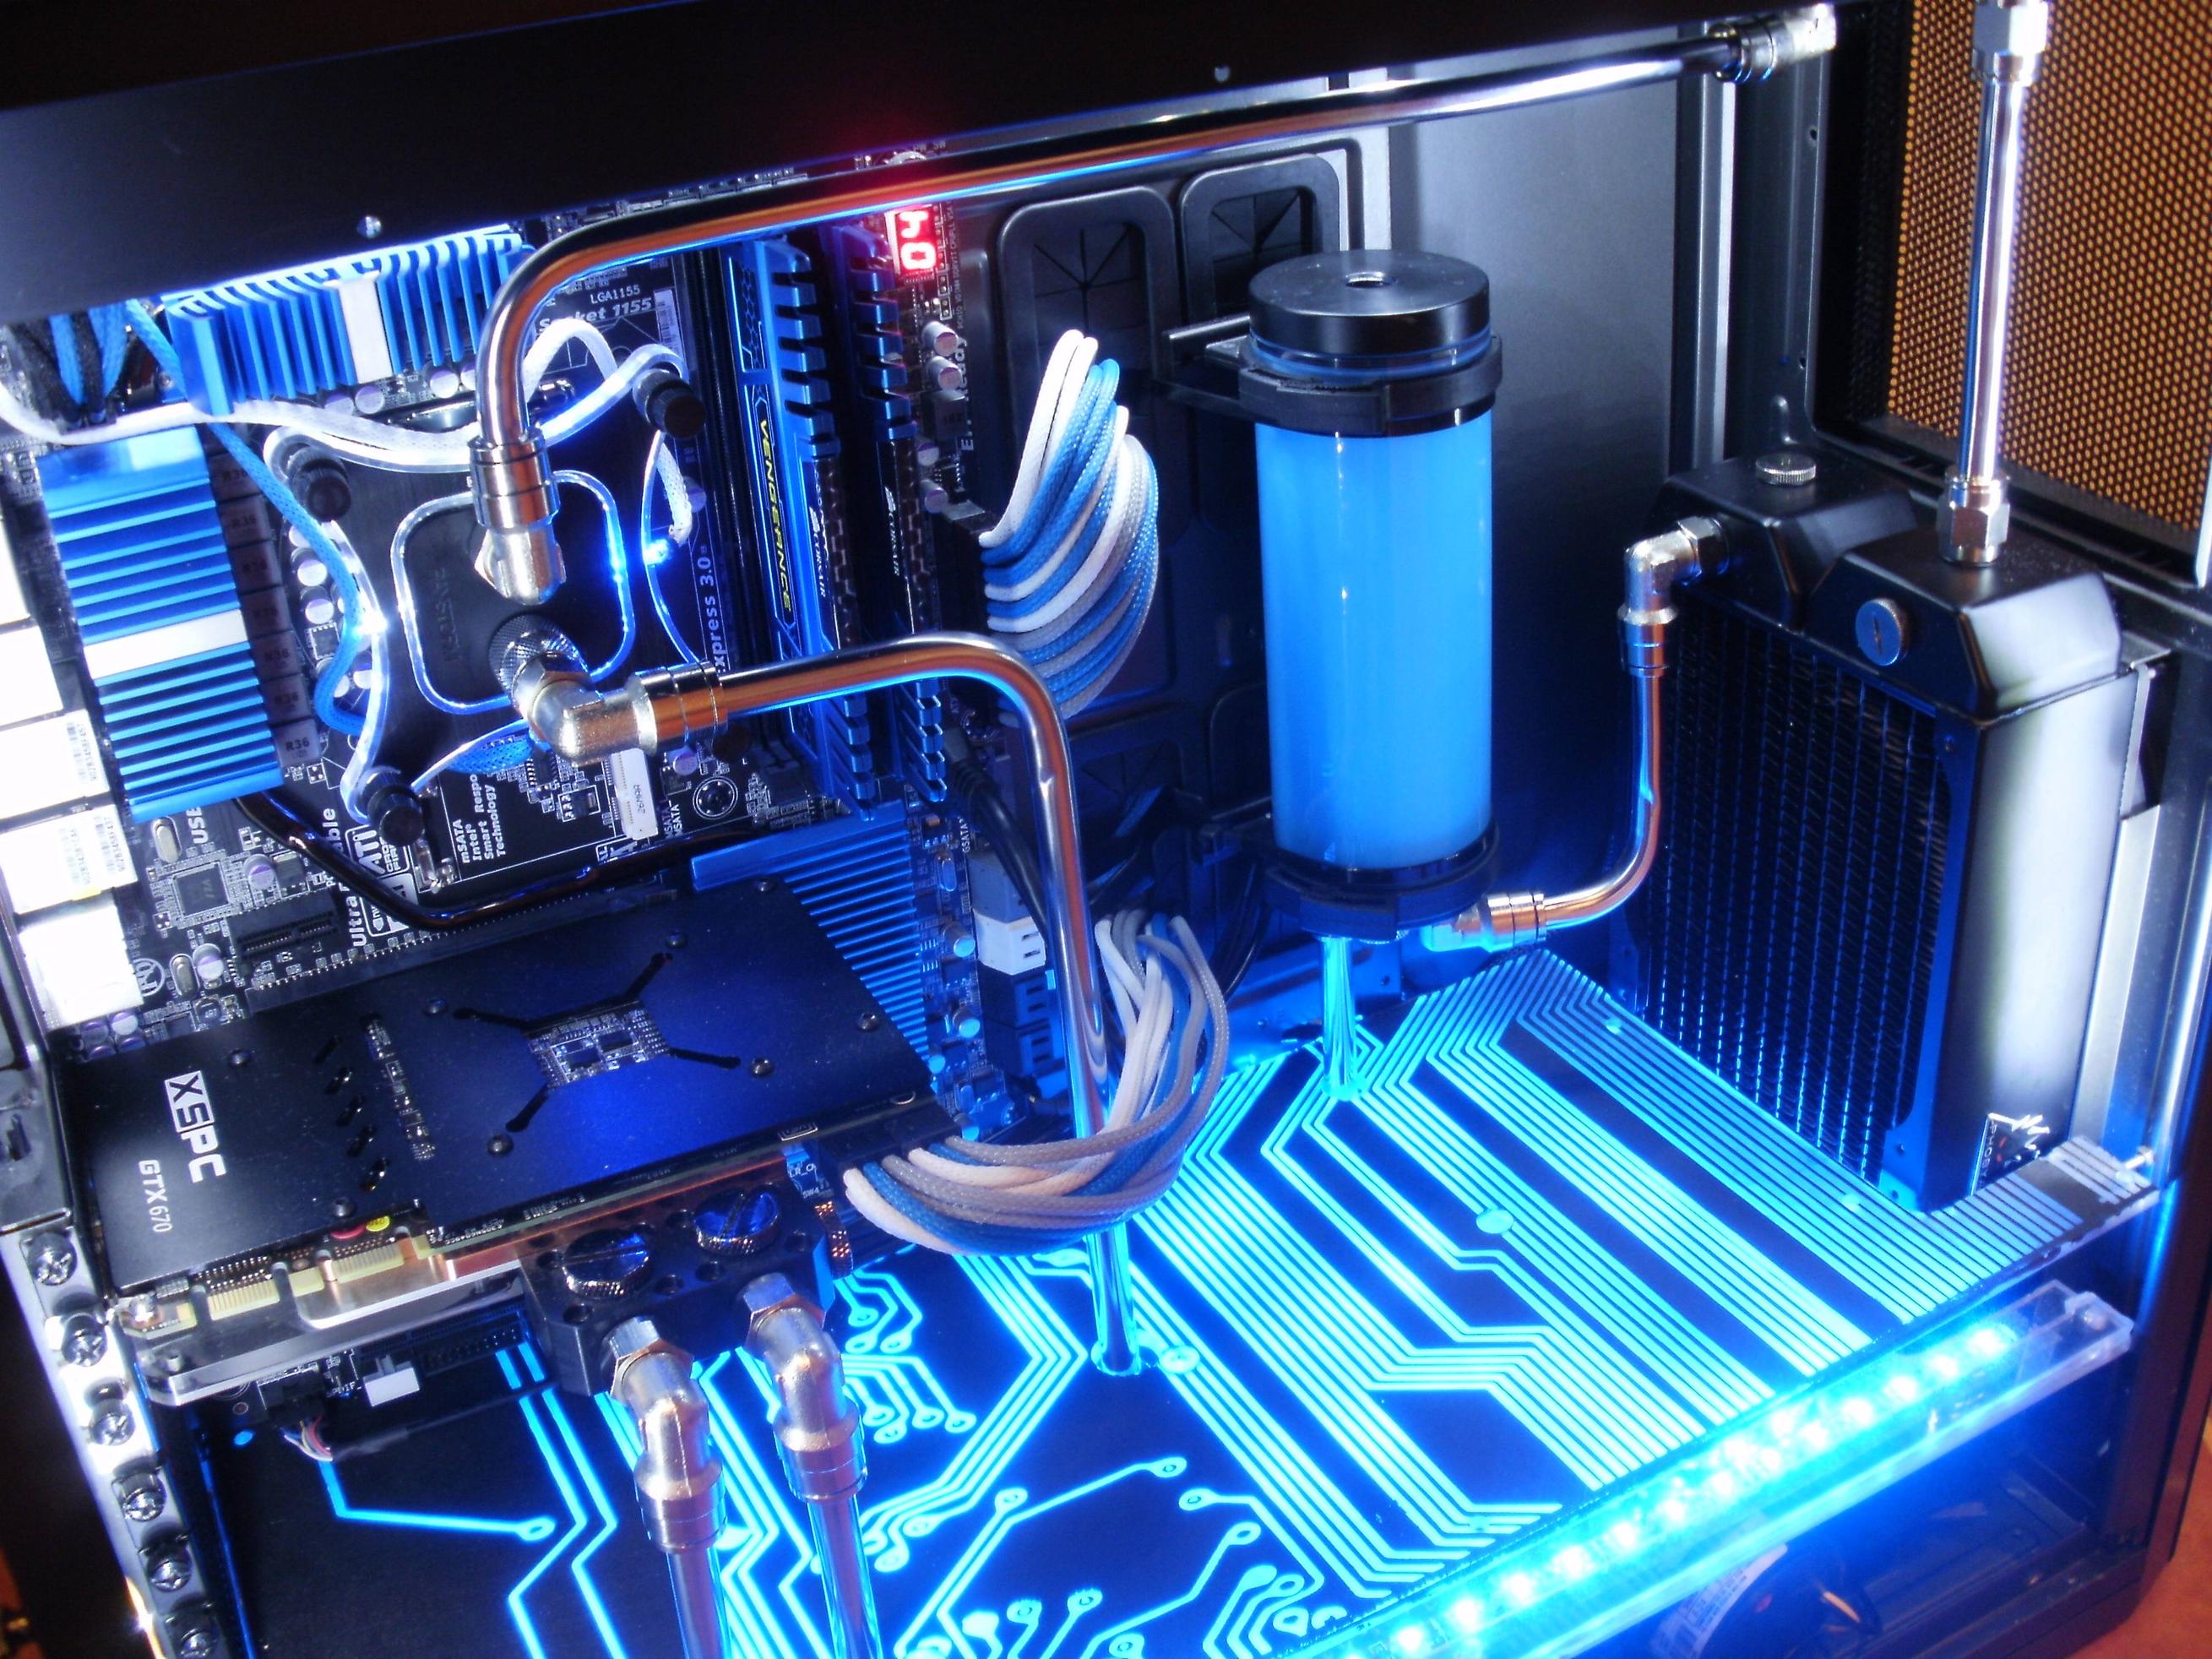
Finished Pictures
-
 JordanMac got a reaction from Ben17 in Building a NAS. How do you start? (Guide)
brilliant writeup! just as i was thinking of building a nas.
-
 JordanMac got a reaction from documnt in The Water Cooling Gallery
intel i5 3570k
Gigabyte Z77X-UD5H
seagate barracuda 1tb
intel 330 series 60gb x2
corsair tx750m
140mm silverstone air penetrators x5
corsair vengeance 8gb blue 1600mhz
blue psu sleeved cables
Bitfenix hydra pro
gtx 670
nzxt switch 810 gun metal
Bitspower Z-Multi 150mm Water Tank
1/2" 3/4" clear 2m tubing
XSPC Raystorm
XSPC Razor gtx 670 full cover block
1/2" compression x10 + 1 45 fitting
2 hose clamps 1/2"
ThermoChill PA140.3
Blue coolant XSPC
Phobya G-Changer 280 Radiator
XSPC / Laing D5 Vario 1/2 Barbs Front Cover and RPM Wire
2x g1/4" to g3/8" converter
2m strip of 120 leds off ebay
-
 JordanMac got a reaction from spellmanuk in Does using 4G router count as tethering?
Thanks for the suggestion I looked into it and I think I might go for that
-

-
 JordanMac got a reaction from Dukanater in Post your Good Ghetto mods
I'm sorry but that is just badass.
-
 JordanMac got a reaction from SirBobson in How to Make an Awesome Midplate
Materials and tools
- clear acrylic sheet
the stuff I used was 5mm thick. It's important that you use a thick piece of plastic otherwise it will bow when etched, if doing this again I would go for a 10mm thick piece. This need to be cut to the shape of the inside of the case, make it slightly smaller, take the measurements of the inside of the case and remove 5-10mm. You also need a second sheet the exact same shape, however this piece doesn't need to be as thick, 5mm is more than enough. I would recommend sourcing your plastic from sheet plastics UK if your from the uk, sorry I don't know anywhere for anywhere else.
- power drill and assorted drill bits
You need a fairly decent power drill that is able to drill steel but the standard battery powered portable drill will do the job. You will also need some drill bits, you will need a 4.5mm or 5mm bit and if you are running any pipes through the midplate you will need another drill bit that is 2mm bigger than the diameter of your pipe. For example my pipes were 10mm so I drilled 12mm hole through the midplate.
- acrylic paint
You could use a spray paint designed for plastic such as plastikotes plastic range or you cab do what I did and use abd acrylic paint that brushes on. I personally prefer to use the brush on paint as you can put a much thicker coat on than you can with a spray can.
- mouse sander
The mouse sander is used to remove the paint on the areas where you want the light to shine through. It is important that you use a mouse sander and not a belt sander, belt Sanders are far too aggressive to be used for this purpose, youre only wanting to remove some paint not tons of material.
- jigsaw
This is used to cut the plastic sheets down to size and to the correct shape, you will also want some plastic cutting blades.
- M4 bolts and M4 nuts x6 each
Instructions
If you buy any chance have a £5000 laser cutter sitting around it may be a good time to get the manual out and learn how to use it. however if you are like me and don't have one you will need to find one that you can use or you will have to pay for a company to do it for you.
Step 1 - Measure your case.
you need to measure the area in which your midplate is going to go. measure from the highest point on the motherboard tray to where the side panel would be. then measure from the front of the case to the rear of the case. for me my measurements for the switch 810 was 515mm by 205mm. write this down its very important.
Step 2 - Enter some 2d design software that can out put a scale drawing in dxf file type. i personally use corel draw becuase i was taught it in school and college, wouldn't reccomend it to be honest there are much better software packages out there but this is the one i have been taught to use. the first thing you need to know is that laser cutters recognise red as cut and black as etch.
step 3 - Draw a rectangle that is the same dimensions as you mentioned earlier but with 5mm taken off each measurement. so for example in my switch810 i measured 515mm x 205mm but the rectangle i am drawing is 510mm x 200mm. this is just to allow some wiggle room inside the case. save this design twice, 1st time called layer top and the second time called layer bottom. close layer bottom and open layer top.
step 4 - draw what ever you want inside that red box, anything that is white will have light shining through and anything that is black wont have light shining through.
if you look at this picture, this is what you want with your design is white. if you want a picture i find it best to vetorise it with some software like vectorimage first and then drop it into your design software.
step 5 - either laser cut the plastic yourself or the more likely option is to send the design away to a company that can do plastic laser cutting. an example of the type of company you are looking for; http://www.cutlasercut.com/.
Few key points you need to get across to the company;
1) you need it cut into 10mm CLEAR ACRYLIC
2) you want a DEEP engrave
3) you need both pieces (layer top and layer bottom) but only one has engraving
step 6 - When you recieve your part back it will look something like this:
Notice how the unetched parts are higher up than the etched parts leaving channels and grooves for the paint to sit in. What you need to do now is paint the whole thing black on the textured side. paint 2-3 thick coats of paint on, you need to make sure that the paint is thick enough to block light so when the light is dry hold it up to the light or something to make sure its thick enough.
step 7 - 24 Hours after painting plug your mouse sander in and put the piece of acrylic on a flat surface paint upwards. turn the mouse sander on and put it on the painted surface. DONT PRESS DOWN... you're not trying to remove material you are trying to remove a thin layer of paint. move the sander aroun just using the wieght of the sander to remove the paint on the slightly raised up pieces. you need to be careful and there is a fine line between removing the paint and the plastic, it is important not to over sand.
step 8 - flip the material over and sand the bottom of the top layer until it looks very frosted, this helps to break up the light and remove the individual led's so it just looks like a glow.
step 9 - Wipe down with a cloth, then hold it up to the light. it is very common for the larger areas of paint to have small patches that have been sanded away by mistake, these just need to be fixed using a small paint brush and the same paint.
step 10 - tape both layers together so they perfectly align. mark out where you need holes and drill the hole 2mm bigger than the diameter of the pipe that is going through them. this is very simple and will be very custom for your particular build so i can't really help you very much other than that.
step 11 - seperate the layers again and put the top layer to one side. take the bottom layer and an led strip of the colour of your choosing. stick the led strip(s) in whatever pattern gives you the most coverage. more led's = bright of course.
step 12 - place the top layer of the midplate in the exact position you want it to be in. mark using a pencil a line where the bottom of the plastic is on the motherboard tray and the front panel. drill 4.5mm holes so that the top of the hole is level with this line.
step 13 - put a bolt through the holes and tighten a nut onto them, this will give you a peg coming out of the side of the case. make as many pegs as you need for the top layer to stay in place and then do the same with the bottom layer but about 50mm or more lower.
YOU ARE DONE.
-
 JordanMac got a reaction from astranger200 in How to Make an Awesome Midplate
Materials and tools
- clear acrylic sheet
the stuff I used was 5mm thick. It's important that you use a thick piece of plastic otherwise it will bow when etched, if doing this again I would go for a 10mm thick piece. This need to be cut to the shape of the inside of the case, make it slightly smaller, take the measurements of the inside of the case and remove 5-10mm. You also need a second sheet the exact same shape, however this piece doesn't need to be as thick, 5mm is more than enough. I would recommend sourcing your plastic from sheet plastics UK if your from the uk, sorry I don't know anywhere for anywhere else.
- power drill and assorted drill bits
You need a fairly decent power drill that is able to drill steel but the standard battery powered portable drill will do the job. You will also need some drill bits, you will need a 4.5mm or 5mm bit and if you are running any pipes through the midplate you will need another drill bit that is 2mm bigger than the diameter of your pipe. For example my pipes were 10mm so I drilled 12mm hole through the midplate.
- acrylic paint
You could use a spray paint designed for plastic such as plastikotes plastic range or you cab do what I did and use abd acrylic paint that brushes on. I personally prefer to use the brush on paint as you can put a much thicker coat on than you can with a spray can.
- mouse sander
The mouse sander is used to remove the paint on the areas where you want the light to shine through. It is important that you use a mouse sander and not a belt sander, belt Sanders are far too aggressive to be used for this purpose, youre only wanting to remove some paint not tons of material.
- jigsaw
This is used to cut the plastic sheets down to size and to the correct shape, you will also want some plastic cutting blades.
- M4 bolts and M4 nuts x6 each
Instructions
If you buy any chance have a £5000 laser cutter sitting around it may be a good time to get the manual out and learn how to use it. however if you are like me and don't have one you will need to find one that you can use or you will have to pay for a company to do it for you.
Step 1 - Measure your case.
you need to measure the area in which your midplate is going to go. measure from the highest point on the motherboard tray to where the side panel would be. then measure from the front of the case to the rear of the case. for me my measurements for the switch 810 was 515mm by 205mm. write this down its very important.
Step 2 - Enter some 2d design software that can out put a scale drawing in dxf file type. i personally use corel draw becuase i was taught it in school and college, wouldn't reccomend it to be honest there are much better software packages out there but this is the one i have been taught to use. the first thing you need to know is that laser cutters recognise red as cut and black as etch.
step 3 - Draw a rectangle that is the same dimensions as you mentioned earlier but with 5mm taken off each measurement. so for example in my switch810 i measured 515mm x 205mm but the rectangle i am drawing is 510mm x 200mm. this is just to allow some wiggle room inside the case. save this design twice, 1st time called layer top and the second time called layer bottom. close layer bottom and open layer top.
step 4 - draw what ever you want inside that red box, anything that is white will have light shining through and anything that is black wont have light shining through.
if you look at this picture, this is what you want with your design is white. if you want a picture i find it best to vetorise it with some software like vectorimage first and then drop it into your design software.
step 5 - either laser cut the plastic yourself or the more likely option is to send the design away to a company that can do plastic laser cutting. an example of the type of company you are looking for; http://www.cutlasercut.com/.
Few key points you need to get across to the company;
1) you need it cut into 10mm CLEAR ACRYLIC
2) you want a DEEP engrave
3) you need both pieces (layer top and layer bottom) but only one has engraving
step 6 - When you recieve your part back it will look something like this:
Notice how the unetched parts are higher up than the etched parts leaving channels and grooves for the paint to sit in. What you need to do now is paint the whole thing black on the textured side. paint 2-3 thick coats of paint on, you need to make sure that the paint is thick enough to block light so when the light is dry hold it up to the light or something to make sure its thick enough.
step 7 - 24 Hours after painting plug your mouse sander in and put the piece of acrylic on a flat surface paint upwards. turn the mouse sander on and put it on the painted surface. DONT PRESS DOWN... you're not trying to remove material you are trying to remove a thin layer of paint. move the sander aroun just using the wieght of the sander to remove the paint on the slightly raised up pieces. you need to be careful and there is a fine line between removing the paint and the plastic, it is important not to over sand.
step 8 - flip the material over and sand the bottom of the top layer until it looks very frosted, this helps to break up the light and remove the individual led's so it just looks like a glow.
step 9 - Wipe down with a cloth, then hold it up to the light. it is very common for the larger areas of paint to have small patches that have been sanded away by mistake, these just need to be fixed using a small paint brush and the same paint.
step 10 - tape both layers together so they perfectly align. mark out where you need holes and drill the hole 2mm bigger than the diameter of the pipe that is going through them. this is very simple and will be very custom for your particular build so i can't really help you very much other than that.
step 11 - seperate the layers again and put the top layer to one side. take the bottom layer and an led strip of the colour of your choosing. stick the led strip(s) in whatever pattern gives you the most coverage. more led's = bright of course.
step 12 - place the top layer of the midplate in the exact position you want it to be in. mark using a pencil a line where the bottom of the plastic is on the motherboard tray and the front panel. drill 4.5mm holes so that the top of the hole is level with this line.
step 13 - put a bolt through the holes and tighten a nut onto them, this will give you a peg coming out of the side of the case. make as many pegs as you need for the top layer to stay in place and then do the same with the bottom layer but about 50mm or more lower.
YOU ARE DONE.
-
 JordanMac got a reaction from You_are_a_cunt in How to Make an Awesome Midplate
Materials and tools
- clear acrylic sheet
the stuff I used was 5mm thick. It's important that you use a thick piece of plastic otherwise it will bow when etched, if doing this again I would go for a 10mm thick piece. This need to be cut to the shape of the inside of the case, make it slightly smaller, take the measurements of the inside of the case and remove 5-10mm. You also need a second sheet the exact same shape, however this piece doesn't need to be as thick, 5mm is more than enough. I would recommend sourcing your plastic from sheet plastics UK if your from the uk, sorry I don't know anywhere for anywhere else.
- power drill and assorted drill bits
You need a fairly decent power drill that is able to drill steel but the standard battery powered portable drill will do the job. You will also need some drill bits, you will need a 4.5mm or 5mm bit and if you are running any pipes through the midplate you will need another drill bit that is 2mm bigger than the diameter of your pipe. For example my pipes were 10mm so I drilled 12mm hole through the midplate.
- acrylic paint
You could use a spray paint designed for plastic such as plastikotes plastic range or you cab do what I did and use abd acrylic paint that brushes on. I personally prefer to use the brush on paint as you can put a much thicker coat on than you can with a spray can.
- mouse sander
The mouse sander is used to remove the paint on the areas where you want the light to shine through. It is important that you use a mouse sander and not a belt sander, belt Sanders are far too aggressive to be used for this purpose, youre only wanting to remove some paint not tons of material.
- jigsaw
This is used to cut the plastic sheets down to size and to the correct shape, you will also want some plastic cutting blades.
- M4 bolts and M4 nuts x6 each
Instructions
If you buy any chance have a £5000 laser cutter sitting around it may be a good time to get the manual out and learn how to use it. however if you are like me and don't have one you will need to find one that you can use or you will have to pay for a company to do it for you.
Step 1 - Measure your case.
you need to measure the area in which your midplate is going to go. measure from the highest point on the motherboard tray to where the side panel would be. then measure from the front of the case to the rear of the case. for me my measurements for the switch 810 was 515mm by 205mm. write this down its very important.
Step 2 - Enter some 2d design software that can out put a scale drawing in dxf file type. i personally use corel draw becuase i was taught it in school and college, wouldn't reccomend it to be honest there are much better software packages out there but this is the one i have been taught to use. the first thing you need to know is that laser cutters recognise red as cut and black as etch.
step 3 - Draw a rectangle that is the same dimensions as you mentioned earlier but with 5mm taken off each measurement. so for example in my switch810 i measured 515mm x 205mm but the rectangle i am drawing is 510mm x 200mm. this is just to allow some wiggle room inside the case. save this design twice, 1st time called layer top and the second time called layer bottom. close layer bottom and open layer top.
step 4 - draw what ever you want inside that red box, anything that is white will have light shining through and anything that is black wont have light shining through.
if you look at this picture, this is what you want with your design is white. if you want a picture i find it best to vetorise it with some software like vectorimage first and then drop it into your design software.
step 5 - either laser cut the plastic yourself or the more likely option is to send the design away to a company that can do plastic laser cutting. an example of the type of company you are looking for; http://www.cutlasercut.com/.
Few key points you need to get across to the company;
1) you need it cut into 10mm CLEAR ACRYLIC
2) you want a DEEP engrave
3) you need both pieces (layer top and layer bottom) but only one has engraving
step 6 - When you recieve your part back it will look something like this:
Notice how the unetched parts are higher up than the etched parts leaving channels and grooves for the paint to sit in. What you need to do now is paint the whole thing black on the textured side. paint 2-3 thick coats of paint on, you need to make sure that the paint is thick enough to block light so when the light is dry hold it up to the light or something to make sure its thick enough.
step 7 - 24 Hours after painting plug your mouse sander in and put the piece of acrylic on a flat surface paint upwards. turn the mouse sander on and put it on the painted surface. DONT PRESS DOWN... you're not trying to remove material you are trying to remove a thin layer of paint. move the sander aroun just using the wieght of the sander to remove the paint on the slightly raised up pieces. you need to be careful and there is a fine line between removing the paint and the plastic, it is important not to over sand.
step 8 - flip the material over and sand the bottom of the top layer until it looks very frosted, this helps to break up the light and remove the individual led's so it just looks like a glow.
step 9 - Wipe down with a cloth, then hold it up to the light. it is very common for the larger areas of paint to have small patches that have been sanded away by mistake, these just need to be fixed using a small paint brush and the same paint.
step 10 - tape both layers together so they perfectly align. mark out where you need holes and drill the hole 2mm bigger than the diameter of the pipe that is going through them. this is very simple and will be very custom for your particular build so i can't really help you very much other than that.
step 11 - seperate the layers again and put the top layer to one side. take the bottom layer and an led strip of the colour of your choosing. stick the led strip(s) in whatever pattern gives you the most coverage. more led's = bright of course.
step 12 - place the top layer of the midplate in the exact position you want it to be in. mark using a pencil a line where the bottom of the plastic is on the motherboard tray and the front panel. drill 4.5mm holes so that the top of the hole is level with this line.
step 13 - put a bolt through the holes and tighten a nut onto them, this will give you a peg coming out of the side of the case. make as many pegs as you need for the top layer to stay in place and then do the same with the bottom layer but about 50mm or more lower.
YOU ARE DONE.
-
 JordanMac got a reaction from colinreay in [Finished] Project: Cobalt (Chromed Copper Piping, Laser Etching, Cable Sleeving and More)
Update 7
Designs for sleeving
Some nice packages arrived today, i got some tools, some sleeving from mdpc and some connectors.
Sleeving from MDPC, blue, grey and white plus some blue sata sleeving.
i bought a couple of 24 pin extenders so that i wouldn't have to worry about crimping my own wires.
watching Lutro0 and he said be creful removing the pins you can cut yourself and i said "Naaah, no way, not a chance." withing 5 wires this happened.
the 6 pin vga cables
Now for the 24 pin
All of the wires including the 24pin, six 6 pin, 8 pin and one of the sata cables
24 pin pattern
Sata cable...
Well that all of the wire sleeving, the next update will be in a few days as im having trouble getting the finish i want with the nickel plating.
-
 JordanMac got a reaction from Dimi3os in Motorbikes
shame :( my father was happy for me to get a motorcycle, it was my mum i spent several months convincing...
-
 JordanMac got a reaction from Cuzum in Worst game you have played?
Splinter cell conviction, it was just such a disappointment compared to all of the other splinter cells ive played.
-
 JordanMac got a reaction from heikkikon in Acrylic Tubing vs Regular Tubing
Acrylic tubing
Pros
-Can get really straight runs which always look good
-wont discolour like some tubing does
Cons
-with hard piping it is harder to move items around/swap items
-little to no flexibility so your bends have to be spot on.
-fittings and the tubing itself is a little more expensive than standard barbs and tubing
Regular tubing
Pros
-no need for heatguns etc to bend
-no need to be precise about bends etc as the tubing is flexible
-cheaper and easier
Cons
-doesn't look as good because you can get perfectly straight runs
-doesn't hold its shape (will sag etc)
your basically looking at a choice between practicality/easiness with regular tubing vs better looking/harder for acrylic tubing.
-
 JordanMac got a reaction from GoldSrc in How to Make an Awesome Midplate
Materials and tools
- clear acrylic sheet
the stuff I used was 5mm thick. It's important that you use a thick piece of plastic otherwise it will bow when etched, if doing this again I would go for a 10mm thick piece. This need to be cut to the shape of the inside of the case, make it slightly smaller, take the measurements of the inside of the case and remove 5-10mm. You also need a second sheet the exact same shape, however this piece doesn't need to be as thick, 5mm is more than enough. I would recommend sourcing your plastic from sheet plastics UK if your from the uk, sorry I don't know anywhere for anywhere else.
- power drill and assorted drill bits
You need a fairly decent power drill that is able to drill steel but the standard battery powered portable drill will do the job. You will also need some drill bits, you will need a 4.5mm or 5mm bit and if you are running any pipes through the midplate you will need another drill bit that is 2mm bigger than the diameter of your pipe. For example my pipes were 10mm so I drilled 12mm hole through the midplate.
- acrylic paint
You could use a spray paint designed for plastic such as plastikotes plastic range or you cab do what I did and use abd acrylic paint that brushes on. I personally prefer to use the brush on paint as you can put a much thicker coat on than you can with a spray can.
- mouse sander
The mouse sander is used to remove the paint on the areas where you want the light to shine through. It is important that you use a mouse sander and not a belt sander, belt Sanders are far too aggressive to be used for this purpose, youre only wanting to remove some paint not tons of material.
- jigsaw
This is used to cut the plastic sheets down to size and to the correct shape, you will also want some plastic cutting blades.
- M4 bolts and M4 nuts x6 each
Instructions
If you buy any chance have a £5000 laser cutter sitting around it may be a good time to get the manual out and learn how to use it. however if you are like me and don't have one you will need to find one that you can use or you will have to pay for a company to do it for you.
Step 1 - Measure your case.
you need to measure the area in which your midplate is going to go. measure from the highest point on the motherboard tray to where the side panel would be. then measure from the front of the case to the rear of the case. for me my measurements for the switch 810 was 515mm by 205mm. write this down its very important.
Step 2 - Enter some 2d design software that can out put a scale drawing in dxf file type. i personally use corel draw becuase i was taught it in school and college, wouldn't reccomend it to be honest there are much better software packages out there but this is the one i have been taught to use. the first thing you need to know is that laser cutters recognise red as cut and black as etch.
step 3 - Draw a rectangle that is the same dimensions as you mentioned earlier but with 5mm taken off each measurement. so for example in my switch810 i measured 515mm x 205mm but the rectangle i am drawing is 510mm x 200mm. this is just to allow some wiggle room inside the case. save this design twice, 1st time called layer top and the second time called layer bottom. close layer bottom and open layer top.
step 4 - draw what ever you want inside that red box, anything that is white will have light shining through and anything that is black wont have light shining through.
if you look at this picture, this is what you want with your design is white. if you want a picture i find it best to vetorise it with some software like vectorimage first and then drop it into your design software.
step 5 - either laser cut the plastic yourself or the more likely option is to send the design away to a company that can do plastic laser cutting. an example of the type of company you are looking for; http://www.cutlasercut.com/.
Few key points you need to get across to the company;
1) you need it cut into 10mm CLEAR ACRYLIC
2) you want a DEEP engrave
3) you need both pieces (layer top and layer bottom) but only one has engraving
step 6 - When you recieve your part back it will look something like this:
Notice how the unetched parts are higher up than the etched parts leaving channels and grooves for the paint to sit in. What you need to do now is paint the whole thing black on the textured side. paint 2-3 thick coats of paint on, you need to make sure that the paint is thick enough to block light so when the light is dry hold it up to the light or something to make sure its thick enough.
step 7 - 24 Hours after painting plug your mouse sander in and put the piece of acrylic on a flat surface paint upwards. turn the mouse sander on and put it on the painted surface. DONT PRESS DOWN... you're not trying to remove material you are trying to remove a thin layer of paint. move the sander aroun just using the wieght of the sander to remove the paint on the slightly raised up pieces. you need to be careful and there is a fine line between removing the paint and the plastic, it is important not to over sand.
step 8 - flip the material over and sand the bottom of the top layer until it looks very frosted, this helps to break up the light and remove the individual led's so it just looks like a glow.
step 9 - Wipe down with a cloth, then hold it up to the light. it is very common for the larger areas of paint to have small patches that have been sanded away by mistake, these just need to be fixed using a small paint brush and the same paint.
step 10 - tape both layers together so they perfectly align. mark out where you need holes and drill the hole 2mm bigger than the diameter of the pipe that is going through them. this is very simple and will be very custom for your particular build so i can't really help you very much other than that.
step 11 - seperate the layers again and put the top layer to one side. take the bottom layer and an led strip of the colour of your choosing. stick the led strip(s) in whatever pattern gives you the most coverage. more led's = bright of course.
step 12 - place the top layer of the midplate in the exact position you want it to be in. mark using a pencil a line where the bottom of the plastic is on the motherboard tray and the front panel. drill 4.5mm holes so that the top of the hole is level with this line.
step 13 - put a bolt through the holes and tighten a nut onto them, this will give you a peg coming out of the side of the case. make as many pegs as you need for the top layer to stay in place and then do the same with the bottom layer but about 50mm or more lower.
YOU ARE DONE.
-
 JordanMac got a reaction from Toltar in How to Make an Awesome Midplate
Materials and tools
- clear acrylic sheet
the stuff I used was 5mm thick. It's important that you use a thick piece of plastic otherwise it will bow when etched, if doing this again I would go for a 10mm thick piece. This need to be cut to the shape of the inside of the case, make it slightly smaller, take the measurements of the inside of the case and remove 5-10mm. You also need a second sheet the exact same shape, however this piece doesn't need to be as thick, 5mm is more than enough. I would recommend sourcing your plastic from sheet plastics UK if your from the uk, sorry I don't know anywhere for anywhere else.
- power drill and assorted drill bits
You need a fairly decent power drill that is able to drill steel but the standard battery powered portable drill will do the job. You will also need some drill bits, you will need a 4.5mm or 5mm bit and if you are running any pipes through the midplate you will need another drill bit that is 2mm bigger than the diameter of your pipe. For example my pipes were 10mm so I drilled 12mm hole through the midplate.
- acrylic paint
You could use a spray paint designed for plastic such as plastikotes plastic range or you cab do what I did and use abd acrylic paint that brushes on. I personally prefer to use the brush on paint as you can put a much thicker coat on than you can with a spray can.
- mouse sander
The mouse sander is used to remove the paint on the areas where you want the light to shine through. It is important that you use a mouse sander and not a belt sander, belt Sanders are far too aggressive to be used for this purpose, youre only wanting to remove some paint not tons of material.
- jigsaw
This is used to cut the plastic sheets down to size and to the correct shape, you will also want some plastic cutting blades.
- M4 bolts and M4 nuts x6 each
Instructions
If you buy any chance have a £5000 laser cutter sitting around it may be a good time to get the manual out and learn how to use it. however if you are like me and don't have one you will need to find one that you can use or you will have to pay for a company to do it for you.
Step 1 - Measure your case.
you need to measure the area in which your midplate is going to go. measure from the highest point on the motherboard tray to where the side panel would be. then measure from the front of the case to the rear of the case. for me my measurements for the switch 810 was 515mm by 205mm. write this down its very important.
Step 2 - Enter some 2d design software that can out put a scale drawing in dxf file type. i personally use corel draw becuase i was taught it in school and college, wouldn't reccomend it to be honest there are much better software packages out there but this is the one i have been taught to use. the first thing you need to know is that laser cutters recognise red as cut and black as etch.
step 3 - Draw a rectangle that is the same dimensions as you mentioned earlier but with 5mm taken off each measurement. so for example in my switch810 i measured 515mm x 205mm but the rectangle i am drawing is 510mm x 200mm. this is just to allow some wiggle room inside the case. save this design twice, 1st time called layer top and the second time called layer bottom. close layer bottom and open layer top.
step 4 - draw what ever you want inside that red box, anything that is white will have light shining through and anything that is black wont have light shining through.
if you look at this picture, this is what you want with your design is white. if you want a picture i find it best to vetorise it with some software like vectorimage first and then drop it into your design software.
step 5 - either laser cut the plastic yourself or the more likely option is to send the design away to a company that can do plastic laser cutting. an example of the type of company you are looking for; http://www.cutlasercut.com/.
Few key points you need to get across to the company;
1) you need it cut into 10mm CLEAR ACRYLIC
2) you want a DEEP engrave
3) you need both pieces (layer top and layer bottom) but only one has engraving
step 6 - When you recieve your part back it will look something like this:
Notice how the unetched parts are higher up than the etched parts leaving channels and grooves for the paint to sit in. What you need to do now is paint the whole thing black on the textured side. paint 2-3 thick coats of paint on, you need to make sure that the paint is thick enough to block light so when the light is dry hold it up to the light or something to make sure its thick enough.
step 7 - 24 Hours after painting plug your mouse sander in and put the piece of acrylic on a flat surface paint upwards. turn the mouse sander on and put it on the painted surface. DONT PRESS DOWN... you're not trying to remove material you are trying to remove a thin layer of paint. move the sander aroun just using the wieght of the sander to remove the paint on the slightly raised up pieces. you need to be careful and there is a fine line between removing the paint and the plastic, it is important not to over sand.
step 8 - flip the material over and sand the bottom of the top layer until it looks very frosted, this helps to break up the light and remove the individual led's so it just looks like a glow.
step 9 - Wipe down with a cloth, then hold it up to the light. it is very common for the larger areas of paint to have small patches that have been sanded away by mistake, these just need to be fixed using a small paint brush and the same paint.
step 10 - tape both layers together so they perfectly align. mark out where you need holes and drill the hole 2mm bigger than the diameter of the pipe that is going through them. this is very simple and will be very custom for your particular build so i can't really help you very much other than that.
step 11 - seperate the layers again and put the top layer to one side. take the bottom layer and an led strip of the colour of your choosing. stick the led strip(s) in whatever pattern gives you the most coverage. more led's = bright of course.
step 12 - place the top layer of the midplate in the exact position you want it to be in. mark using a pencil a line where the bottom of the plastic is on the motherboard tray and the front panel. drill 4.5mm holes so that the top of the hole is level with this line.
step 13 - put a bolt through the holes and tighten a nut onto them, this will give you a peg coming out of the side of the case. make as many pegs as you need for the top layer to stay in place and then do the same with the bottom layer but about 50mm or more lower.
YOU ARE DONE.
-

-
 JordanMac got a reaction from Kawaii Besu in Post Linus Memes Here! << -Original thread has returned
-
 JordanMac got a reaction from Jayfeather787 in Post Linus Memes Here! << -Original thread has returned
-
 JordanMac got a reaction from hypnodog in Experiences with non-techies
Also my granddad has half of his browser covered with toolbars, and im not exaggerating with the area in which you can see the webpage is half the screen height. i delete it every time i go down there and i go back 3 months later to find it full up again.
-
 JordanMac got a reaction from Shahnewaz in Experiences with non-techies
Also my granddad has half of his browser covered with toolbars, and im not exaggerating with the area in which you can see the webpage is half the screen height. i delete it every time i go down there and i go back 3 months later to find it full up again.
-
 JordanMac got a reaction from Tedster in Does the forum keep going down?
Yes. although not as much as the vbulletin5 days, or "the dark ages" as it should be called.
-
-
 JordanMac got a reaction from Shroomster in How to Make an Awesome Midplate
Materials and tools
- clear acrylic sheet
the stuff I used was 5mm thick. It's important that you use a thick piece of plastic otherwise it will bow when etched, if doing this again I would go for a 10mm thick piece. This need to be cut to the shape of the inside of the case, make it slightly smaller, take the measurements of the inside of the case and remove 5-10mm. You also need a second sheet the exact same shape, however this piece doesn't need to be as thick, 5mm is more than enough. I would recommend sourcing your plastic from sheet plastics UK if your from the uk, sorry I don't know anywhere for anywhere else.
- power drill and assorted drill bits
You need a fairly decent power drill that is able to drill steel but the standard battery powered portable drill will do the job. You will also need some drill bits, you will need a 4.5mm or 5mm bit and if you are running any pipes through the midplate you will need another drill bit that is 2mm bigger than the diameter of your pipe. For example my pipes were 10mm so I drilled 12mm hole through the midplate.
- acrylic paint
You could use a spray paint designed for plastic such as plastikotes plastic range or you cab do what I did and use abd acrylic paint that brushes on. I personally prefer to use the brush on paint as you can put a much thicker coat on than you can with a spray can.
- mouse sander
The mouse sander is used to remove the paint on the areas where you want the light to shine through. It is important that you use a mouse sander and not a belt sander, belt Sanders are far too aggressive to be used for this purpose, youre only wanting to remove some paint not tons of material.
- jigsaw
This is used to cut the plastic sheets down to size and to the correct shape, you will also want some plastic cutting blades.
- M4 bolts and M4 nuts x6 each
Instructions
If you buy any chance have a £5000 laser cutter sitting around it may be a good time to get the manual out and learn how to use it. however if you are like me and don't have one you will need to find one that you can use or you will have to pay for a company to do it for you.
Step 1 - Measure your case.
you need to measure the area in which your midplate is going to go. measure from the highest point on the motherboard tray to where the side panel would be. then measure from the front of the case to the rear of the case. for me my measurements for the switch 810 was 515mm by 205mm. write this down its very important.
Step 2 - Enter some 2d design software that can out put a scale drawing in dxf file type. i personally use corel draw becuase i was taught it in school and college, wouldn't reccomend it to be honest there are much better software packages out there but this is the one i have been taught to use. the first thing you need to know is that laser cutters recognise red as cut and black as etch.
step 3 - Draw a rectangle that is the same dimensions as you mentioned earlier but with 5mm taken off each measurement. so for example in my switch810 i measured 515mm x 205mm but the rectangle i am drawing is 510mm x 200mm. this is just to allow some wiggle room inside the case. save this design twice, 1st time called layer top and the second time called layer bottom. close layer bottom and open layer top.
step 4 - draw what ever you want inside that red box, anything that is white will have light shining through and anything that is black wont have light shining through.
if you look at this picture, this is what you want with your design is white. if you want a picture i find it best to vetorise it with some software like vectorimage first and then drop it into your design software.
step 5 - either laser cut the plastic yourself or the more likely option is to send the design away to a company that can do plastic laser cutting. an example of the type of company you are looking for; http://www.cutlasercut.com/.
Few key points you need to get across to the company;
1) you need it cut into 10mm CLEAR ACRYLIC
2) you want a DEEP engrave
3) you need both pieces (layer top and layer bottom) but only one has engraving
step 6 - When you recieve your part back it will look something like this:
Notice how the unetched parts are higher up than the etched parts leaving channels and grooves for the paint to sit in. What you need to do now is paint the whole thing black on the textured side. paint 2-3 thick coats of paint on, you need to make sure that the paint is thick enough to block light so when the light is dry hold it up to the light or something to make sure its thick enough.
step 7 - 24 Hours after painting plug your mouse sander in and put the piece of acrylic on a flat surface paint upwards. turn the mouse sander on and put it on the painted surface. DONT PRESS DOWN... you're not trying to remove material you are trying to remove a thin layer of paint. move the sander aroun just using the wieght of the sander to remove the paint on the slightly raised up pieces. you need to be careful and there is a fine line between removing the paint and the plastic, it is important not to over sand.
step 8 - flip the material over and sand the bottom of the top layer until it looks very frosted, this helps to break up the light and remove the individual led's so it just looks like a glow.
step 9 - Wipe down with a cloth, then hold it up to the light. it is very common for the larger areas of paint to have small patches that have been sanded away by mistake, these just need to be fixed using a small paint brush and the same paint.
step 10 - tape both layers together so they perfectly align. mark out where you need holes and drill the hole 2mm bigger than the diameter of the pipe that is going through them. this is very simple and will be very custom for your particular build so i can't really help you very much other than that.
step 11 - seperate the layers again and put the top layer to one side. take the bottom layer and an led strip of the colour of your choosing. stick the led strip(s) in whatever pattern gives you the most coverage. more led's = bright of course.
step 12 - place the top layer of the midplate in the exact position you want it to be in. mark using a pencil a line where the bottom of the plastic is on the motherboard tray and the front panel. drill 4.5mm holes so that the top of the hole is level with this line.
step 13 - put a bolt through the holes and tighten a nut onto them, this will give you a peg coming out of the side of the case. make as many pegs as you need for the top layer to stay in place and then do the same with the bottom layer but about 50mm or more lower.
YOU ARE DONE.
-
 JordanMac got a reaction from λGhost in How to Make an Awesome Midplate
Materials and tools
- clear acrylic sheet
the stuff I used was 5mm thick. It's important that you use a thick piece of plastic otherwise it will bow when etched, if doing this again I would go for a 10mm thick piece. This need to be cut to the shape of the inside of the case, make it slightly smaller, take the measurements of the inside of the case and remove 5-10mm. You also need a second sheet the exact same shape, however this piece doesn't need to be as thick, 5mm is more than enough. I would recommend sourcing your plastic from sheet plastics UK if your from the uk, sorry I don't know anywhere for anywhere else.
- power drill and assorted drill bits
You need a fairly decent power drill that is able to drill steel but the standard battery powered portable drill will do the job. You will also need some drill bits, you will need a 4.5mm or 5mm bit and if you are running any pipes through the midplate you will need another drill bit that is 2mm bigger than the diameter of your pipe. For example my pipes were 10mm so I drilled 12mm hole through the midplate.
- acrylic paint
You could use a spray paint designed for plastic such as plastikotes plastic range or you cab do what I did and use abd acrylic paint that brushes on. I personally prefer to use the brush on paint as you can put a much thicker coat on than you can with a spray can.
- mouse sander
The mouse sander is used to remove the paint on the areas where you want the light to shine through. It is important that you use a mouse sander and not a belt sander, belt Sanders are far too aggressive to be used for this purpose, youre only wanting to remove some paint not tons of material.
- jigsaw
This is used to cut the plastic sheets down to size and to the correct shape, you will also want some plastic cutting blades.
- M4 bolts and M4 nuts x6 each
Instructions
If you buy any chance have a £5000 laser cutter sitting around it may be a good time to get the manual out and learn how to use it. however if you are like me and don't have one you will need to find one that you can use or you will have to pay for a company to do it for you.
Step 1 - Measure your case.
you need to measure the area in which your midplate is going to go. measure from the highest point on the motherboard tray to where the side panel would be. then measure from the front of the case to the rear of the case. for me my measurements for the switch 810 was 515mm by 205mm. write this down its very important.
Step 2 - Enter some 2d design software that can out put a scale drawing in dxf file type. i personally use corel draw becuase i was taught it in school and college, wouldn't reccomend it to be honest there are much better software packages out there but this is the one i have been taught to use. the first thing you need to know is that laser cutters recognise red as cut and black as etch.
step 3 - Draw a rectangle that is the same dimensions as you mentioned earlier but with 5mm taken off each measurement. so for example in my switch810 i measured 515mm x 205mm but the rectangle i am drawing is 510mm x 200mm. this is just to allow some wiggle room inside the case. save this design twice, 1st time called layer top and the second time called layer bottom. close layer bottom and open layer top.
step 4 - draw what ever you want inside that red box, anything that is white will have light shining through and anything that is black wont have light shining through.
if you look at this picture, this is what you want with your design is white. if you want a picture i find it best to vetorise it with some software like vectorimage first and then drop it into your design software.
step 5 - either laser cut the plastic yourself or the more likely option is to send the design away to a company that can do plastic laser cutting. an example of the type of company you are looking for; http://www.cutlasercut.com/.
Few key points you need to get across to the company;
1) you need it cut into 10mm CLEAR ACRYLIC
2) you want a DEEP engrave
3) you need both pieces (layer top and layer bottom) but only one has engraving
step 6 - When you recieve your part back it will look something like this:
Notice how the unetched parts are higher up than the etched parts leaving channels and grooves for the paint to sit in. What you need to do now is paint the whole thing black on the textured side. paint 2-3 thick coats of paint on, you need to make sure that the paint is thick enough to block light so when the light is dry hold it up to the light or something to make sure its thick enough.
step 7 - 24 Hours after painting plug your mouse sander in and put the piece of acrylic on a flat surface paint upwards. turn the mouse sander on and put it on the painted surface. DONT PRESS DOWN... you're not trying to remove material you are trying to remove a thin layer of paint. move the sander aroun just using the wieght of the sander to remove the paint on the slightly raised up pieces. you need to be careful and there is a fine line between removing the paint and the plastic, it is important not to over sand.
step 8 - flip the material over and sand the bottom of the top layer until it looks very frosted, this helps to break up the light and remove the individual led's so it just looks like a glow.
step 9 - Wipe down with a cloth, then hold it up to the light. it is very common for the larger areas of paint to have small patches that have been sanded away by mistake, these just need to be fixed using a small paint brush and the same paint.
step 10 - tape both layers together so they perfectly align. mark out where you need holes and drill the hole 2mm bigger than the diameter of the pipe that is going through them. this is very simple and will be very custom for your particular build so i can't really help you very much other than that.
step 11 - seperate the layers again and put the top layer to one side. take the bottom layer and an led strip of the colour of your choosing. stick the led strip(s) in whatever pattern gives you the most coverage. more led's = bright of course.
step 12 - place the top layer of the midplate in the exact position you want it to be in. mark using a pencil a line where the bottom of the plastic is on the motherboard tray and the front panel. drill 4.5mm holes so that the top of the hole is level with this line.
step 13 - put a bolt through the holes and tighten a nut onto them, this will give you a peg coming out of the side of the case. make as many pegs as you need for the top layer to stay in place and then do the same with the bottom layer but about 50mm or more lower.
YOU ARE DONE.
-
 JordanMac got a reaction from Kherm in How to Make an Awesome Midplate
Materials and tools
- clear acrylic sheet
the stuff I used was 5mm thick. It's important that you use a thick piece of plastic otherwise it will bow when etched, if doing this again I would go for a 10mm thick piece. This need to be cut to the shape of the inside of the case, make it slightly smaller, take the measurements of the inside of the case and remove 5-10mm. You also need a second sheet the exact same shape, however this piece doesn't need to be as thick, 5mm is more than enough. I would recommend sourcing your plastic from sheet plastics UK if your from the uk, sorry I don't know anywhere for anywhere else.
- power drill and assorted drill bits
You need a fairly decent power drill that is able to drill steel but the standard battery powered portable drill will do the job. You will also need some drill bits, you will need a 4.5mm or 5mm bit and if you are running any pipes through the midplate you will need another drill bit that is 2mm bigger than the diameter of your pipe. For example my pipes were 10mm so I drilled 12mm hole through the midplate.
- acrylic paint
You could use a spray paint designed for plastic such as plastikotes plastic range or you cab do what I did and use abd acrylic paint that brushes on. I personally prefer to use the brush on paint as you can put a much thicker coat on than you can with a spray can.
- mouse sander
The mouse sander is used to remove the paint on the areas where you want the light to shine through. It is important that you use a mouse sander and not a belt sander, belt Sanders are far too aggressive to be used for this purpose, youre only wanting to remove some paint not tons of material.
- jigsaw
This is used to cut the plastic sheets down to size and to the correct shape, you will also want some plastic cutting blades.
- M4 bolts and M4 nuts x6 each
Instructions
If you buy any chance have a £5000 laser cutter sitting around it may be a good time to get the manual out and learn how to use it. however if you are like me and don't have one you will need to find one that you can use or you will have to pay for a company to do it for you.
Step 1 - Measure your case.
you need to measure the area in which your midplate is going to go. measure from the highest point on the motherboard tray to where the side panel would be. then measure from the front of the case to the rear of the case. for me my measurements for the switch 810 was 515mm by 205mm. write this down its very important.
Step 2 - Enter some 2d design software that can out put a scale drawing in dxf file type. i personally use corel draw becuase i was taught it in school and college, wouldn't reccomend it to be honest there are much better software packages out there but this is the one i have been taught to use. the first thing you need to know is that laser cutters recognise red as cut and black as etch.
step 3 - Draw a rectangle that is the same dimensions as you mentioned earlier but with 5mm taken off each measurement. so for example in my switch810 i measured 515mm x 205mm but the rectangle i am drawing is 510mm x 200mm. this is just to allow some wiggle room inside the case. save this design twice, 1st time called layer top and the second time called layer bottom. close layer bottom and open layer top.
step 4 - draw what ever you want inside that red box, anything that is white will have light shining through and anything that is black wont have light shining through.
if you look at this picture, this is what you want with your design is white. if you want a picture i find it best to vetorise it with some software like vectorimage first and then drop it into your design software.
step 5 - either laser cut the plastic yourself or the more likely option is to send the design away to a company that can do plastic laser cutting. an example of the type of company you are looking for; http://www.cutlasercut.com/.
Few key points you need to get across to the company;
1) you need it cut into 10mm CLEAR ACRYLIC
2) you want a DEEP engrave
3) you need both pieces (layer top and layer bottom) but only one has engraving
step 6 - When you recieve your part back it will look something like this:
Notice how the unetched parts are higher up than the etched parts leaving channels and grooves for the paint to sit in. What you need to do now is paint the whole thing black on the textured side. paint 2-3 thick coats of paint on, you need to make sure that the paint is thick enough to block light so when the light is dry hold it up to the light or something to make sure its thick enough.
step 7 - 24 Hours after painting plug your mouse sander in and put the piece of acrylic on a flat surface paint upwards. turn the mouse sander on and put it on the painted surface. DONT PRESS DOWN... you're not trying to remove material you are trying to remove a thin layer of paint. move the sander aroun just using the wieght of the sander to remove the paint on the slightly raised up pieces. you need to be careful and there is a fine line between removing the paint and the plastic, it is important not to over sand.
step 8 - flip the material over and sand the bottom of the top layer until it looks very frosted, this helps to break up the light and remove the individual led's so it just looks like a glow.
step 9 - Wipe down with a cloth, then hold it up to the light. it is very common for the larger areas of paint to have small patches that have been sanded away by mistake, these just need to be fixed using a small paint brush and the same paint.
step 10 - tape both layers together so they perfectly align. mark out where you need holes and drill the hole 2mm bigger than the diameter of the pipe that is going through them. this is very simple and will be very custom for your particular build so i can't really help you very much other than that.
step 11 - seperate the layers again and put the top layer to one side. take the bottom layer and an led strip of the colour of your choosing. stick the led strip(s) in whatever pattern gives you the most coverage. more led's = bright of course.
step 12 - place the top layer of the midplate in the exact position you want it to be in. mark using a pencil a line where the bottom of the plastic is on the motherboard tray and the front panel. drill 4.5mm holes so that the top of the hole is level with this line.
step 13 - put a bolt through the holes and tighten a nut onto them, this will give you a peg coming out of the side of the case. make as many pegs as you need for the top layer to stay in place and then do the same with the bottom layer but about 50mm or more lower.
YOU ARE DONE.


