

PBaines
-
Posts
578 -
Joined
-
Last visited
Content Type
Forums
Status Updates
Blogs
Events
Gallery
Downloads
Store Home
Everything posted by PBaines
-
Here is my Phantom 410 build, I made a new custom motherboard tray and a PSU cable cover, All of this you will only really need a drill for (buy the acrylic to size) and make the mounting holes
-
Ah, then yes a GTX780 would be a perfect fit Especially if you are going to be gaming at 144hz!
-
Then a GTX760 would be all you need for that resolution imo, what kind of frame rates are you getting currently?
-
What resolution do you game at?
-
That first pic :wub:
-
I use these for all my youtube downloading needs; it seemed like such a scammy site when I first looked. It was too good to be true, but seriously, these are epic and would highly recommend! http://www.4kdownload.com/
-
If you were in New Zealand or didn't mind a delay (probably about 2 weeks in total of shipping delay) I could do it for you, most places that offer sleeving wouldn't charge much more if not anything at all as sleeve is basically all the same price across it's spectrum, ie all MDPC-X sleeving cost the same I think. If you were going to do a heatshrinkless job then sure you could attempt that yourself, however if you were going to do a heatshrink job, to put it bluntly it won't come out very good at all if you haven't had the experience. Which is why heatshrinkless is always recommended to first-time sleevers. Depending on what you want to do to your case, MNPCTECH's youtube channel have some pretty good mod guide videos if you were wanting to do modding --------------------- Will start on those sleeving topics mentioned
-
Hope to get the F.A.Q started this weekend, it will be pretty big however. What would people like me to firstly do topics on? But here are some pics of a clients build using some sleeved cables I did for him, it looks epic! note; case is a powder coated Corsair 350D and he also is intending on watercoolint it all too Credits go to: Brent Strudwick
-
Removes crap, increases speed. Battery life. more tweaks in the settings. The basics of most custom roms
-
if the plastic you are painting is "shiny" make sure that you sand that all back off. Other than that, prime, sand (400 grit) paint, sand (1000+ grit) paint, sand (1000+ grit) paint I would recommend waiting a day between any painting. Also, would recommend getting a heat gun. After spraying a coat, have the heatgun on high and QUICKLY move around the paint job, this dries it 1000x quicker. Do not hold it in a place for more than 2 seconds as you could risk overheating and causing bubbles. Other than that, it is all very straight forward
-
I get all my tools/wring from http://lutro0-customs.com/ and then all my sleeving from http://en.mdpc-x.com/ I don't know of anyplace in NZ where you can get stuff for custom length cables..
-
Get a pair of pliers, and grab the pin 1mm above the plastic and push down, you don't want to bend the staple I will be adding the staple method to the F.A.Q when I get a day off work! In regards to that cable, maybe if you pulled all the wires apart you might be able too? As remember sleeve is circular so wouldn't work great with a rectangle haha. That being said, you could probably use the MDPC-X sleeve/sata shrink which is pretty rectangular
-
You mean Teleios? I personally have not used that sleeve yet as it is still relatively new. In my next order from Lutro0 (for about 1000 ATX Pins hehe) I will get a few ft of the Teleious sleeve and see which I like better. I think from memory he said the main difference is the diameter. MDPC-X has a slightly larger diameter requiring more of a 'stretch'. And that the weave on the sleeve is the same. Though as I said, I have not used it personally so maybe Lutro0 can help you there To sleeve a full power supply I would recommend getting 40 meters (130ft) You will still have a couple of meters left over most likely but remember "it is better to have more, and not need it. Then get less, and then need more" For an amateur sleever I would recommend these tools: http://lutro0-customs.com/products/original-molex-extractor http://lutro0-customs.com/products/lc-sleeving-tool http://lutro0-customs.com/products/lc-flush-cutter You could also get this heatgun here http://lutro0-customs.com/products/heatgun Or you could get one locally from your hardware store You will also need a lighter (This basically is to singe the end of the sleeve so that the sleeve doesn't untangle when you snake it along the wire)
-
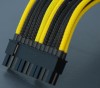
here are the 2 8-pin GPU cables that a client will be using with their GTX780 Classified!
-
I like the ideas that you have pointed out, though I probably will not have the three way split this time around. As it creates more fluid, meaning I need more pressure from the pumps to push the water around. I will try and do the cleanest, parallel runs possible with only one run, instead of a split. I especially love the power cable out a leg, that is actually awesome! However finding a drill big enough to go through a leg? we shall see hahaha It is only 11cm, I could make it smaller as the only thing that will be in that area is the reservoir and my ssd's so I guess I only have to make it thick enough to house those I can't really lye the radiator down as it the intake will be really awkward and will lose a lot of performance. Also means I have to have exhaust through the bottom etc. Though the top is thick, remember that I will be having the section between my arms and legs a lot smaller as you can see with that rounded section. I have thought about laying my GPU's down, but I like them 90 degrees, I have seen quite a few builds that have used extenders and personally I didn't like them. But yeah, since all the components are in the left bay, and the leg/arm section is narrow all should be well!
-
Looking to start a new desk. After completing the first one I have found strengths and weaknesses meaning that the new desk should fix everything that was wrong with the current one Here is what I have made in sketchup (to scale) which anyone is able to use this model if they wished, here is the link https://dl.dropboxusercontent.com/u/97695353/Desk%20rev%202.0.skp Sketchup is available here http://www.sketchup.com/download Please use constructive criticism, with explanations! instead of something like "I don't like where the vandal switches are"
-
 Yeah, I think I've said it like 3 or 4 times? haha and w00p in the Live Stream 2 weeks in a row!
 -
The process is the same yes, just make sure you find a pin out diagram with the voltages listed like the above image and then check that against your cables once you've sleeved them to check them over
-
Here is a thread from a local forum that has pages of information. Feel free to browse the latest pages I'm sure there'll be people saying they're at 120hz http://www.gpforums.co.nz/showthread.php?s=&threadid=442303&perpage=35&pagenumber=1
-
Why are people even talking about Internet speeds in a build log? Be gone, for I banish you
-
Most Korean monitors like the xstar, qnix and the likes can do a minimum of around 100...
-
I know you can with 1440p, but it is mostly limited to around 110hz though some get to 120hz. Also to get 144hz I think you need a custom PCB for a catleap monitor
-
Which is an LED-LCD backlit monitor, where as the Korean ones are IPS which is why they're so amaze-balls
-
it is just like people who love spending money on cars etc, everyone has something that they love spending on, as for me. Well I think you guessed I have to feed my addiction to my hobby ;D
-
Not if you buy a Korean X-Star or QNIX or similar, which are overclockable up to 144hz