


crocski
-
Posts
325 -
Joined
-
Last visited
Reputation Activity
-


-
 crocski got a reaction from Eyal in [Build Log] The Define Project (it's like the never ending story... c'mon inside!)
Awesome awesome log
-
crocski reacted to JordanMac in [Finished] Project: Cobalt (Chromed Copper Piping, Laser Etching, Cable Sleeving and More)
Update 4
Some fittings to make the drainage system.
Installing a backplate on my gtx 670 i already had the XSPC waterblock installed so i went for the XSPC one so i was guarenteed compatibility plus it looks really good aswell.
Removing the drive cage to make room for the front radiator and to give a cleaner look to the build
Using the line method for thermal paste as this is apperently best for ivy bridge as the silicon is in a line down the middle. fittings also installed.
Pump looks really messy but with the foam and plastic tubing it should stop all vibrations from transfering to the copper pipe and into the case. this will be hidden from view with some black acrylic.
All components and fittings in place just need to give the radiator a blow out and get the piping in.
as you can see it is now dark outside took around 4 hours to get everything sorted and i'm still not happy with it i think it could be cleaner but nether the less i shall be nickel plating on sunday.
Wont be able to do any work tomorrow as i'm at a barbecue all day.
-
crocski reacted to zip2k4 in My C70 Obot then - now, Lilith
I'll just dump all the pics here for those who want to check it out.
Any questions and suggestions are welcome :)
maybe later on I will update this with full water cooling - prolly when I felt the need to upgrade :P
These are all the stuff in the rig
1st time cabling
side panel window
Inside look
how it looks outside in my 'experiment room'
obligatory night shots
Updates:
the XPSC raystorm block
after attaching it
finished basic loop
then i got leaks! D:
figured out the problem was the fittings, had to replace the fittings and placed a bit more fittings to make it look purrty :3
finished one at the moment
Update:
Well, I finally moved from Australia to Indonesia where I'll reside for awhile
so of all the things was I can't carry my case with me, so bye bye C70 :<
but say hello to NZXT 820 which I picked up for a steal! xD
*PS: if you're wonderin, I packed every single parts that I have with bubble wraps and such and put it into my luggage
this includes all my spare screws, my 2 monitors, thermal compound cleaners and all my tools into 1 luggage lols
but here it is, revived back, my pc lilith :D
Hope you enjoyed the pics, as the travelling wasn't enjoyable at all :P
-
 crocski got a reaction from sme81 in Project Penny
oh man you did a really awesome job.. Looks beautiful
-
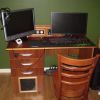 crocski got a reaction from Bupalooga in Desk Build: Monolith - Big Green Powerful Machine!
Coming together nicely
-
-
 crocski got a reaction from ProKoN in Antec 900 The Re-Birth of a Legend
Enjoyed this mod lots. Great job
-
crocski reacted to Bupalooga in Desk Build: Monolith - Big Green Powerful Machine!
OK! So i havnt updated this for like 2 months. Its been incredibly slow progress in my spare time but this will be a reasonably large update. Iv nearly finished the desk construction & painting. I hope to order hardware sometime soon.
So i found a slab of laminated pine for the top. Couldnt be bothered joining and finishing planks to make my own. I was at TAFE that day so I cut it to size while i was there. 2010x670
Was finally able to pick up my glass too.
Bought a Slotting router bit to make the rebate for my front glass to sit into. It was 4mm while the glass 6mm so i had to make 2 passes.
Very happy with front window
This is how i work once the sun goes down
Chamfered around the edges of the drawer faces with the router, used a dremel & sander to chamfer around the front glass because the slot interfered with using the router.
I did hand sand this smoother, just diddnt get a better pic
Made the work space that slides out on the left but gluing 2 pieces of MDF together to make the right thisckness, chamfered the edges as well.
Started working on the slide out workspace. Im finishing it the same as the top with the crackle finish & glass coat so this will work as a practice piece.
Primed it the taped off what i diddnt want green
Made it green
Under UV light! SWEET!
Taped off the chamfers & applied the crackle coat
Painted it black with the spray gun.
Imediately afer sprayed
10min later, finished reacting. Not the exact pattern i wanted, will have to spray it thicker. Will use the otherside as another practice & will hopefully turn out better.
Trying it again on the second side. Chamfered the edges, touched up primer, re-taped, greened & crackled the same as the first side. Will spray the black thicker this time.
Imediately after spraying
After 10min
After 20min, Finished! Need only remove tape & black the remaining edge
GLORY SHOTS!!!
I Now practiced using the Glass coat. Tried on the bad side first and experimented on how it would act on the chamfers by making it differently.
Once you begin mixing the 2 part glass coat you have around 20min to finish pouring & working it. It must be used on a level work space because it self levels and finished a few mm thick and as hard as glass! Touch dry in 12hours & fully cured in 7days.
The bad side Glasses Heaps shiney
Then the Good side Glassed. Turned out MAAAAAAAAAD!
So ill add another update soon. Most of the construction & painting is finished now, Will just make another post to fill up to where im up too because this one seems to be very long!
-
crocski reacted to d33g33 in Heavily modified Fractal Define R4 with dual 180mm and 360 radiators
Hi guys,
My first post! I've been following the Linus YouTube channel for a while and decided to make the investment into the forum as well.
I have been out of the PC game building for a long time so I had to do a lot of research to catch back up, also I wanted to do my first liquid cooled machine.
UPDATED PHOTO AFTER REBUILD
First Post -> Below
1st Update - Sleeving order and window concept
2nd Update - First attempt at sleeving
3rd Update - Custom Window cutout
4th Update - Fans!
5th Update - Radiator Shroud
6th Update - Radiator Updates
7th Update - Finishing Side Panel
8th Update - New front plate for 2x180mm rad
9th Update - False motherboard tray and goodies
10th Update - Front Panel Sleeving and starting to reassemble
11th Update - Modified Front door!
12th Update - Acrylic Tube Bending
13th Update - Complete Teaser Photo
14th Update - NOW COMPLETE
First things first here is my PC.
Intel 3770k
Asus z77 Sabertooth
2x 8gb 2400mhz Corsair Dominator Platinum
2x Samsung 840 120gb SSD's in RAID 0
EVGA Geforce GTX670 Superclocked 4gb
CoolerMaster Silent Hybrid Pro 850w PSU
Fractal Design R4 Case
Here's a quick peak at it assembled to test run to make sure no issues before I started to WaterCool.
Cable management is super dirty as I knew it was just going to get tore down once I was happy with it.
I noticed after building that CPU temps were a lot higher than I was happy with, one core getting to 100degrees while playing FarCry 3. I reseated a couple of times and tried some MX4 but temps never really seemed to come down much at all. I would fix all that with the liquid cooling.
After no ticks with the machine running dry and gathered everything for Watercooling, here's a list of what I got.
Koolance-380 CPU Waterblock
XSPC Razor GTX670 Waterblock
XSPC RX240mm Radiator
Black Ice GT 240mm Radiator
Switftech MCP655 Pump with BitsPower dressup kit
Frozen Q Liquid Fusion T-Virus 25ml Reservoir
All fittings are matt black Bitspower
Tubing is white PrimoChill 1/2 x 3/4
and I ordered in 6x 2150rpm 120mm Gentle Typhoons
Goodies!
I started to build a step by step, photo's of dissembling the fans and painting, also took apart the bracket for the video card and painted that white as well so everything was black and white, no grey. But... I got carried away with he build so photo's stopped.
Liquid cooling went in fairly straight forward apart from the top rad. Even though its a thing rad the high dominator platinums and the plastic 'thermal armor' on the mobo meant it just wouldn't fit, not even offset so... out came the drill. I also took this to the 5-1/4" bays so there are no drive bays at all now, just SSD's velcro'd to the back of the Motherboard tray.
I err... 'extended' the 'honeycomb' so I was able to mount the rad almost hard up against the side of the case, heaps of clearance!
I had my first go at sleeving! it was shambles. I don't know if the product I was using wasn't that great (modkobra kit) but I watched a heap of guides and it just seemed everything looked nice and tight but the heatshrink just wouldn't hold everything together and before long the sleeve would contract from it's stretched clean state and there would be a bunch of cables hanging out somewhere.
I did the best I could but maybe I need to practice some more or step it up to some MDPC sleeve.
Final step was to put a side panel on to show off all the liquid cooling, I got a very dark blank tinted plexiglass cut to size. I drilled in some nutserts the the chassis and then drilled holes in the plexiglass and used M6 allenkey headed bolts to fix it all together. I had some lamptron noise deadening foam so I stuck that around the edge for a great sound and vibration killer. When the PC is off its very hard to see inside and then when I turn it on with the 60cm of LED strip inside its lights right up. Super happy!
After a bit I was very disappointed with my temps, I had just spent about $1000 on watercooling equipment and temps still weren't great. I started doing some research into it expressing how disappointed I was and I stumbled across Delidding. I had never heard of it before! A lot of people say they cant afford the risk but when I was looking at my PC the CPU was about the cheapest unit in it so, out with the blade! Cutting was no problem, took me about 10mins to get it off using 2 different blades, a very thin and then thicker one. If I was to do it again I would go the vice and hammer approach.
After delidding and cleaning up I applied CooLaboratory Liquid Ultra between the die and IHS and MX4 between the IHS and CPU waterblock. The results? Fantastic!
Running at 4.4ghz @ 1.220 vcore (1.232 on CPUZ) my max average was 78.25degrees after delid running same clock and voltage temps were 61.20 degrees a great result! All this with undervolted fans @ 5v so the system is super quiet.
As this test was done right before and after the delid I actually believe that the temps have improved as the TIM has had time to cure. I'm now running @ 4.6ghz 24/7 @ 1.344vcore in CPUZ (manage to get to 4.8! but backed off http://valid.canardpc.com/show_oc.php?id=2767490) and I don't see temps over 54 normally. Yesterday I ran AIDA64 for an hour and max temp was 62 degrees.
Next I moved onto OCing the graphics card. It seems that the higher the videocard memory the worse the overclock, I managed to get a +36mhz to the core and +100mhz on the memory which isn't great but hey, its free performance right? I played around with some alternate hacked BIOS' and by just turned up the TDP managed to boost up to 1254mhz. I've been running like this amount a month stable so here it can stay.
Here's some glam shot's the last one is how it sits now unfortunately the colour is off due to the speaker lighting but it shows the side panel, the foam is obvious in the picture but not in real life. Also shows how I moved the res to mount directly on top of the pump. Enjoy!
Any that's about my build! thanks for checking it out. I think ill order sine sleeved extensions for the videocard, 24 and 8pin's to tidy it up just a tad more, apart from that wait for a cheap GTX670 to come up for sale and add that for SLI. That will do me until Ivy Bridge-E's release in Sept I think :D
Any feedback is always welcome!
Thanks All.
DeeG
btw wrote this from my new Intel NUC, what an awesome unit! driving 2x 24's at 1920x1200 :) and its 8gb RAM with a 256gb SSD! COmputers are awesome...
-
 crocski got a reaction from graw1187 in Prometheus: CAD/workstation/gaming
I don't get why everyone gets so butt-hurt over a titan and x79.. What the differences? jeez its his money, his decision.
Great build !
-
crocski reacted to Makaseo in Define R4, Haswell, & 760 Build
Update with CPU cooler and ACX graphics card!
Obligatory box shot:
Graphics card replacement:
The reference-style blower cooler of the other EVGA card had that faint grinding noise that both Linus and Anandtech mentioned (and that I ignored) and it eventually drove me nuts. Returned it for a refund and got myself the stock clock 760 with the ACX cooler instead. Much quieter. A bit of coil whine during high-load, high-fps stress like DJMax Trilogy or the Windows Experience evaluation, but with proper 3D games it's completely fine and very quiet. I miss the white of the old card, but the ACX card doesn't look as bad as I thought it would. Goes very well with the mobo and the RAM.
The Xigmatekdarkknighttwonighthawkedition:
Not a huge fan of the backplate. Pro: it's sturdy plastic. Con: it's sturdy plastic.
Fitted with two SP120 quiet editions. I still can't hear any of my components above the sound of my Caviar Blue drive. Just to put this rant out there--the mounting system works brilliantly once installed, but getting the rubber hooks through the rubber grommets of the fans was a royal pain. I got told off by a few people who said I could have just taken off the grommets, but then it wouldn't have looked as bloody nice, now would it? I hope I never have to replace the fans on this thing.
Was worried about the RAM clearance, but there's plenty of room even for slots 2 and 4 if I wanted to add more DIMMs. Completely a non-issue, at least with this motherboard.
Finished (blurry) picture. I know I sacrificed a bit of my initial black-and-white zeal, but overall I'm actually extremely happy with how it turned out. I took a lot of the advice you guys gave and removed the HDD tray once I got the CPU cooler on with white fans. Not as much white as before, but I'd say there's just enough now with a lot more of that nice gray/silver as well. Much stealthier. Much sexier.
I think the only thing I'd ever realistically spend more money on would be sleeved extension cables for CPU, GPU, and 24pin, and an SSD to replace my boot drive. MAYBE a better PSU, but I've had absolutely no trouble with this one so far. It's fairly silent when my Caviar Blue drive turns off after idling, but that drive makes a proper racket when it's on.
Update: I just discovered the 760 ACX backplate from EVGA. Just take all my moneydollars...
-
crocski reacted to Nicktrance in Define R4, Haswell, & 760 Build
Looks really nice and clean, you can get a Xigmatek Night Hawk for about 50$, it performs very well for its price and it's matte black so it will look pretty epic in your PC :).
-
crocski reacted to jscho in Fractal Design Arc Midi R2 Build
Hey guys, I'm posting some pictures of my [Now Completed] build. I'm really excited as it's my first ever PC build :D I've decided to get some parts now and some later when I have the money, (I'm 16 working on minimum wage), and I was quite disappointed to discover the day I got my 680, the 780 was released. Oh well, whatcha gonna do. The 680 is still beast and I got a SWEET deal on it :D
Here are the specs.
---Specifications---
Fractal Design Arc Midi R2
Intel Core i5 3570k @ 4.2Ghz
Asus Sabertooth Z77
Corsair Dominator Platinum 2x4GB 1866MHz
Asus GeForce GTX 680 OC
Samsung 840 Series 120GB
Corsair H60 2013
Seasonic Platinum 1000W
WD 1GB Green HDD
Some ghetto 80GB hard drive I scavenged from school, dedicated music drive.
---Future Changes---
MAJOR:
1. NAMING THE BUILD ;)
2. Delidding of CPU and OC to at least 4.4Ghz+ (with the current cooler) - Coming very soon. Hopefully October-ish.
3. Custom sleeved cables - Designing soon
4. Custom watercooling loop - CPU only for the moment - Top 360mm rad mod and OC further to hopefully at least 4.7Ghz+
5. I'm sticking with the single 680 for a while. When 800 series is released, I'll grab two 880s and full watercool them and add another 240mm front rad.
MINOR:
Upgrading peripherals. Mechanical keyboard, heaphones etc.
2 More Corsair AF140s
Dedicated sound card - Asus Xonar D2X most likely
Another kit of RAM or even upgrade to a 2x8 kit, move the current 2x4 to another build. We'll see ;)
AverMedia Live Gamer HD PCIe Capture Card
A 2TB WD Green drive for backups and more storage.
I might start a new thread once the major upgrades begin. This one is a bit too messy for my liking :(
---Table of Contents---
First Photos - Below this table :)
Build Complete
Updated Parts Photo
Latest Setup Photo
New Keyboard
New Fans and LEDs
FIRST PHOTOS
No PSU just yet!
Love this memory SOOOO much!
Thanks guys, I'll keep this thread up to date as I go!
-
crocski reacted to ProKoN in Antec 900 The Re-Birth of a Legend
Things are beginning to move along.
close to being finished.
-
crocski reacted to bchampion96 in I Can't Think of a Name for My Computer
I just called mine Larry. Larry the Leviathan :P
-
crocski reacted to AndyCapets in AC's Max Power PC Build Log
Hello everybody!
So, as you can tell, my build is already finished, well almost, let me explain.
I plan a couple of things to make this rig unique and to make it in a yellow and black theme.
Here a the things I plan on doing:
-Sleeving the PSU
-Buying a custom loop for the system
-Buying a non-reference R9-290 DONE
-Putting a window in the door
-Buying the Asus PB248Q monitor
These are just a couple of things I plan and will do for this rig, that Is why I invite you to subscribe to this thread to see more!
Updates:
07/24/2013: New CPU Cooler Fans
08/01/2013: New Intake Fans
09/10/2013: Motherboard and RAM going for RMA
10/16/2013: MB and RAM back from RMA
10/24/2013: Cutting Case for front I/O Cable Routing
12/31/2013: Bought a new SSD
01/11/2014: New GPU
Let's start shall we. Here is the finished look of what I already have:
Current State:
The components:
Case: Corsair Carbide 500R in Arctic White
Motherboard: MSI Z87 MPower Max
Processor: Intel i5-4670K @ Stock
Cooler: Cooler Master Hyper 212 EVO
Graphics Card: Sapphire R9 290 Tri-X OC 4GB
Ram: Kingston HyperX Beast 2x4GB 1866MHz CAS9
HDD: Seagate Barracuda 1TB 7200RPM
SSD: SanDisk Extreme II 120GB
PSU: Lepa G 750W 80+ Gold Semi-modular
-
crocski reacted to Sam_Mayer in Project ObsidianRed [Corsair Obsidian 800D] [Work in Progress]
this is just i pic i took for the corsair kink software main screen, during this week i'll start to drill some holes in the midplate for routing watercooling tubing and gpu cables i'll post more photos later on.
-
crocski reacted to Karikiro in Quiet Fractal Design Define R4
This is a build log of a value and silence oriented computer with efficiency in mind, followed up by some basic overclocking of someone inexperienced.
If you have any questions feel free to ask.
Also: Feel free to correct my grammar. English is not my first language and I do not consider myself being particularly good at it.
Edit: This article has grown quite significantly in size, since it has been first uploaded. I will continue to update this post as well as the thread with information, tips and thoughts about the products I use.
Tl;dr
Contents
Introduction Why did I upgrade?
Previous Situation My previous computer
New System Specifications Computer-components and peripherals
The Build Build log with commented pictures and personal thoughts
Set-Up Basic computer settings and hardware configuration
Power Consumption Synthetical, approximate numbers
Benchmark Results Synthetical numbers with Windows Performance Index, ALLBenchmark Catzilla, Unigine Heaven and Valley
Overclocking and Undervolting Settings and temperatures
November 2013 Update Small report of the situation and what has changed in the four months of operation
January 2014 Update Airflow personalisation, different RAM and minor modding including advanced noise dampening
April 2015 Update Removed soundcard, new SSD, frontpanel mods, broken old and sketchy new GPU
Introduction
Why did I upgrade my PC?
The performance, my previous system offered, covered most of the used applications sufficiently. However, recent purchases were giving it a hard time, so I needed to upgrade.
The new system is supposed to last for some years and to be vastly quieter. I hope to get increased performance without too much of an increase in power-consumption, too.
Edit (07.11.2013): Never mind. I now got a GTX 770, because I need to heat my room.
Previous Situation
This is an Acer Aspire X3900 (Q1 2010), my first and current PC:
CPU : intel Core i3-530 (4/2 cores, 2.93GHz) GPU : Sapphire GT 320 1GB RAM : 4 GB RAM DDR3-1333MHz CL9 HDD : Western Digital Green 1TB (WD19EADS <90MB/s) PSU : 220W PSU Flex ATX ODD : noctua DVD-R/W ... wait As you may have noticed there is something off here.
You need to know that I am quite picky about noise. Therefore, I prefer quiet solutions.
Yet, what you are seeing on the two previous pictures is not quite quiet. In fact it turns into a vacuum-cleaner once one utilizes it.
In an attempt to lower its noise-output, I did the following:
placed cloth-tape on every metal surface that is touching another and is not bolted to which to reduce rattle replaced CPU-fan replaced the defected (friction bearing) PSU-fan by a temperature-regulated ball-bearing-fan (only to short the sensor with a paper-clip after finding out that the PSU is already regulating the fan) and wrapping cloth-tape around it to lower transmission of vibration placed shroud on GPU-fan to force it to pull its air from outside of the case "ghetto-mounted" a noctua NF-P12 in the ODD-bay with two packets of tissues to internally move the air and cool the chipset and ODD / case sandwiched HDD (<52°C)
Since nothing really helped I got myself a Fractral Design Define R4 (very nice case), a Seasonic X-560, a Noctua NH-U12P SE2 and an Asus GTX650-DC-1GD5 (130€ launch, oh gosh). That pretty much solved my worries.
Now you may ask yourself why I do use the Acer case again. Well, after 9 month of usage the PSU decided to make electrical noises. Nothing obnoxious, yet audible, probably caused by the primary ripple smoothing.
Since I planned on upgrading my machine anyway and putting it into the R4, I returned the faulty PSU and rebuild my current PC to its 'personalised' default.
New System Specifications
CPU : Intel Core i5-4670k CPU-Cooler : Noctua NH-U12P SE2 GPU : Asus GTX 650 >> replaced with >> Palit GTX 770 >> replaced with >> Asus GTX 560 SC : Asus Xonar DX 7.1 >> removed MB : Gigabyte GA-Z87MX-D3H RAM : Samsung Green Series 2x4GB DDR3-1600 CL11 1,35V >> replaced with >> Corsair Vengeance 2x4GB DDR3-1600 CL9 1,5V SSD : Samsung 840 Basic 250GB >> replaced with >> SanDisk Extreme II 480GB ODD : DVD-R DL R/W PSU : Seasonic X-650 Case : Fractal Design Define R4 OS: Windows 7 Professional 64bit
Here is a preview of the build in progress since I am waiting for the PSU to return to me.
Why would they package 90€ RAM like toothbrushes?
The Build
The PSU has arrived and the build can go on.
It is a Seasonic X-650 that the vendor send back to me. Compared to the X-560, the X-650 has got black flat cables, which to me look better than the colour-coded, sleeved ones included with the X-560. Even the 24-pin mainboard-cable has got all black wires bundled in a fairly good sleeving.
The angled SATA-power-connector could not be fitted onto the surface-mounted SSD though as it would have been the case with the X-560. Therefore I had to think of another location, which I found on the ODD.
Mounted like that the connectors of both of the drives line up to allow straight cable-routing.
Salad.
Cable-management is mostly done. I did not do an outstanding job I have to admit, but it is out of sight and not too tight of a fit.
Not using any zip-ties also gives me a great amount of flexability, since i do not need to replace any of the mounting-strips if I am changing something.
Soundcard and graphicscard are mounted. (I forgot to take a photo of it, but it is straight forward anyway.) Time to install the CPU-heatsink.
For thermal conductivity I used PROLIMA TECH PK-3.
If you are unsure as to how to apply thermal paste it can be worth to take a look at this video:
http://www.youtube.com/watch?v=-hNgFNH7zhQ
The build is done.
No Pictures of the outside; there is nothing spectacular going on there. Also I forgot to take photos again.
My desk.
The keyboard that you are seeing on the picture above was not intended to be a replacement for the Acer one. I just found it and used it on my old Acer PC for the software set-up of my new PC. After some use I found that for me this keyboard is vastly superior to my previous, when it comes to the typing experience.
I do not know, what type of switches Fujitsu has used on this particular keyboard, but from what I have heard of the Cherry key switches, they seem to be quite similar to the Cherry MX Browns.
That I found it is very convenient, too, since I where looking for a new keyboard and where considering to buy the Corsair K70, despite it having MX Red switches and only red lighting with the black base.
I where struggling, because if I am going to spend that much money on a keyboard, I want it to fit all my preferences, which it did not at all points. I am eager to see what versions of the K70 Corsair will release in the future, but might stay with the Fujitsu to save money.
Set-Up
Mainboard
Stock: All relevant settings set to 'auto' / 'default'
Overclock: fBus=100MHz; nc=43-43-42-42; Uc=1,2V; nm=16
Graphicscard (GTX 650)
Stock: All relevant settings set to 'auto' / 'default'
Overclock: fc=1215MHz; Uc=1,125V; fm=2550MHz (5100MHz)
Graphicscard (GTX 770)
Stock: All relevant settings set to 'auto' / 'default'
Overclock: fc=1293MHz; Uc=1,2V; fm=3804MHz (7408MHz)
Ventilation
2x Front (Fractal Design Silent Series R2 140 at 5V)
1x Rear (Fractal Design Silent Series R2 140 at 5V)
1x CPU (Noctua NF-P12 at 5V)
2x GPU (NZXT FN 12RB at 5V)
1x PSU (semi-passive)
Power Consumption
Power Consumption at power outlet (stock system / overclocked system; GTX 650 / GTX 770)
Idle: 41 - 45W / 51 - 55W
Maximum with OCCT: 139 - 149W / 159 - 169W / 294 - 304W / 333 - 353W
Benchmark Results How to read: Test: stock + 650 / overclocked + 650 (oc) / stock + 770 / stock + 770 (oc) (previous PC)
Windows Performance Index
Processor : 7,6 / 7,7 / 7,7 / 7,7 (6,9) / 7,6
Memory (RAM) : 7,8 / 7,8 / 7,8 / 7,8 (5,9) / 7,7
Graphics : 7,3 / 7,5 / 7,9 / 7,9 (6,6) / 7,9
Gaming graphics : 7,3 / 7,5 / 7,9 / 7,9 (6,6) / 7,9
Primary hard disk : 7,9 / 7,9 / 7,9 / 7,9 (5,9) / 7,9
AllBenchmark Catzilla (RC5 / RC5 / RC6 / RC6 / RC6 / 1.4)
(576p: 4670k + 650, 4670k (oc) + 650 (oc), 4670k + 770, 4670k + 770 (oc), (previous system) and 4670k + 780Ti)
Score : 6319 / 7233 / 19411 / 20339 (1813) / 31957
Hardware (GPU+CPU) : 6185 / 7035 / 19189 / 20096 (1891) / 31798
Physics Test (CPU) : 537 / 646 / 586 / 551 (120) / 644
Fur Test (GPU) : 485 / 533 / 1427 / 1567 (163) / 2870
Fluid Test (GPU) : 348 / 401 / 1387 / 1520 (95) / 2095
Raymarch Test (GPU) : 216 / 250 / 785 / 893 (73) / 1197
Loading Time (ms) : 10817 / 9144 / 11132 / 10855 (31786) / 10594
Unigine Heaven 4.0
(basic)
FPS : 46,2 / 51,7 / 142,6 / 153,8 (16,3)
Score : 1163 / 1302 / 3591 / 3873 (410)
Min FPS : 25,6 / 27,3 / 28,2 / 29,9 (10,0)
Max FPS : 81,5 / 92,7 / 241,9 / 296,1 (26,6)
(extreme)
FPS : 14,8 / 16,7 / 49,1 / 54,4 (6,0)
Score : 374 / 420 / 1236 / 1371 (152)
Min FPS : 5,4 / 9,8 / 19,9 / 22,0 (3,9)
Max FPS : 34,7 / 38,1 / 115,6 / 135,0 (10,5)
Unigine Valley 1.0
(basic)
FPS : 38,7 / 43,8 / 107,3 / 106,8 (13,6) / 110,8
Score : 1620 / 1833 / 4489 / 4469 (568) / 4635
Min FPS : 20,2 / 24,7 / 24,4 / 28,0 (8,6) / 32,7
Max FPS : 76,0 / 82,1 / 170,2 / 161,7 (23,7) / 165,3
(extreme)
FPS : 18,7 / 21,1 / 60,0 / 66,4 (5,2) / 90,2
Score : 784 / 882 / 2511 / 2778 (219) / 3772
Min FPS : 9,0 / 12,5 / 27,7 / 29,2 (3,1) / 36,0
Max FPS : 33,5 / 39,0 / 118,7 / 123,7 (9,3) / 157,5
(extreme hd = 1920 x 1080 p)
FPS : 14,3 / 16,0 / 45,7 / 48,9 (-) / 72,9
Score : 600 / 671 / 1910 / 2048 (-) / 3050
Min FPS : 7,4 / 9,6 / 24,5 / 24,8 (-) / 34,8
Max FPS : 26,0 / 29,1 / 84,1 / 68,8 (-) / 139,9
Overclocking and Undervolting
This Gigabyte Z87 / Haswell Overclocking Guide helped me out a lot.
For the following results I would like to repeat that all fans are running at approximately 5V and the computer is operating at about 24°C room temperature.
Result GPU (GTX 650 / GTX 770)
GPU Clock: 1215MHz
GPU Voltage: 1,125V
Memory Clock: 2700MHz (5400MHz)
Temperature: <76°C
Fan (AUTO): <35% (<30°C ambient)
Result CPU
Multiplier: stock
Vcore: 1,025V (undervolted)
Multiplier: 42 (overclocked)
Vcore: 1,150V
Notes:
AIDA64
38/38/37/36x (stock) at 1,010V after 2 hours
LTT Forums CPU Overclocking Database
November 2013 Update
An update.
While my old computer is suffering from random experiments, such as cooling the Sapphire GT 320 passively and overheating it in the process, remounting the HDD to several random places in the case to lower noise and temperatures, and peltiering the spirits out of the poor i3, there isn't much that changed during the four month period, the new computer has been running by now.
Basically there are three things that changed: SSD, rear case fan and the GPU.
The SSD, that I mounted on top of the ODD, had to move at some point and I didn't bother to stick it back, so it is almost carelessly chucked behind the mainboard tray.
Don't worry the temperature is fine, it is an SSD after all.
There is also a new fractal design Silent Series R2 140mm now mounted in the back, while the noctua moved back to its prior position.
I mainly bought the additional fan, because it annoyed me to turn the fan control up to '7V' to start the noctua fan up on system start. It now sits on the CPU cooler, just because I have it. It isn't necessary at all.
The major reason I even update this post is the new Palit GTX 770 (vanilla), that I got for about 260 Euro. If it hadn't been for the low price, I probably hadn't bought it.
It is reasonably silent at idle, but can be heard under load. Please be aware, that I am picky about noise, so this might be a fairly silent card to you. For a more detailed subjective description go here.
Thanks for reading this far. I am not sure, if anyone cares about this project, but if there is anyone I can help with this post, I am glad, I could.
January 2014 Update
I have re-uploaded all pictures of all my topics in high quality. (<=2MB 1600x1200p; offline compressed)
It took me some time to figure out what was wrong with the picture quality I achieved, but now I know that the images where compressed online by wiping a sandy sponge over them several times and then crumbling them to the desired size.
Noise
I took off the fan-bracket of the graphicscard to replace the original fans due to their excessive noise-production under heavy load.
After two hours of trying different ways of mounting 120mm fans onto the card itself, I gave up and thought about other ways.
I came up with a mounting arm that screwed onto the PCI-covers, but it didn't fit with the materials I had and wasn't strong enough. So I decided to buy Alpenföhn's mounting system that is included with their "Peter" GPU-cooler.
Currently, there are two NZXT 120mm fans mounted onto the bracket. They are connected to a 1-to-4 PWM splitter, which is connected to the case's fan controller. It also provides power to the rear and CPU fan (the second CPU fan doesn't offer a significant temperature decrease and adds noise, so I removed it), so now all fans are controlled by one voltage.
With all fans at 5V and ambient temperatures around 23°C the GPU runs without throttling in BF3 (max, no AA @ 1080p) and any older games at 60 fps. Only in AC4:BF (max, no AA, no Physx @ 1080p) it starts to sweat, but still offers about 34-60 fps (avsync; 42 fps average), as it downclocks the core to 1045 MHz at <85°C.
Since the fans I use aren't as quiet as I wished them to be and I assume that this issue wouldn't be solved by any other fan, I figured that further noise dampening was appropriate. For that purpose I ordered some sheets of studio noise dampening material that is usually used to cancel out echo when voice or music is being recorded.
For testing I first installed the foam onto the mainboard facing panel. I didn't expect it to be very effective, but surprisingly the result was very good.
To decrease the noise more effectively I scattered the off-cut of the original piece within the case.
Furthermore, my brother noticed, that the front fan cover, which I assume is there to give the case a cleaner look, when the door is opened, theoretically reflects some of the noise, the front fans emit, and removing it, allowed the noise to run directly into the foam of the front door, achieving a greater noise cancellation than the stock configuration. So I removed it and experienced this assumption to be true.
Side effects are easier cleaning of the filter and the now larger chamber the fans can pull their air from.
The result: Sitting in front of it in a silent room the only noise I hear is the whisper quiet airflow of the six fans inside. No amount of money spend on better fans could have given me a better result and considering the price of six new fans, a tenth of it for the foam instead seems fairly appealing to me.
If you feel bothered by your computer's noise, you already own reasonably quiet fans and your case supports it, I definitely recommend this method before anything else.
Hardware
I am now using Corsair Vengance RAM (2x4GB DDR3-1600MHz CL9-9-9-24 at 1,5V). That is, because it is faulty and my brothers machine couldn't deal with it as well as mine can. *should probably return it*
Due to the new GPU cooling, the soundcard had to move down two slots.
To connect it to the m-ATX board I got a PCIe x1 extention cable. It isn't particularly beautiful but serves its purpose just fine.
I finally personalised the frontpanel to my preferences. The mods include matting the power LED socket, for which I have written tutorial here, and the USB ports, which I lowered into the case to fit the bevel as the audio connectors are as it has been probably intended by fractal design in the first place. There are some problems with that, however. The USB 3.0 cables make contact with the duct, if the connector socket is pushed down too far. For that reason the USB ports can be at a slight angle. None the less, I am satisfied with the result.
April 2015 Update
Typical April weather.
It's been a while since the last update - fifteen month to be exact.
In chronologic order: the changes.
Since the beginning I had trouble with the Asus soundcard as it decided to occasionally turn the volume up to max on start-up, distorting all sounds until restart and therefore causing a very loud and terrifying screeching sound that was supposed to be the Windows 7 start-up-jingle.
Since it was only necessary on the old board to not have to listen to obnoxious background-noises, I removed it.
--------------------------------
Mid 2014 the Palit GTX 770 quit on me but that wasn't the only bad thing to happen: shortly after, the Samsung 840 Basic 250GB SSD died, too. The sudden end was probably provoked by continuously having only 0,3GB of available space left to compensate for dead sectors.
"No big deal", I thought to myself "I will just return it and use an HDD in the meantime". ... But no. Apparently, if you choose \C as the data to backup in Windows, but not separately "User", it will save \C but not all of it. In my case not the userdata. Oh well.
The SSD was repleaced by a SanDisk Extreme II 480GB, whilst the 850 evo I got back from Samsung went into a Lenovo ThinkPad L540.
Since the GTX 770 still hadn't arrived I looked for alternatives.
While asking in different computer-stores for some scrap GPUs/-coolers for a GT 320 I intended to use, I was surprised they offered me a seemingly broken Asus GTX 560 that one of the employees pulled out of his personal system. They said I could have it for a small tip and that by chance it may be still operational.
A quick test at home after carefully cleaning it revealed that it was indeed still operational.
The only parts broken were the fans, which I replaced a few days later with bequiet Silent Wings PWM 92mm fans.
After another week a new 770 arrived at my house, but since the 560 is powerful enough for my needs and I currently need to save money I sold it.
--------------------------------
Next up: frontpanel. I widened the cable-hole to allow the USB3-cables to pass through while having the ports fully seated back into the frontpanel and glued the PCB in place.
I also added a few LEDs with custom acrylic glass socket around the USB and audio ports and immediately removed it again, because it looked horrible. So horrible in fact, that I didn't even take a photo.
It was made from four separate layers glued together and slotted in between the ports. The LEDs were connected to 12V.
Also this.
I installed and removed that, too.
--------------------------------
The GPU has been running fine the last two month but I still wanted to check, whether everything was alright.
That is what greeted me, as I opened the case:
Rubber bands don't cope well with warmth, but I didn't expect them to wear out that quickly.
Since rubber bands were out of the question and I still had the custom mounting arm that I didn't use, I modified that one to carry the GPU fans.
It screws onto the Alpenföhn mount.
--------------------------------
I finally got around to make a proper stand for my desk, too.
-
crocski reacted to Robi Dawn in My In progress build ^^)
check this turn out lol...
rather proud of this i usually stuff things up badly when i try this stuff..
-
crocski reacted to MWildd in Project Desire - Inverted ATX - Front Panel Teaser - 19th Sept
Thanks man, hope it turns out like them tbh.
Haha keep an eye here then! :D
Thats sorta what i was going for, aswell as stealthy, not alot of colours other than black
Thanks man :D
UPDATE
So ive made some progress with the front panel mod.
First i went and bought some sheet aluminium. I bought 2 because i thought id mess up, but alas i havent!
So here comes some pictures!
so this is my build that started in the 300R but unfortunately got put off due to college work and stuffs. Pretty disgusting i know.
So before i started i needed to add to my tool collection. Going to be doing a fair bit of metal work so needed a range of files and the case will be coming apart so need some way to assemble it again.
Unfortunately i didnt get a before picture of the panel, but i think you can imagine what a flat panel of aluminum looks like!
So i first bent the sheet into the shape of the front of the 300R fascia. Trust me. Without an angle bender, this is a nightmare! Took a while to figure out how to bend it and what to do it with! But i got there.
Heres the panel sat ontop of the original front panel. Bend looks pretty on point to me.
So i go to use my drill to make the mounting holes, and it doesnt charge. So heres what i replaced it with! Getting pretty expensive already.
So heres the first bolt mounted. Im using the same mounting holes that are already on the 300r front panel, just for convenience more than anything.
Bolt front a different angle
Got the second bolt drilled and screwed in.
Had to take the front panel power button assembly out to find where i had to drill my hole. Pretty simple mechanism when you look at it in action.
Drilled an initial hole, just need to use a round file to get it to the right size and shape.
Quick bit of filing. Looks kinda sketchy, but trust me it got better a little bit later.
Started to do some initial measurements and sketches. Remember, measure twice, cut once.
Had to use a compass in order to get the same curves in each corner.
Cutting templates drawn. You can see the slight dent, accidentally stepped on it. But not to worry, it gets cut out later!
Time for cutting. Bring on the dremel.
Heres the sheet after being cut. The bottom triangle has already been filed and sanded so looks sharper. But after ive done the top theyll look the same! Everything seems to be lining up at the moment.
I didnt get as many before and after shots as id like but i suppose these will do.
Heres the panel stood infront of the front panel. This isnt bolted on, hence the difference in lining up.
I didnt actually get a shot of it bolted on so stay tuned for that!!
I also got the black acrylic for the front panel!!
So thats all i documented so far. I have done some more, ie installing the acrylic etc, but havent yet got pictures.
Stay tuned as i should have all but the painting done hopefully by tomorrow!!
Thanks for checking this out guys. :D
-
crocski reacted to W0lfxRage in Nes Gaming PC
I was trying to make and affordable Nes gaming pc and it turned out fairly close to what i wanted. The power supply is on the outside, but i just hide it under the table :D When idling i cant even hear it running!
Specs:
Gigabyte Z77N WIFI
i5 3570k
ADATA 128gb SSD
4gb Corsair Ram
Corsair CX500 power supply
XFX Radeon 7850 1gb
-
crocski reacted to RaXzeD in Zoe - mATX Haswell & 780 build!
So, I finally got enough money to build my first computer, and yeah, this is what happened. I decided to go with mATX because, well, I just love Corsair's cases, and I fell in love with the 350D as soon as I saw Linus unbox it. I knew I wanted to go with a green color scheme, because, that's simply my color.
Aaaaand, just a quick note about the name.. Zoe has been a name that has always stuck with me. From the days of SSX on the old Xbox. Yeah, the perfect name for my little baby Cx
*I just noticed that there was another build called ZOE. I did not know that when I came up with the name, I just randomly went through topics on the forum, and it had been on Build logs of the week*
Case - Corsair Obsidian 350D
CPU - Intel Core I7 4770K (not overclocked yet)
Cooler - Corsair H100i (Stock fans at the moment)
MOBO - Gigabyte G1 Sniper M5
RAM - Corsair Dominator Platinum 16 Gigs
PSU - Corsair AX 760i (Individually sleeved cables too)
GPU - Gainward Geforce GTX 780
SSD - Samsung 840 PRO
HDD - WD Green 3 TB
Lighting - NZXT Sleeved LED Kit
2 Things I'm going to point out about this picture. Firstly, I decided to mount the radiator to the right because I just love the look, but the 5.25" bays are kind of in the way, which makes it look a little bit dodgy. Also, I've tried to remove the Corsair logo on the PSU, but there's still adhesive on it. The red logo just wouldn't fit with the build.
Picture of that 780. I'm pretty happy with how the cables look in the front (not in the back though, haha) The LED strip doesn't look too great as it is right now though.
The system powered on. The thing I dislike about the motherboard is the diagnostics LED. The red light doesn't fit in, and it annoys me... Haha, I haven't checked in the bios if you're able to turn it off, but yeah.
Also, I'm not a great photographer, therefore the mediocre image quality.
Closeup on the system powered on. Here you can really see that LED I was talking about..
Aaaand the last one, with the side panel on. One thing to note, the 8-pin is a bit more messy because the picture was taken before I tidied it up :P
She's going to be tidied up even more. Better cable management and new fans are on the list. Not really important at the moment though.
-
crocski reacted to IPCharger in [Build Log] Caselabs S3 (Watercooled/ GTX 780)
DAYUM THAT MEMORY LOOKS SEXY! But i really want some 4k pictures of that intel heat sink. I bet you could reach 5Ghz with that beast :D
-
crocski reacted to MetallicAcid in MetallicAcid's ROG V Gene TJ08-E
Hey everyone!
I am starting a thread here on LTT for my upcoming water cooled upgrade for the ROG Gene V TJ08-E. I was wanting to have a watercooled build that did not look like all the others... It is especially hard with a small case such as the Silverstone TJ08-E as there is only a handful of WC products that work in my case... So I decided to use hard acrylic tubing with the help of B Negative's tube bending guide. I must just warn everybody that this thread is photo heavy, so there is a 56k modem warning here for those of you using dial-up internet, or with a limited mobile surf packet!
First I would like to explain where this build has come from, and what I plan to do with it in the future. Best to explain with pictures! Here is how my PC looked in January this year:
At this point, I had gained enough courage to try my hand at some modding. I was wanting to have something more unique, something with my stamp on it. So I started out with a couple of projects on making my computer stand out from the rest. What I had in mind at that point was just to sleeve the PSU, and try to make a floor which lit up white to show off the components in my case... The sleeving took a long time, and the light panel failed and looked like poo.
So I had to come up with something not just OK, but PERFECT! I wanted to do a mod that had not been done before, and have this mod cover the many bare spaces within the case. Suddenly, I found inspiration from the SupremeFX III sound chip design which can be found on my Asus Z77 Maximus V Gene motherboard. This is what the design looks like on the board:
So, here is my journey to replicating my design on my own PC with the help of a few hand tools, elbow grease, and time. Enjoy these pics:
Let’s just say that the kitchen wasn’t looking so happy after all this work… Neither was the wife!
After a doing the light panels, I had the inspiration and motivation to do something special about the back of the PC. Something special with the cabling, SSD placement, and maybe use some aluminium to "spruse" it up a bit. It was nothing advanced, but in my opinion, it tied in with the general feeling that I washoping to acheive with the upgrade! This is what I had come up with:
So, 5 months had gone by since I had started this rebuild. I had bought some more hardware, sold some hardware, filed and sanded like a "mofo", and in the end, I ended up with a computer that I was 100% happy with!!! This is what it looked like:
Once completed, in May 2013, fans who had followed the build nominated me for overclock.net's "Mod Of The Month", of which I was 1 of 4 contestants gunning for glory. After 8 days of voting, I had won the competition with 58% of a total of 310 votes.
But the story doesn't end there... Sadly, after having the computer up and running for a week, I noticed that the SLI setup ran too hot because of the aluminium mid-plate sitting directly above the top GPU, and my Corsair H80 CPU AIO (All In One) solution's pump died. This forced me to send it back as RMA to where I had bought it from. After 3 weeks of having a dead computer, I was told that the H80 would not be replaced, but that I would get a refund. More stress! BUT, After some thinking, and planning, and determination, I decided to take it to the NEXT LEVEL (again?) and WATER COOL!!! So, after some more hard work, I would like to present the final pictures for this watecooling upgrade:
Thank you Aquatuning for your sponsorship!
MetallicAcid
Awards and commendations: OCN's "Mod Of The Month" May 2013 Linus Tech Tips WAN show "Build Of The Week" Featured on Rog Nordic Facebook page Featured on Sweclockers Facebook page Featured on Perfect PCs Tumblr page


