Jump to content

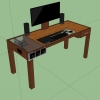
CUSTOM GAMING PC DESK!

Go to solution Solved by blu4,

Looks awesome man, I'd go with the motherboard IO sticking at the back though, since you'll be able to hide all the cables. With the new design, they will show from the left and you'll put strain on the connectors IMO.

UPDATE:1

Thank You Guys For CHECKING THIS Forum! This is a gaming pc desk/case I am planning to invest in! I am serious about this desk, so I want to make it as affordable and reasonable , so that I can actually build it! I am planning to take my pc out of its current ATX Case and put it in this desk. I made two different variations of the desk's top. It will either be the lighter colored wood, or same wood through out the desk/case. Led's will also be installed in the PC compartment . 


MY PC SPECS ARE:

GIGABYTE GA-Z97X-Gaming 5 Motherboard

Intel Core i5 4690k (STOCK COOLER)

PNY GTX 970 XLR8

12GB RAM HYPERX FURY

2 Corsair AF120MM Fans

2 Sentey 120MM Fans


1.5 TB HDDs


Thank you guys!

I want all the possible feed back so that i can accomplish this desk build. If you use the following renders, please give me credit......

Quote me for replies! 

I will keep future updates! 


RENDERS:

post-242243-0-37732800-1436247804_thumb.

post-242243-0-72463300-1436247805_thumb.

post-242243-0-05506800-1436247807_thumb.

post-242243-0-17147000-1436247808_thumb.

post-242243-0-14528100-1436247809_thumb.

post-242243-0-59818300-1436247810_thumb.


RENDERS CREATED IN GOOGLE SKETCHUP!


MEASUREMENTS ARE UPCOMING


UPDATE:2


These are the new renders I've came up with your feedback in the comments!!!!!!!!


WHAT'S DIFFERENT????!
 

More legs/support

Custom Fan Exterior Wood DESIGN

Separate partition for PSU

HDD's Mounted Sideways


RENDERS 2.0:

post-242243-0-73476800-1436254882_thumb.post-242243-0-88917800-1436254883_thumb.post-242243-0-96417200-1436254884_thumb.post-242243-0-93495700-1436254885_thumb.


UPDATE:3


Deciding on what materials to go with! 


For the table top im thinking of getting some plywood and layer it?? If you have any feed back on the top help me out!!!!!


PC UPDATE:

NOW IN A H440 - white


Liquid cooled.... h60 Corsair

post-242243-0-85915600-1436254886_thumb.

Link to comment
Share on other sites

Link to post
Share on other sites

Damn those are some good models I would put some sort of back my the GPU, perhaps an intake fan, I would also add some more legs where the PC is just incase the desk collapses for some reason that part will still stay supported but what do I know, I've never built a desk xD

Link to comment
Share on other sites

Link to post
Share on other sites

Id figure out a way to enclose the psu underneath at the back then run the wires through holes from underneath. Itd just be much cleaner then where it currently is.

Link to comment
Share on other sites

Link to post
Share on other sites

Id figure out a way to enclose the psu underneath at the back then run the wires through holes from underneath. Itd just be much cleaner then where it currently is.

agreed, you should maybe look at some ventilation on the top as well since hot air rises, or at least have fan on the rear pulling air out.

Case - Fractal Design Arc Mini R2 : Mobo - Asus Maximus VI Gene : PSU - Corsair AX760 : CPU - Intel i7 4790k w/ EK-Supremacy EVO Copper/Acetal Water Block  : Memory - Corsair Vengence Pro 24gb 1600mhz : GPU - Evga GTX 780 Ti Classified w/ EK-FC780 GTX Classy - Acetal+Nickel Water Block : Storage - Samsung 840 Evo 250gb & 850 Evo 1tb SSDs, 2x 6TB External HDDs : Fans - 5x Noctua NF-F12 & 1x NF-S12A : Display - 24in Benq XL2420TE : Rads - Darkside LPX360 & LP240 : Pump/Res - EK-XRES 140 D5 Vario Pump

Link to comment
Share on other sites

Link to post
Share on other sites

Looks cool.  Do you have any experience building things?


Yeah, I have built a few things but nothing as extreme of a build as this! I do have some people in mind who will help me aswell to achieve this goal. Thank you for tuning in!

Link to comment
Share on other sites

Link to post
Share on other sites

Damn those are some good models I would put some sort of back my the GPU, perhaps an intake fan, I would also add some more legs where the PC is just incase the desk collapses for some reason that part will still stay supported but what do I know, I've never built a desk xD

Thanks ! Thats a great idea! I will include this in my second level of rendering ! I will keep you updATED!

Link to comment
Share on other sites

Link to post
Share on other sites

Id figure out a way to enclose the psu underneath at the back then run the wires through holes from underneath. Itd just be much cleaner then where it currently is.


agreed, you should maybe look at some ventilation on the top as well since hot air rises, or at least have fan on the rear pulling air out.


That makes total sense...! But the reason of this specific orientation is that wire management would be slightly easier considering distance as a factor. This is also something i will take into consideration for my second renderings!

Link to comment
Share on other sites

Link to post
Share on other sites

That makes total sense...! But the reason of this specific orientation is that wire management would be slightly easier considering distance as a factor. This is also something i will take into consideration for my second renderings!

Yah if you can do some fancy cable management by  running the wires flat  all the way to the mobo. That would be cool also. Sick design tho.Hopefully we get to see the finished product. :)

Link to comment
Share on other sites

Link to post
Share on other sites

Why don't you flip motherboard to the other side of the enclosure, so your wires will close to the peripherals and you won't have to do as much cable management as the wires are already hidden from view under the table?

Check out my YouTube channel here and don't forget to subscribe :D

Current build: Project Athena

Link to comment
Share on other sites

Link to post
Share on other sites

Looks nice :) When using sketchup click window and styles. From there select default styles and change it to a white background one. When you export your photos they will have a white background and it will look much nicer. Also sometimes adding shadows can make your table also look cool.

[Case Mod] Operation: The Division --- > Here

[CUSTOM WATER COOLED TABLE] Project: Ravage ---> Here

-== QUOTE ME IN YOUR REPLY IF YOU WANT ME TO RESPOND ==-


Link to comment
Share on other sites

Link to post
Share on other sites

Thank you so much! 


Looks nice :) When using sketchup click window and styles. From there select default styles and change it to a white background one. When you export your photos they will have a white background and it will look much nicer. Also sometimes adding shadows can make your table also look cool.


Your custom desk build inspired this one, so major thanks!!!!

Link to comment
Share on other sites

Link to post
Share on other sites

MOIST this is sooooooooooooooooooooooo cool, i would recommend to put some small holes/vent on the glass so it will get a good air flow "just a recommendation maybe other can correct me on this" but other than that looks so dam good!!!


FOLLOWING FOR SURE!!!!

That will be included in the stage 3 of renderings for sure! Thanks for all the great support and feedback

Link to comment
Share on other sites

Link to post
Share on other sites

Looks awesome man, I'd go with the motherboard IO sticking at the back though, since you'll be able to hide all the cables. With the new design, they will show from the left and you'll put strain on the connectors IMO.

See my blog for amusing encounters from IT workplace: http://linustechtips.com/main/blog/585-life-of-a-techie/

Link to comment
Share on other sites

Link to post
Share on other sites

Subbed to see progression of this project. 

On the front pannel can always use a drawer face to mount fans or do some custom acrylic work to make sure it has the look you want.
Could also place the fans under the desk to reduce noise and have linear airflow to the I/O and across graphics card.

Link to comment
Share on other sites

Link to post
Share on other sites

looking good, having the PSU hidden under or around the back would be a good idea, cuts down on the extra heat also.
I had cables coming from the side on my 1st desk, looked messy so had to cover them,
with the new desk Iv not got them going out the back, lot more cleaner looking 

Link to comment
Share on other sites

Link to post
Share on other sites

  • 2 weeks later...

looking good, having the PSU hidden under or around the back would be a good idea, cuts down on the extra heat also.

I had cables coming from the side on my 1st desk, looked messy so had to cover them,

with the new desk Iv not got them going out the back, lot more cleaner looking


Subbed to see progression of this project. 

On the front pannel can always use a drawer face to mount fans or do some custom acrylic work to make sure it has the look you want.

Could also place the fans under the desk to reduce noise and have linear airflow to the I/O and across graphics card.


Looks awesome man, I'd go with the motherboard IO sticking at the back though, since you'll be able to hide all the cables. With the new design, they will show from the left and you'll put strain on the connectors IMO.

Thanks for the great support

Link to comment
Share on other sites

Link to post
Share on other sites

Any updates?

"In the middle of every difficulty lies opportunity."
- Albert Einstein

Link to comment
Share on other sites

Link to post
Share on other sites

Any updates?


Working on measurments and materials! It will take time for me to form a decision. 

Link to comment
Share on other sites

Link to post
Share on other sites

I would put your motherboard to the back of the desk and try to fit your PSU in the back also then put the fans on the side 

Link to comment
Share on other sites

Link to post
Share on other sites

Definitely a tough project to take on!
I'd recommend using one piece of glass across the entire table top (keyboard area + roof of pc compartment). Your table top will have a smooth finish and make the pc compartment uniform with the desk. Also you could use a vinyl wrap on the wood to get whatever colour scheme you wanted - the glass would help protect the vinyl from wear/tear. Glass is also pretty easy to clean and could be used as a writing surface.


Any idea where will the power button be?

Link to comment
Share on other sites

Link to post
Share on other sites

What will go into the back compartment with the PSU? Why not put te HDD's there to make more room for you MB :)


And why isn't there an SSD? I can't live without them :P


And i would suggest getting an aftermarket cooler for your cpu, i prefer a more silent build :)


Link to comment
Share on other sites

Link to post
Share on other sites

I agree with what @tomdabomb89 said and use an all glass top. You never have to worry about it warping, it's easy to clean, and will show off everything under it (could be good or bad).

Just had an idea. Of you covered the top all in glass you could do two separate pieces that joined with a hinge giving you easy access to the portion with the mobo and any components in that area.

Link to comment
Share on other sites

Link to post
Share on other sites

Create an account or sign in to comment

You need to be a member in order to leave a comment

Create an account

Sign up for a new account in our community. It's easy!

Register a new account

Sign in

Already have an account? Sign in here.

Sign In Now

×